自作のシンプルなアンドロイド用メモ帳アプリ
以下のように動作する、自作のシンプルなメモ帳アプリです。
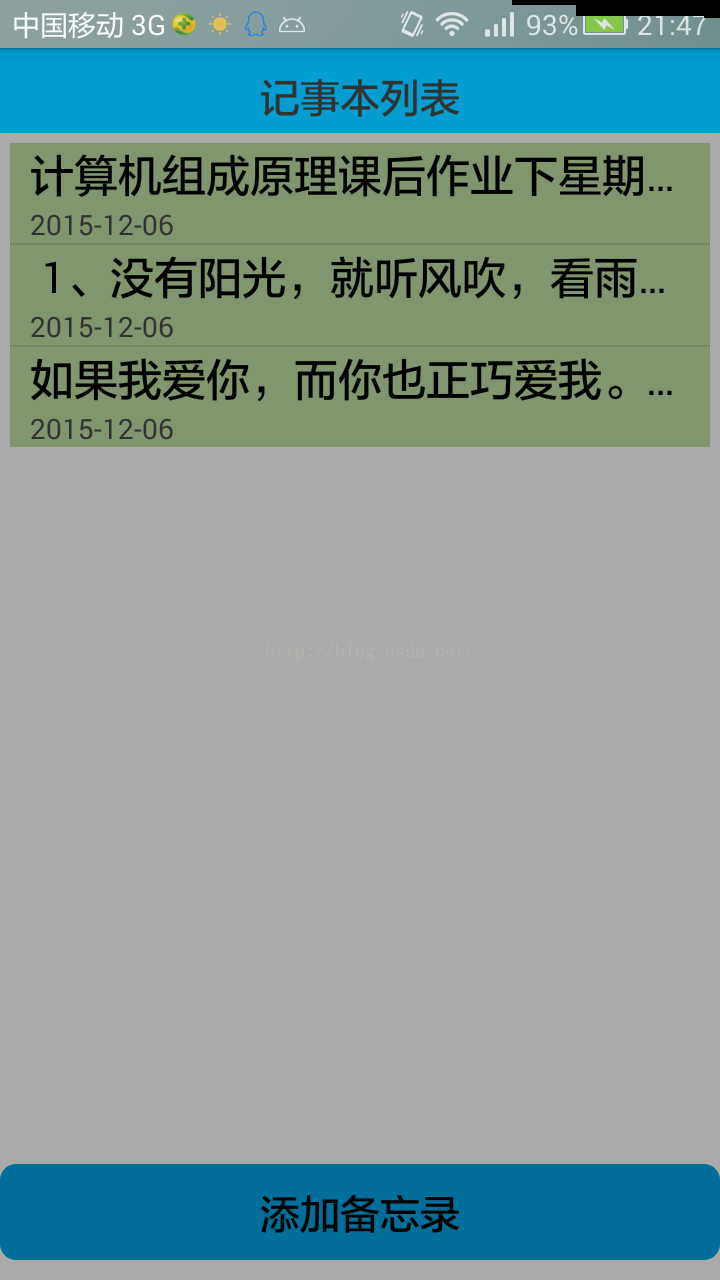
I. まず、最初のインターフェイスは、一番上にTextView、真ん中にLinearlayoutにネストされたlistview、一番下にボタンが書かれています。最初のページの簡単なレイアウトxmlファイルが添付されています。
<LinearLayout xmlns:android="http://schemas.android.com/apk/res/android"
    android:layout_width="fill_parent"
    android:layout_height="fill_parent"
    android:background="@android:color/darker_gray"
    android:orientation="vertical" >
    <TextView
        android:layout_height="wrap_content"
        android:layout_width="fill_parent"
        android:text="Notepad list"
        android:textSize="20sp"
        android:paddingTop="10dp"
        android:paddingBottom="5dp"
        android:background="#039DCF"
        android:gravity="center"/>

    <LinearLayout
        android:layout_width="fill_parent"
        android:layout_height="fill_parent"
        android:layout_weight="1" >

        <ListView
            android:id="@+id/listview"
            android:layout_margin="5dp"
            android:background="#81966F"
            android:layout_width="match_parent"
            android:layout_height="wrap_content" >
        </ListView>
    </LinearLayout>

    <Button
        android:id="@+id/btn_editnote"
        android:layout_width="fill_parent"
        android:layout_height="wrap_content"
        android:background="@drawable/btn_selctor"
        android:layout_gravity="center"
        android:layout_marginBottom="10dp"
        android:text="Add memo"
        android:textSize="20sp" />

</LinearLayout>
ボタンのスタイルについては、btn_selectorは自分で定義したボタンスタイルです。
次に、ListViewにデータを表示するためのxmlファイルの設定ですが、以下のコードで設定します。
<?xml version="1.0" encoding="utf-8"? >
<LinearLayout xmlns:android="http://schemas.android.com/apk/res/android"
    android:layout_width="match_parent"
    android:layout_height="match_parent"
    android:orientation="vertical" >

    <TextView
        android:id="@+id/tv_content"
        android:layout_width="match_parent"
        android:layout_height="wrap_content"
        android:layout_marginLeft="10dp"
        android:singleLine="true"
        android:text="Large Text"
        android:textAppearance="?android:attr/textAppearanceLarge" />

    <TextView
        android:id="@+id/tv_date"
        android:layout_width="fill_parent"
        android:layout_height="wrap_content"
        android:layout_marginLeft="10dp"
        android:text="TextView" />

</LinearLayout>
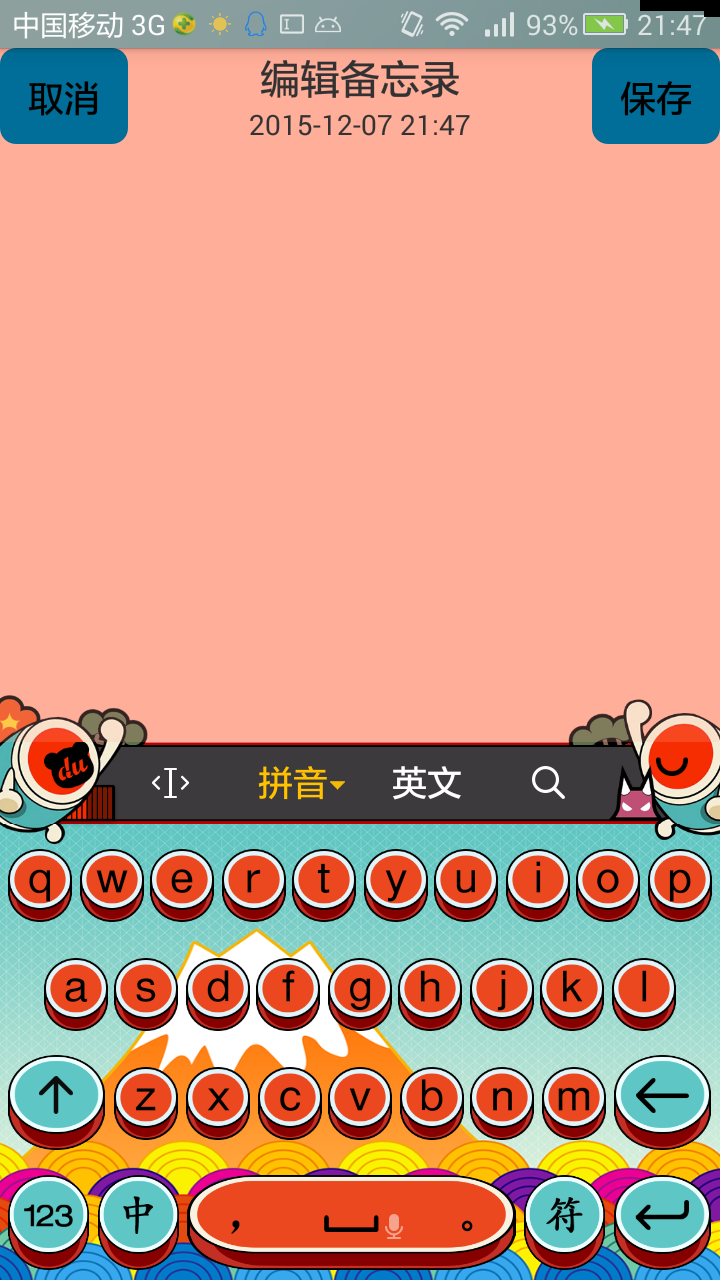
2つ目のインターフェースは、2つのボタンとTextViewを含むトップリニアレイアウトです。
<?xml version="1.0" encoding="utf-8"? >
<LinearLayout xmlns:android="http://schemas.android.com/apk/res/android"
    android:layout_width="match_parent"
    android:layout_height="match_parent"
    android:background="#FFAE99"
    android:orientation="vertical" >

    <LinearLayout
        android:layout_width="match_parent"
        android:layout_height="wrap_content" >

        <Button
            android:id="@+id/btn_cancel"
            android:layout_width="wrap_content"
            android:layout_height="wrap_content"
            android:background="@drawable/btn_selctor"
            android:text="cancel" />

        <LinearLayout
            android:layout_width="wrap_content"
            android:layout_height="wrap_content"
            android:layout_gravity="center"
            android:layout_weight="1"
            android:orientation="vertical" >

            <TextView
                android:layout_width="fill_parent"
                android:layout_height="wrap_content"
                android:gravity="center"
                android:text="edit_memo"
                android:textSize="20sp" />

            <TextView
                android:id="@+id/tv_date"
                android:layout_width="fill_parent"
                android:layout_height="wrap_content"
                android:gravity="center"
                android:text="" />
        </LinearLayout>

        <Button
            android:id="@+id/btn_ok"
            android:layout_width="wrap_content"
            android:layout_height="wrap_content"
            android:background="@drawable/btn_selctor"
            android:text="save" />
    </LinearLayout>

    <ScrollView
        android:layout_width="fill_parent"
        android:layout_height="fill_parent"
        android:scrollbars="vertical" >

        <LinearLayout
            android:layout_width="fill_parent"
            android:layout_height="fill_parent"
            android:layout_marginLeft="2dp"
            android:orientation="vertical" >

            <EditText
                android:id="@+id/et_content"
                android:layout_width="fill_parent"
                android:layout_height="wrap_content"
                android:background="#FFAE99"
                android:textSize="20sp" />
        </LinearLayout>
    </ScrollView>

</LinearLayout>
四、ログのデータをデータベースに保存し、sqliteを使用して、3つのプロパティ、"_id"、"コンテンツ"、"日付"、NoteDBを作成して、データベースを作成してください。
package com.example.datenote;

import android.content.Context;
import android.database.sqlite.SQLiteDatabase;
import android.database.sqlite.SQLiteOpenHelper;
import android.util.Log;

public class NotesDB extends SQLiteOpenHelper {

	public static final String TABLE_NAME_NOTES = "notes";
	public static final String COLUMN_NAME_ID = "_id";
	public static final String COLUMN_NAME_NOTE_CONTENT = "content";
	public static final String COLUMN_NAME_NOTE_DATE = "date";

	public NotesDB(Context context) {
		super(context, "notes", null, 1);
		// TODO Auto-generated constructor stub
	}

	@Override
	public void onCreate(SQLiteDatabase db) {
		String sql = "CREATE TABLE " + TABLE_NAME_NOTES + "(" + COLUMN_NAME_ID
				+ " INTEGER PRIMARY KEY AUTOINCREMENT,"
				+ COLUMN_NAME_NOTE_CONTENT + " TEXT NOT NULL DEFAULT\"\","
				+ COLUMN_NAME_NOTE_DATE + " TEXT NOT NULL DEFAULT\"\"" + ")";
		Log.d("SQL", sql);
		db.execSQL(sql);
// String sql1="insert into "+TABLE_NAME_NOTES+"values("+"1,"+"'write homework',"+"'work at night to write homework'" +")";
// Log.d("SQL1", sql1);
// db.execSQL(sql1);
// ContentValues values=new ContentValues();
// values.put("id",1);
// values.put("content","write homework");
// values.put("date", "2013-1-2");
// db.insert("note", null, values);

	}

	@Override
	public void onUpgrade(SQLiteDatabase arg0, int arg1, int arg2) {
		// TODO Auto-generated method stub

	}

}
最初のページでは、Add Memoをクリックした後、2番目の画面にジャンプし、クリックイベントを設定して、あるアクティビティから別のアクティビティにジャンプするようにします。また、ListViewで記録された各ログをクリックしても2画面目にジャンプしますが、空白のEditTextではなく、ログを含むEditTextが表示されます。
package com.example.datenote;

import java.util.ArrayList;
import java.util.HashMap;
import java.util;
import java.util.Map;

import android.app.Activity;
import android.app.AlertDialog;
import android.app.AlertDialog.Builder;
import android.content.Context;
import android.content.DialogInterface;
import android.content.Intent;
import android.database.Cursor;
import android.database.sqlite.SQLiteDatabase;
import android.os.Bundle;
import android.util.Log;
import android.view.View;
import android.view.View.OnClickListener;
import android.view;
import android.widget.AbsListView;
OnScrollListener; import android.widget.AbsListView;
import android.widget.AdapterView;
OnItemClickListener; import android.widget;
OnItemLongClickListener; import android.widget.AdapterView;
import android.widget;
import android.widget.ListView;
import android.widget.SimpleAdapter;
import android.widget.TextView;
Toast;

public class MainActivity extends Activity implements OnScrollListener,
		OnItemClickListener, OnItemLongClickListener {

	private Context mContext;
	private ListView listview;
	private SimpleAdapter simp_adapter;
	private List<Map<String, Object>> dataList;
	private Button addNote;
	private TextView tv_content;
	private NotesDB DB;
	private SQLiteDatabase dbread;

	@Override
	protected void onCreate(Bundle savedInstanceState) {
		super.onCreate(savedInstanceState);
		requestWindowFeature(Window.FEATURE_NO_TITLE);
		setContentView(R.layout.activity_main);
		tv_content = (TextView) findViewById(R.id.tv_c
		listview.setOnItemLongClickListener(this);
		listview.setOnScrollListener(this);
	}

	public void RefreshNotesList() {

		int size = dataList.size();
		if (size > 0) {
			dataList.removeAll(dataList);
			simp_adapter.notifyDataSetChanged();
			listview.setAdapter(simp_adapter);
		}
		simp_adapter = new SimpleAdapter(this, getData(), R.layout.item,
				new String[] { "tv_content", "tv_date" }, new int[] {
						R.id.tv_content, R.id.tv_date });
		listview.setAdapter(simp_adapter);
	}

	private List<Map<String, Object>> getData() {

		Cursor cursor = dbread.query("note", null, "content!=\"\"", null, null,
				null, null);

		while (cursor.moveToNext()) {
			String name = cursor.getString(cursor.getColumnIndex("content"));
			String date = cursor.getString(cursor.getColumnIndex("date"));
			Map<String, Object> map = new HashMap<String, Object>();
			map.put("tv_content", name);
			map.put("tv_date", date);
			dataList.add(map);
		}
		cursor.close();
		return dataList;

	}

	@Override
	public void onScroll(AbsListView arg0, int arg1, int arg2, int arg3) {
		// TODO Auto-generated method stub

	}

	// Sliding listview listener event
	@Override
	public void onScrollStateChanged(AbsListView arg0, int arg1) {
		// TODO Auto-generated method stub
		switch (arg1) {
		case SCROLL_STATE_FLING:
			Log.i("main", "The user slid hard before leaving the screen, the view can continue to slide by inertia");
		case SCROLL_STATE_IDLE:
			Log.i("main", "The view has stopped sliding");
		case SCROLL_STATE_TOUCH_SCROLL:
			Log.i("main", "Finger did not leave the screen, trying to swipe");
		}
	}

	// Listener event for clicking on an item in the listview
	@Override
	public void onItemClick(AdapterView<? > arg0, View arg1, int arg2, long arg3) {
		noteEdit.ENTER_STATE = 1;
		// Log.d("arg2", arg2 + "");
		// TextView
		// content=(TextView)listview.getChildAt(arg2).findViewById(R.id.tv_content);
		// String content1=content.toString();
		String content = listview.getItemAtPosition(arg2) + "";
		String content1 = content.substring(content.indexOf("=") + 1,
				content.indexOf(","));
		Log.d("CONTENT", content1);
		Cursor c = dbread.query("note", null,
				"content=" + "'" + content1 + "'" null, null, null, null, null);
		while (c.moveToNext()) {
			String No = c.getString(c.getColumnIndex("_id"));
			Log.d("TEXT", No);
			// Intent intent = new Intent(mContext, noteEdit.class);
			// intent.putExtra("data", text);
			// setResult(4, intent);
			// // intent.putExtra("data",text);
			// startActivityForResult(intent, 3);
			Intent myIntent = new Intent();
			Bundle bundle = new Bundle();
			bundle.putString("info", content1);
			noteEdit.id = Integer.parseInt(No);
			myIntent.putExtras(bundle);
			myIntent.setClass(MainActivity.this, noteEdit.class);
			startActivityForResult(myIntent, 1);
		}

	}

	@Override
	// Accept the data returned from the previous page and refresh the page
	protected void onActivityResult(int requestCode, int resultCode, Intent data) {
		// TODO Auto-generated method stub
		super.onActivityResult(requestCode, resultCode, data);
		if (requestCode == 1 && resultCode == 2) {
			RefreshNotesList();
		}
	}

	// Click on an item in the listview for a long time
	@Override
	public boolean onItemLongClick(AdapterView<? > arg0, View arg1, int arg2,
			long arg3) {
		final int n=arg2;
		Builder builder = new AlertDialog;
		builder.setTitle("Delete this log");
		builder.setMessage("Confirm deletion? ");
		builder.setPos
VI. 2つ目のポストジャンプインターフェースのActivityを以下のように記述する。
package com.example.datenote;

import java.text.SimpleDateFormat;
import java.util;

import android.app.Activity;
import android.content.Context;
import android.content.Intent;
import android.database.sqlite.SQLiteDatabase;
import android.database.sqlite.SQLiteStatement;
import android.os.Bundle;
import android.util.Log;
import android.view.View;
import android.view.View.OnClickListener;
import android.view;
import android.view.WindowManager;
import android.view.inputmethod;
import android.widget.Button;
import android.widget.EditText;
import android.widget.TextView;

public class noteEdit extends Activity {
	private TextView tv_date;
	private EditText et_content;
	private Button btn_ok;
	private Button btn_cancel;
	private NotesDB DB;
	private SQLiteDatabase dbread;
	public static int ENTER_STATE = 0;
	public static String last_content;
	public static int id;

	@Override
	protected void onCreate(Bundle savedInstanceState) {
		// TODO Auto-generated method stub
		super.onCreate(savedInstanceState);
		// set no title
		requestWindowFeature(Window.FEATURE_NO_TITLE);
		setContentView(R.layout.edit);

		tv_date = (TextView) findViewById(R.id.tv_date);
		Date date = new Date();
		SimpleDateFormat sdf = new SimpleDateFormat("yyyy-MM-dd HH:mm");
		String dateString = sdf.format(date);
		tv_date.setText(dateString);

		et_content = (EditText) findViewById(R.id.et_content);
		// Set the soft keyboard to pop up automatically
		getWindow().setSoftInputMode(
				WindowManager.LayoutParams.SOFT_INPUT_STATE_ALWAYS_VISIBLE);

		DB = new NotesDB(this);
		dbread = DB.getReadableDatabase();

		Bundle myBundle = this.getIntent().getExtras();
		last_content = myBundle.getString("info");
		Log.d("LAST_CONTENT", last_content);
		et_content.setText(last_content);
		// Confirm the click event of the button
		btn_ok = (Button) findViewById(R.id.btn_ok);
		btn_ok.setOnClickListener(new OnClickListener() {
			public void onClick(View arg0) {
				// Get the contents of the log
				String content = et_content.getText().toString();
				Log.d("LOG1", content);
				// Get the time to write the log
				Date date = new Date();
				SimpleDateFormat sdf = new SimpleDateFormat("yyyy-MM-dd");
				String dateNum = sdf.format(date);
				String sql;
				String sql_count = "SELECT COUNT(*) FROM note";
				SQLiteStatement statement = dbread.compileStatement(sql_count);
				long count = statement.simpleQueryForLong();
				Log.d("COUNT", count + "");
				Log.d("ENTER_STATE", ENTER_STATE + "");
				// Add a new log
				if (ENTER_STATE == 0) {
					if (!CONTENT.equals("")) {
						sql = "INSERT INTO " + NotesDB.TABLE_NAME_NOTES
								+ " values(" + count + "," + "'" + content
								+ "'" + "," + "'" + dateNum + "')";
						Log.d("LOG", sql);
						dbread.execSQL(sql);
					}
				}
				// View and modify an existing log
				else {
						Log.d("Executed command", "Executed the function");
						String updatesql = "update note set content='"
								+ content + "' where _id=" + id;
						dbread.execSQL(updatesql);
						// et_content.setText(last_content);
				}
				Intent data = new Intent();
				setResult(2, data);
				finish();
			}
		});
		btn_cancel = (Button) findViewById(R.id.btn_cancel);
		btn_cancel.setOnClickListener(new OnClickListener() {
			public void onClick(View arg0) {
				finish();
			}
		});
	}

	@Override
	protected void onActivityResult(int requestCode, int resultCode, Intent data) {
		// TODO Auto-generated method stub
		super.onActivityResult(requestCode, resultCode, data);
		// if (requestCode == 3 && resultCode == 4) {
		// last_content=data.getStringExtra("data");
		// Log.d("LAST_STRAING", last_content+"gvg");
		// }
	}
}
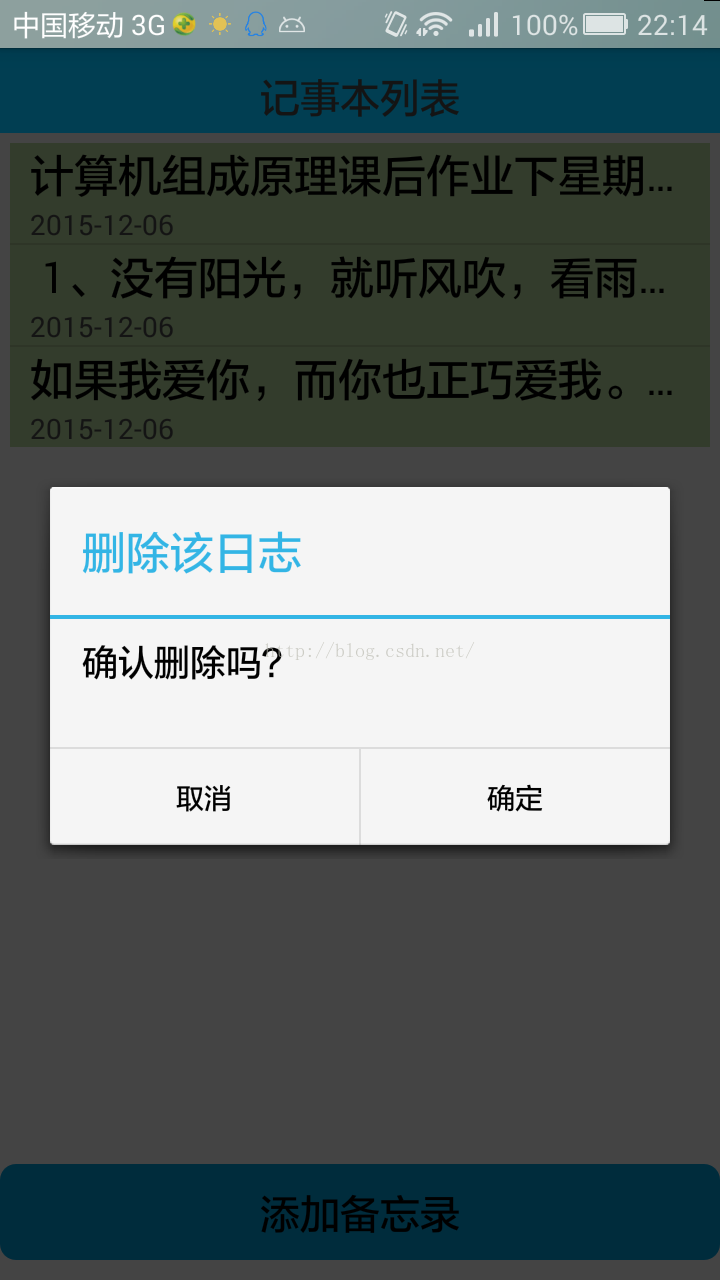
ListViewにOnItemLongclicklistenerを追加し、ロングクリック後にダイアログボックスをポップアップして、ログファイルを削除するかどうかをリマインドする7つです。
public boolean onItemLongClick(AdapterView<? > arg0, View arg1, int arg2,
			long arg3) {
		final int n=arg2;
		Builder builder = new AlertDialog;
		builder.setTitle("Delete this log");
		builder.setMessage("Confirm deletion? ");
		builder.setPositiveButton("OK", new DialogInterface.OnClickListener() {
			@Override
			public void onClick(DialogInterface dialog, int which) {
				String content = listview.getItemAtPosition(n) + "";
				String content1 = content.substring(content.indexOf("=") + 1,
						content.indexOf(","));
				Cursor c = dbread.query("note", null, "content=" + "'"
						+ content1 + "'", null, null, null, null);
				while (c.moveToNext()) {
					String id = c.getString(c.getColumnIndex("_id"));
					String sql_del = "update note set content='' where _id="
							+ id;
					dbread.execSQL(sql_del);
					RefreshNotesList();
				}
			}
		});
		builder.setNegativeButton("Cancel", new DialogInterface.OnClickListener() {
			@Override
			public void onClick(DialogInterface dialog, int which) {
			}
		});
		builder.create();
		builder.show();
		return true;
	}
最後に戻り値を true にすることに注意してください。そうしないと OnItemClickListener と衝突してしまいます。
ロングクリックで削除した場合の効果を添付します。
Android 6.0以上では、読み取り/書き込みの許可申請を手動で行う必要があるため、保存後に表示されないことがありますので、以下の場所で許可申請を手動で行う必要があります。
//After android 6.0, you have to dynamically obtain permissions
    private void checkPermission() {
        // Storage Permissions
        final int REQUEST_EXTERNAL_STORAGE = 1;
        String[] PERMISSIONS_STORAGE = {
                Manifest.permission.READ_EXTERNAL_STORAGE,
                WRITE_EXTERNAL_STORAGE};

        try {
            //check for write permissions
            int permission = ActivityCompat.checkSelfPermission(MainActivity.this,
                    "android.permission.WRITE_EXTERNAL_STORAGE");
            if (permission ! = PackageManager.PERMISSION_GRANTED) {
                // No write permission, go to request write permission, a dialog will pop up
                ActivityCompat.requestPermissions(MainActivity.this, PERMISSIONS_STORAGE, REQUEST_EXTERNAL_STORAGE);
            }
        } catch (Exception e) {
            e.printStackTrace();
        }


    }
githubに更新されましたので、ご自身でダウンロードしてください。
リソーススコアをダウンロードするためにcsdnにアクセスする人が多いので、コードのアップロード先を
ギズブ
コードは自分でダウンロードすることができます。
関連
-
ADBサーバーがACKしない ソリューション
-
ADBサーバーがACKしない問題を解決 (pro-test)
-
Eclipse パッケージエクスプローラーの開き方
-
解決策 エラーです。jarfile にアクセスできません。\ʕ-̫͡-ʔ
-
Rは変数に解決できない
-
Android Studioで「Error:SSL peer shut down incorrectly」というエラーが表示される。
-
Android 問題集 No.11:トランスポートエンドポイントが接続されていない
-
Androidレイアウトにおけるmargin,padding,alignの使い分けと違いについて
-
Androidスレッドの詳細
-
Android Studioのインポートプロジェクトが表示されます。ファイルをクランチするのに失敗しました
最新
-
nginxです。[emerg] 0.0.0.0:80 への bind() に失敗しました (98: アドレスは既に使用中です)
-
htmlページでギリシャ文字を使うには
-
ピュアhtml+cssでの要素読み込み効果
-
純粋なhtml + cssで五輪を実現するサンプルコード
-
ナビゲーションバー・ドロップダウンメニューのHTML+CSSサンプルコード
-
タイピング効果を実現するピュアhtml+css
-
htmlの選択ボックスのプレースホルダー作成に関する質問
-
html css3 伸縮しない 画像表示効果
-
トップナビゲーションバーメニュー作成用HTML+CSS
-
html+css 実装 サイバーパンク風ボタン
おすすめ
-
AndroidManifest.xml は、アプリが Google 検索でインデックス化されていないことを警告しています。
-
root化されているのですが、adb shellの後、suを入力するとpermission deniedと表示されます。
-
Android Control - TabLayout Usage Introduction
-
アンドロイドバージョン一覧
-
Androidのレイアウトにおけるmarginとpaddingの違いについて
-
Android ProgressBarの詳しい解説とカスタマイズ方法
-
Android統計チャート MPAndroidChart
-
Android Studioのヒント - これを読めば、すべてのヒントが役に立つ
-
appの実行エラー:ターゲットデバイスが見つかりませんでした。
-
開始します。Intent { act=android.intent.action.MAIN cat=[android.intent.category.LAUNCHER] cmp=com.