顔認証のPython高速実装
この記事のコード、画像、モデルは以下からダウンロードしてください。
質問内容
1.jpg
2.jpg
顔検出:顔をフレームアウトさせる。
顔の位置合わせ:顔のキーポイントを探し出す。
顔認識:誰が誰であるかを判断する。
解決方法
- 顔検出、顔データ収集
- 顔深度特徴量の抽出
- 顔認識分類器の学習
- 顔検出、顔認識用分類器の呼び出し
インストール
pip install opencv-python
pip install opencv-contrib-python
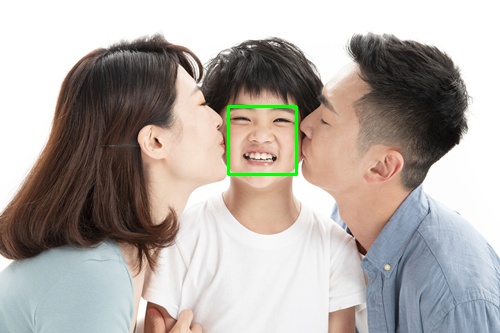
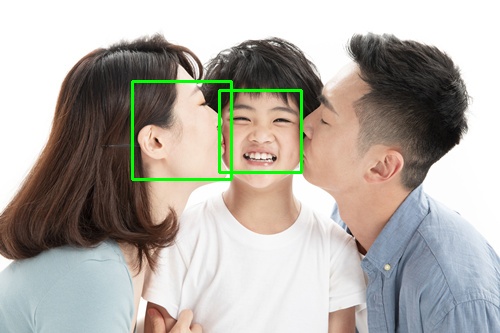
顔検出
1. HARR特徴カスケード分類器
OpenCVを用いたカスケード分類器 CascadeClassifier 学習済みモデルを読み込む haarcascade_frontalface_default.xml AdaBoostアルゴリズムを使用し、非常に高速に動作するこのモデルは、2013年12月19日にアップロードされたものです。
コード
import cv2

# Read the file
image = '1.jpg'
model = 'haarcascade_frontalface_default.xml'
image = cv2.imread(image) # Read the image
model = cv2.CascadeClassifier(model) # load model

# Face detection
faces = model.detectMultiScale(image)
for (x, y, w, h) in faces:
    cv2.rectangle(image, (x, y), (x + w, y + h), (0, 255, 0), thickness=2) # Draw a rectangular box of faces

# Display and save the image
cv2.imshow('result', image)
cv2.waitKey(0)
cv2.destroyAllWindows()
cv2.imwrite('result.jpg', image)
print('Saved')
効果


デメリット
- 正面の顔にしか効果がありません。
- ロバスト性が不十分で、よく横転する。例えば、顔のように見える場所のある服も検出される。
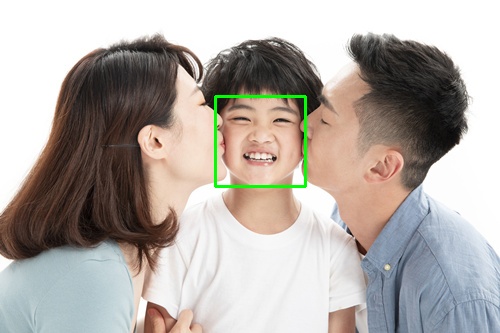
2. LBP特徴カスケード分類器
OpenCVを用いたカスケード分類器 CascadeClassifier 学習済みモデルを読み込む lbpcascade_frontalface_improved.xml , 2016年12月21日にアップロードされたモデルです。
コード
import cv2

# Read the file
image = '1.jpg'
model = 'lbpcascade_frontalface_improved.xml'
image = cv2.imread(image) # Read the image
model = cv2.CascadeClassifier(model) # load model

# Face detection
faces = model.detectMultiScale(image)
for (x, y, w, h) in faces:
    cv2.rectangle(image, (x, y), (x + w, y + h), (0, 255, 0), thickness=2) # Draw a rectangular box of faces

# Display and save the image
cv2.imshow('result', image)
cv2.waitKey(0)
cv2.destroyAllWindows()
cv2.imwrite('result.jpg', image)
print('Saved')
効果

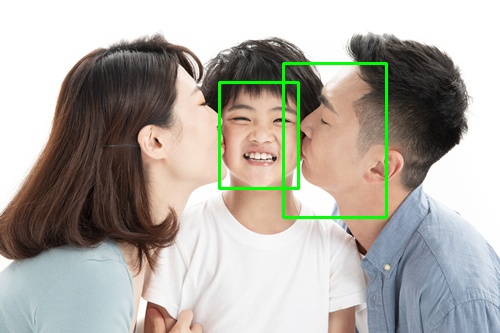
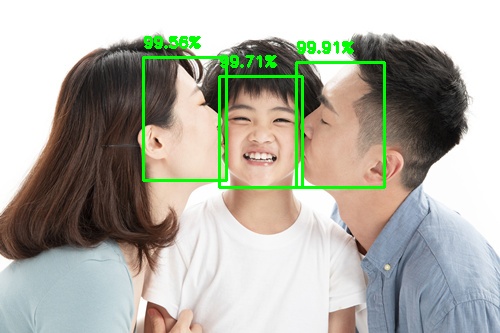
3. DNN事前学習済みモデル
残差ネットワークResNet-10のSSDネットワークモデルをベースとし、非常に高速に動作するOpenCVを用いたDNN顔認識事前学習モデルを2018年にアップロードしました。
- Caffeモデル
- TensorFlowモデル
コード
import cv2
import numpy as np

# Read the file
image = '1.jpg'
net = cv2.dnn.readNetFromCaffe('deploy.prototxt', 'res10_300x300_ssd_iter_140000_fp16.caffemodel') # Caffe model
# net = cv2.dnn.readNetFromTensorflow('opencv_face_detector_uint8.pb', 'opencv_face_detector.pbtxt') # TensorFlow model
image = cv2.imread(image) # Read the image
height, width, channel = image.shape # height, width, number of channels

# Face detection
blob = cv2.dnn.blobFromImage(cv2.resize(image, (300, 300)), 1.0, (300, 300), (104.0, 177.0, 123.0)) # Resize and reduce the effect of lighting
net.setInput(blob) # Set input
detections = net.forward() # detections
faces = detections[0, 0] # face results
for face in faces:
    confidence = face[2] # confidence
    if confidence > 0.5: # Confidence threshold set to 0.5
        box = face[3:7] * np.array([width, height, width, height]) # face rectangular box coordinates
        pt1 = int(box[0]), int(box[1]) # coordinates of the upper left corner
        pt2 = int(box[2]), int(box[3]) # lower right corner coordinates
        cv2.rectangle(image, pt1, pt2, (0, 255, 0), thickness=2) # draw the face rectangle box

        text = '{:.2f}%'.format(confidence * 100) # confidence text
        startX, startY = pt1
        y = startY - 10 if startY - 10 > 10 else startY + 10
        org = (startX, y) # coordinates of the lower left corner of the text
        cv2.putText(image, text, org, cv2.FONT_HERSHEY_SIMPLEX, 0.5, (0, 255, 0), thickness=2) # Draw the confidence level

# Display and save the image
cv2.imshow('result', image)
cv2.waitKey(0)
cv2.destroyAllWindows()
cv2.imwrite('result.jpg', image)
print('Saved')
効果
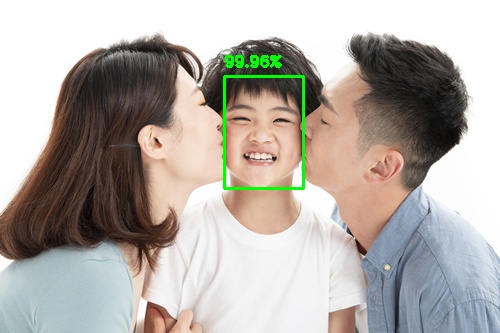

少年の顔の信頼度は50.38%しかなく、改善が必要である
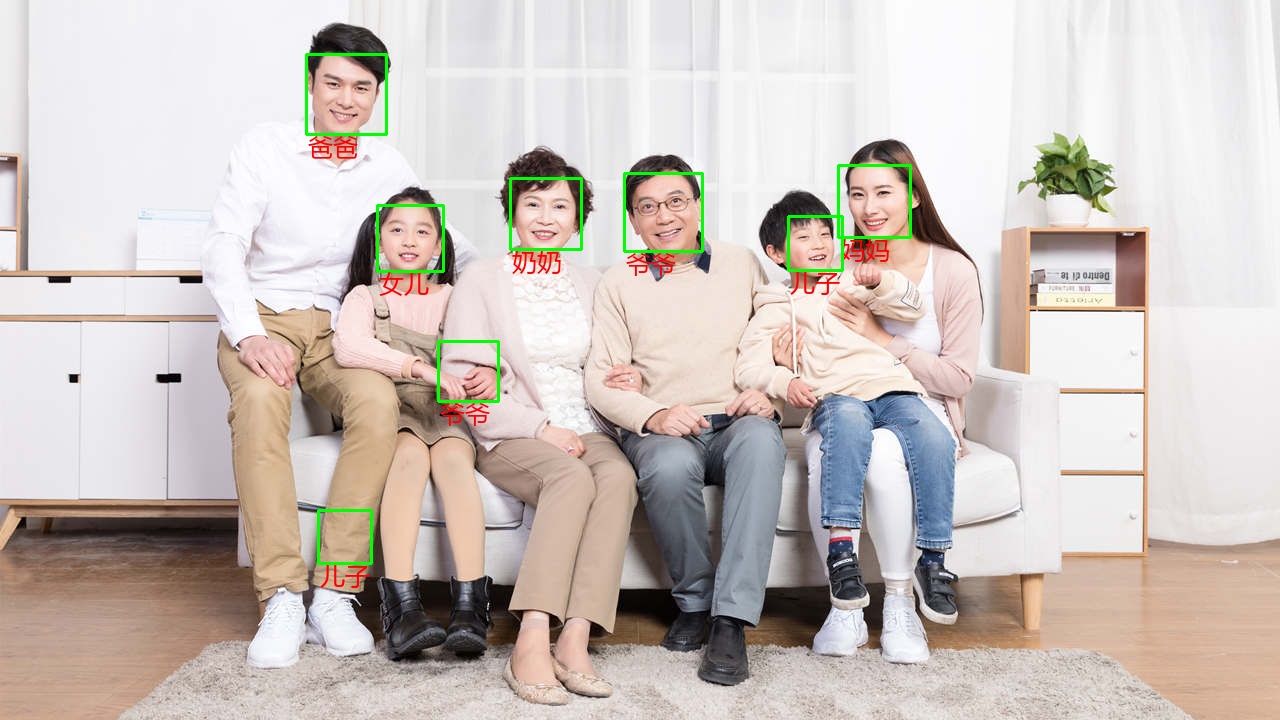
4. MTCNN事前学習済みモデル
MTCNNはMulti-task Cascaded Convolutional Networksで、顔検出と顔位置合わせを行うことができます。
- detect_face.py MTCNNネットワークの構築
- モデルの重み : det1.npy, det2.npy, det3.npy
コード
import cv2
import detect_face
import tensorflow as tf

# Read the file
image = '1.jpg'
image = cv2.imread(image) # read the image
pnet, rnet, onet = detect_face.create_mtcnn(tf.Session(), None) # Load the model

# face detection
minsize = 20 # minimum face size
threshold = [0.6, 0.7, 0.7] # Threshold for the three stages of MTCNN
factor = 0.709 # ratio of the face size scaling pyramid
margin = 44 # Crop margin around the border
image_rgb = cv2.cvtColor(image, cv2.COLOR_BGR2RGB)
faces, _ = detect_face.detect_face(image_rgb, minsize, pnet, rnet, onet, threshold, factor)
for face in faces:
    face = face.astype(int)
    (x, y, w, h) = face[:4]
    cv2.rectangle(image, (x, y), (w, h), (0, 255, 0), thickness=2) # Draw a rectangular box of the face

# Display and save the image
cv2.imshow('result', image)
cv2.waitKey(0)
cv2.destroyAllWindows()
cv2.imwrite('result.jpg', image)
print('Saved')
エラーが報告された場合
TypeError: reduce_max() got an unexpected keyword argument 'keepdims'TensorFlowのバージョンが1.7.0より低いためにkeepdimsに置き換えられました。keep_dimsでOK
効果

5. HOG顔検出器
インストール手順です。
コード
import cv2
import dlib

# Read the file
image = '1.jpg'
image = cv2.imread(image)
image_rgb = cv2.cvtColor(image, cv2.COLOR_BGR2RGB)

# Face detection
model = dlib.get_frontal_face_detector() # load model
faces = model(image_rgb, 1)
for face in faces:
    (x, y, w, h) = face.left(), face.top(), face.right(), face.bottom()
    cv2.rectangle(image, (x, y), (w, h), (0, 255, 0), thickness=2) # Draw a rectangular box of the face

# Display and save the image
cv2.imshow('result', image)
cv2.waitKey(0)
cv2.destroyAllWindows()
cv2.imwrite('result.jpg', image)
print('Saved')
効果
6. MMOD事前学習モデル
を使用しています。 Dlib の MMOD顔検出器 DNN実装に基づく事前学習済みモデルのダウンロード mmod_human_face_detector.dat.bz2(英語版のみ をクリックし、解凍してください。
コード
import cv2
import dlib

# Read the file
image = '1.jpg'
image = cv2.imread(image)
image_rgb = cv2.cvtColor(image, cv2.COLOR_BGR2RGB)

# face detection
model = dlib.cnn_face_detection_model_v1('mmod_human_face_detector.dat') # load model
faces = model(image_rgb, 1)
for face in faces:
    face = face.rect
    (x, y, w, h) = face.left(), face.top(), face.right(), face.bottom()
    cv2.rectangle(image, (x, y), (w, h), (0, 255, 0), thickness=2) # Draw a rectangular box of the face

# Display and save the image
cv2.imshow('result', image)
cv2.waitKey(0)
cv2.destroyAllWindows()
cv2.imwrite('result.jpg', image)
print('Saved')
効果

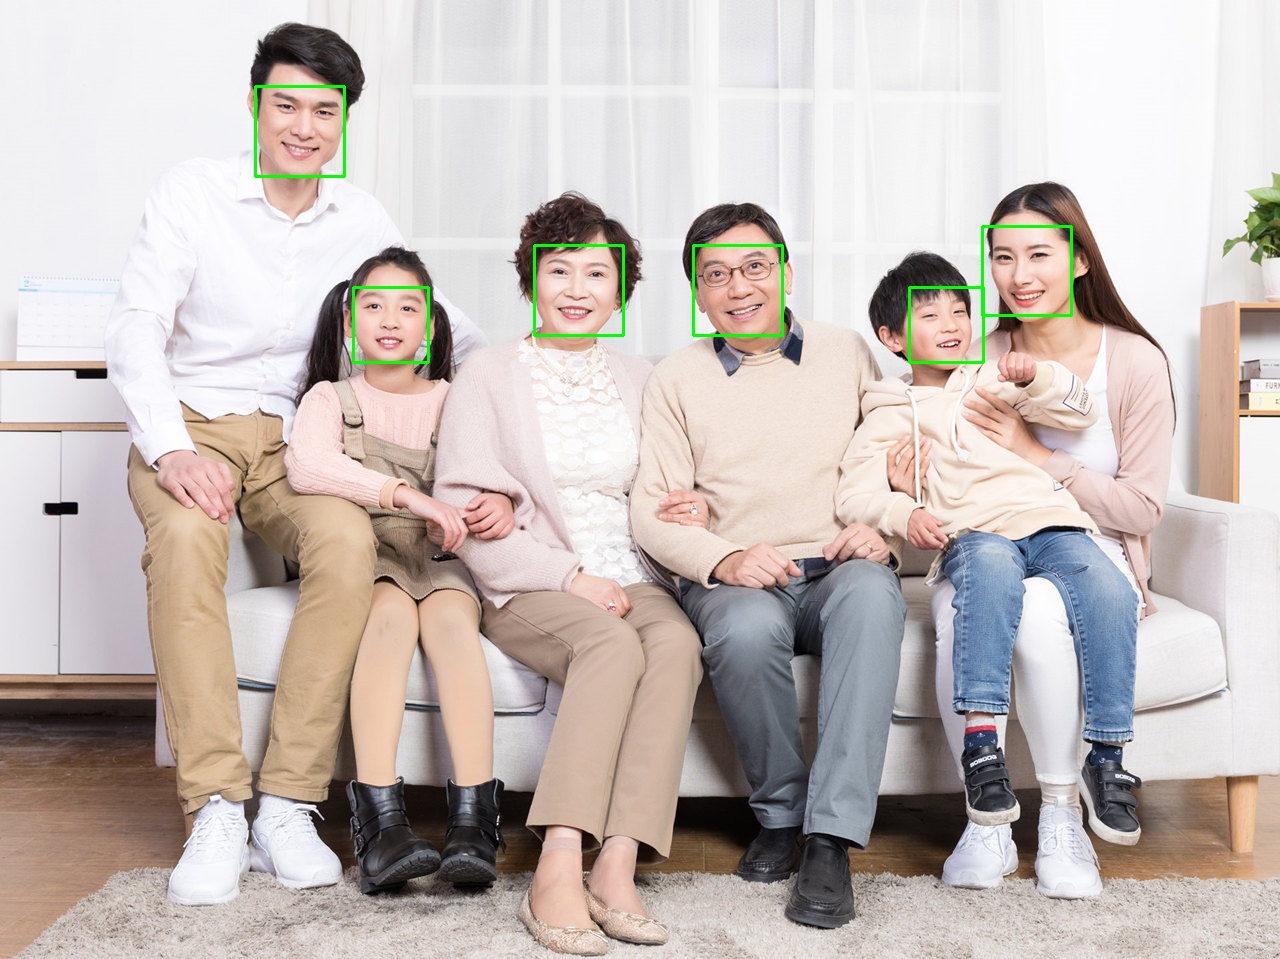
7. RetinaFaceの事前学習済みモデル
を使用しています。 インサイトフェイス の レティナフェイス を実現する学習済みモデル。 ワイドフェイス のSOTAを実現しました。
インストール方法
pip install insightface
コード
import cv2
from insightface.model_zoo import face_detection

# Read the file
image = cv2.imread('1.jpg') # read the image
model = face_detection.retinaface_r50_v1() # load the model
model.prepare(ctx_id=-1, nms=0.4)

# Face detection
faces, landmark = model.detect(image, threshold=0.5, scale=1.0)
for face in faces:
    (x, y, w, h, confidence) = face
    pt1 = int(x), int(y)
    pt2 = int(w), int(h)
    cv2.rectangle(image, pt1, pt2, (0, 255, 0), thickness=2) # draw the face rectangle

    text = '{:.2f}%'.format(confidence * 100) # confidence text
    startX, startY = pt1
    y = startY - 10 if startY - 10 > 10 else startY + 10
    org = (startX, y) # coordinates of the lower left corner of the text
    cv2.putText(image, text, org, cv2.FONT_HERSHEY_SIMPLEX, 0.5, (0, 255, 0), thickness=2) # Draw the confidence level

# Display and save the image
cv2.imshow('result', image)
cv2.waitKey(0)
cv2.destroyAllWindows()
cv2.imwrite('result.jpg', image)
print('Saved')
効果

動作時間
各方式の計算時間の比較
import cv2
import time
import numpy as np

# Read the image
image = '2.jpg'
image = cv2.imread(image)

# Cascade classifier
model = cv2.CascadeClassifier('haarcascade_frontalface_default.xml') # load model
beg = time.time()
faces = model.detectMultiScale(image)
end = time.time()
print('cascade classifier {:.2f} s'.format(end - beg))

# DNN Caffe model
net = cv2.dnn.readNetFromCaffe('deploy.prototxt', 'res10_300x300_ssd_iter_140000_fp16.caffemodel') # Caffe model
beg = time.time()
blob = cv2.dnn.blobFromImage(cv2.resize(image, (300, 300)), 1.0, (300, 300), (104.0, 177.0, 123.0))
net.setInput(blob)
detections = net.forward()
end = time.time()
print('DNN Caffe model {:.2f} s'.format(end - beg))

# DNN TensorFlow model
net = cv2.dnn.readNetFromTensorflow('opencv_face_detector_uint8.pb', 'opencv_face_detector.pbtxt') # TensorFlow model
beg = time.time()
blob = cv2.dnn.blobFromImage(cv2.resize(image, (300, 300)), 1.0, (300, 300), (104.0, 177.0, 123.0))
net.setInput(blob)
detections = net.forward()
end = time.time()
print('DNN TensorFlow model {:.2f} s'.format(end - beg))
結果
<テーブル モデル サイズ 演算時間 カスケード分類器 0.89 MB 0.35 s Caffeモデル 5.12 MB 0.04 s TensorFlowモデル 2.63 MB 0.04 s
顔認識
1. LBPH顔認識装置
使用方法 LBPHFaceRecognizer (Local Binary Patterns Histograms)、局所的なバイナリパターンのヒストグラムであり、特徴の次元を減らすことができる。他の2つのOpenCVの顔認識アルゴリズムが 固有顔認識装置 と フィッシャーフェースレコグナイザー 全体の特徴を考える
イメージ
コード
import os
import cv2
import time
import sqlite3
import pathlib
import numpy as np
from tkinter import *
from PIL import Image, ImageTk, ImageFont, ImageDraw

name = '' # the name of the current face
lastid = 0 # the latest id of the user
id_name_map = {} # The name corresponding to the user's id
name_id_map = {} # User name corresponding to id


def cv2_putChinese(image, chinese, xy, font='msyh.ttc', size=25, fill=(255, 0, 0)):
    """cv2 to PIL draw Chinese and then turn back to cv2"""
    image = cv2.cvtColor(image, cv2.COLOR_BGR2RGB)
    image = Image.fromarray(image)
    font = ImageFont.truetype(font, size)
    draw = ImageDraw.Draw(image)
    draw.text(xy, chinese, font=font, fill=fill)
    image = cv2.cvtColor(np.array(image), cv2.COLOR_RGB2BGR)
    return image


def show_on_tkinter(image, title):
    """Show image with tkinter"""

    def save(event):
        global name
        global lastid
        name = entry.get()
        if name:
            if name not in name_id_map:
                c.execute('INSERT INTO users (`name`) VALUES (?)' , (name,)) # Insert into database
                conn.commit() # Commit
                lastid += 1 # Update the latest id of the user
                id_name_map[lastid] = name
                name_id_map[name] = lastid # Update all users
                if name_id_map:
                    print('Users in database are: {}'.format(' '.join(name_id_map))) # All users
            os.makedirs('dataset/{}'.format(name), exist_ok=True) # Save the face image directory
            filename = 'dataset/{}/{}.jpg'.format(name, int(time.time())) # Save the face image file name
            image.save(filename) # Use Image.save() to avoid the disadvantage that cv2.imwrite() cannot write Chinese names
        window.destroy()

    window = Tk()
    window.title(title)
    image = cv2.cvtColor(image, cv2.COLOR_BGR2RGB)
    height, width, channels = image.shape
    canvas = Canvas(window, width=width, height=height)
    canvas.pack()
    image = Image.fromarray(image)
    photo = ImageTk.PhotoImage(image)
    canvas.create_image(0, 0, image=photo, anchor=NW)
    label = Label(window, text='Enter name, skip if empty')
    label.pack(anchor=CENTER)
    entry = Entry(window)
    entry.pack(anchor=CENTER)
    entry.focus_force()
    entry.bind('
'
, func=save)
    window.mainloop()


# Face database
conn = sqlite3.connect('database.db') # face database
c = conn.cursor()
sql = '''
CREATE TABLE IF NOT EXISTS users (
   `id` INTEGER UNIQUE PRIMARY KEY AUTOINCREMENT,
   `name` TEXT UNIQUE
);
'''
c.execute(sql) # user table
users = c.execute('SELECT * FROM users')
for (id, name) in users:
    lastid = id
    id_name_map[lastid] = name
    name_id_map[name] = id
if name_id_map:
    print('Users in the database are: {}'.format(' '.join(name_id_map))) # All users

# Record faces
os.makedirs('dataset', exist_ok=True) # Save the directory of face images
model = cv2.CascadeClassifier('haarcascade_frontalface_default.xml') # load model
images = pathlib.Path('image').rglob('*')
for image in images:
    print('Processing: {}'.format(image))
    image = str(image)
    image = cv2.imread(image)
    original = image.copy()
    cv2.imshow('original', original)
    gray = cv2.cvtColor(image, cv2.COLOR_BGR2GRAY) # convert to grayscale
    faces = model.detectMultiScale(gray)
    for i, (x, y, w, h) in enumerate(faces):
        face = image[y:y + h, x:x + w]
        cv2.rectangle(original, (x, y), (x + w, y + h), (0, 255, 0), thickness=2)
        cv2.imshow('original', original)
        show_on_tkinter(face, title=i + 1)
cv2.destroyAllWindows()
conn.close()

# Train the face recognizer
recognizer = cv2.face.LBPHFaceRecognizer_create()
ids = []
faces = []
for name in pathlib.Path('dataset').rglob('*'):
    pathlib.Path(name).glob('*')
    for image in images:
        ids.append(name_id_map[name.name])
        image = Image.open(image).convert('L')
        image = np.array(image)
顔を記録する
効果
2. OpenFace顔認識システム(未完成品)
3. DeepID顔認識装置(未完成品)
4. FaceNet顔認識システム(未完成品)
使用方法 フェイスネット の顔認識用事前学習済みモデル、2018年にアップロードされたInception ResNet v1をベースにしたモデルです。
ランダムにモデルを選んでください。
-
20180408-102900
- LFW精度:99.05
- トレーニングデータセット CASIA-WebFace
-
20180402-114759
- LFW精度:99.65%。
- トレーニングデータセット VGGFace2
自分の画像で分類器を学習させる - davidsandberg/facenet Wiki - GitHub
5. インサイトフェイス(未完成)
オープンソースの達人が対面する。InsightFaceは、顔認識システムを箱から出して構築することを可能にします。
6. ArcFace (未完成)
カメラキャプチャ
import cv2
import numpy as np

net = cv2.dnn.readNetFromTensorflow('opencv_face_detector_uint8.pb', 'opencv_face_detector.pbtxt') # TensorFlow model


def face_recognition(image):
    height, width, channel = image.shape # height, width, number of channels
    blob = cv2.dnn.blobFromImage(cv2.resize(image, (300, 300)), 1.0, (300, 300), (104.0, 177.0, 123.0)) # Resize and reduce the effect of lighting
    net.setInput(blob) # Set input
    detections = net.forward() # detections
    faces = detections[0, 0] # face results
    for face in faces:
        confidence = face[2] # confidence
        if confidence > 0.5: # Confidence threshold set to 0.5
            box = face[3:7] * np.array([width, height, width, height]) # face rectangular box coordinates
            pt1 = int(box[0]), int(box[1]) # coordinates of the upper left corner
            pt2 = int(box[2]), int(box[3]) # lower right corner coordinates
            cv2.rectangle(image, pt1, pt2, (0, 255, 0), thickness=2) # draw the face rectangle box

            text = '{:.2f}%'.format(confidence * 100) # confidence text
            startX, startY = pt1
            y = startY - 10 if startY - 10 > 10 else startY + 10
            org = (startX, y) # coordinates of the lower left corner of the text
            cv2.putText(image, text, org, cv2.FONT_HERSHEY_SIMPLEX, 0.5, (0, 255, 0), thickness=2) # Draw the confidence level
    return image


if __name__ == '__main__':
    cap = cv2.VideoCapture(0) # turn on the camera

    if not cap.isOpened(): # exit directly without opening
        print("Cannot open camera")
        exit()

    while True:
        ret, frame = cap.read() # Capture frame by frame
        if not ret: # read ret correctly as True
            print("Can't receive frame (stream end?). Exiting ... ")
            break
        frame = face_recognition(frame)
        cv2.imshow('frame', frame) # show
        if cv2.waitKey(1) == ord('q'): # q exit
            break

    cap.release() # Release the camera
    cv2.destroyAllWindows()
効果
クリスマスの帽子をかぶって
画像サイズは標準化されますが、それでも最適化が必要です

import cv2
import numpy
import random
from PIL import Image
from pathlib import Path

# Parameters
HAT_PATH = '. /hat/' # Christmas hat image path
MODEL_PATH = 'haarcascade_frontalface_default.xml' # Path to pre-trained model for face recognition

# Read
model = cv2.CascadeClassifier(MODEL_PATH)

# Read Christmas hat
hats = [] # Christmas hats
hats_portion = [] # Christmas hat aspect ratio
for i in Path(HAT_PATH).glob('*.png'):
    hat = Image.open(i)
    width, height = hat.size
    hats.append(hat)
    hats_portion.append(width / height)


def std_size(imagePath):
    '''Go to standard size'''
    pic = Image.open(imagePath)
    width, height = pic.size
    portion = width / height

    if portion < 1: # portrait
        if portion <= 0.75:
            pic_w = 960
            pic_h = round(960 / portion)
            box = (0, round((pic_h - 1280) / 2), 960, round(pic_h / 2 + 640))

        if portion > 0.75:
            pic_h = 1280
            pic_w = round(1280 * portion)
            box = (round((pic_w - 960) / 2), 0, round(pic_w / 2 + 480), 1280)

    elif portion > 1: # landscape
        if portion > = 1.3333:
            pic_h = 960
            pic_w = round(960 * portion)
            box = (round((pic_w - 1280) / 2), 0, round(pic_w / 2 + 640), 960)

        if portion < 1.3333:
            pic_w = 1280
            pic_h = round(1280 / portion)
            box = (0, round((pic_h - 960) / 2), 1280, round(pic_h / 2 + 480))

    elif portion == 1: # square
        (pic_w, pic_h) = (960, 960)
        box = (0, 0, 960, 960)

    pic = pic.resize((pic_w, pic_h))
    pic = pic.crop(box)
    return pic


def face_detect(pil_image):
    '''Face detection

    :param pil_image: the image read by PIL
    '''
    image = cv2.cvtColor(numpy.array(pil_image), cv2.COLOR_RGB2BGR) # PIL to cv
    gray = cv2.cvtColor(image, cv2.COLOR_BGR2GRAY)
    faces = model.detectMultiScale(
        gray,
        scaleFactor=1.2,
        minNeighbors=5,
        minSize=(50, 60),
        flags=cv2.CASCADE_SCALE_IMAGE
    )
    return faces


def get_hat(x, y, w, h):
    # Set the probability of each hat
    num = random.randint(1, 100)
    if num in range(1, 17):
        hat_num, offset1, offset2, offset3 = (0, 1.2, .05, .67) # hat1
    elif num in range(17, 33):
        hat_num, offset1, offset2, offset3 = (1, 1.3, -.4, .62) # hat2
    elif num in range(33, 49):
        hat_num, offset1, offset2, offset3 = (2, .9, .05, .8) # hat3
    elif num in range(91, 101):
        hat_num, offset1, offset2, offset3 = (3, 1.2, .05, .67) # green hat
    elif num in range(49, 65):
        hat_num, offset1, offset2, offset3 = (4, 1.2, -.1, 1.2) # jiao1
    elif num in range(65, 81):
        hat_num, offset1, offset2, offset3 = (5, 1, 0, 1.2) # jiao2
    elif num in range(81, 91):
        hat_num, offset1, offset2, offset3 = (6, .9, .05, 1) # tree

    hat_portion = hats_portion[hat_num]
    (hat_w, hat_h) = (int(w * offset1), int(w * offset1 / hat_portion))
    # print('hat size:', hat_w, hat_h)
    hatter = hats[hat_num].resize((hat_w, hat_h))

    (hat_x, hat_y) = (int(x + w * offset2), int(y - hat_h * offset3))
    hat_pos = (hat_x, hat_y)
    # print('hat at:', hat_x, hat_y)

    return (hatter, hat_pos)


def wear_hat(imagePath, output, show=False):
    '''Wear a Christmas hat

    :p
TODO
- 顔認識:誰が誰であるかを認識すること
- OpenVINOで事前に学習させたモデル
Intel CPUが必要です。
参考
顔認識用共通データセット
<テーブル データセット 画像数 顔の数 説明 LFW (野生のラベル付き顔) 13233 5749 顔認識用ベンチマークデータセット YTF (YouTube Faces) 動画数3425本 1595 CALFW (クロスエイジLFW) クロスエイジ CPLFW (クロスポーズLFW) クロスポーズ CFP (セレブリティ・イン・フロンタルプロファイル・イン・ザ・ワイルド) 7000 500 有名人の額、横顔 年齢DB-30 12240 570 クロスエイジ顔認識データセット メガフェイス 470万 672057 一人当たり平均7枚 IJB-C (IARPA Janus Benchmark C) 図138000+動画11000 FRVT (顔認証ベンダーテスト) 精度、速度、保存性、信頼性などを考慮する。 VGGFフェイス 2百万円 2622 ノイズが少なく、モデルの学習用データとしてよく利用されます。 VGGFフェイス2 3.31百万円 9131 年齢、姿勢、人種を問わず、ノイズが少なく、学習モデルのデータとしてよく利用される CASIA-WebFace(カシア・ウェブフェイス 494414 10575 国内最高峰の顔認識データセット
備考
おすすめの読み物 顔認識 人脸识别人脸识别别人
参考文献
- opencv haarcascades 事前学習済みモデル
- OpenCVドキュメント
- wx-fancy-pic: ユーザが送信した写真を元に、ポスターや面白い写真を自動生成するWeChatの公共サービス
- OpenCV4 DNN顔検出
- OpenCV でサポートされている顔検出方法の照合と概要
- MTCNN リアルタイム顔検出ネットワーク解説
- OpenVINO Toolkit インテルの事前学習済みモデル
- openface ディープニューラルネットワークによる顔認識
- facenet: Tensorflowを使った顔認識
- awesome_顔認識
- FaceBoxes-公式オープンソースCPUリアルタイム高精度顔検出器
- OpenCV顔認識 - PyImageSearch
- 顔認識用の一般的なデータセット(ダウンロードリンク付き)と一般的な評価指標の紹介
- 顔認証の最新動向と産業規模での顔認証の実践的議論
- Glintは、世界最大かつ最もクリーンな顔認識データセットをオープンソースとして提供しています。Glint360K
- 顔検出の完全ガイド
- insightface/detection/RetinaFace
関連
-
[Django] CSRF 検証に失敗しました。
-
pythonがggplotパッケージを呼び出すとエラーが発生する AttributeError: 'DataFrame' オブジェクトに 'sort' 属性がない
-
ImportError: torchvision という名前のモジュールがありません。
-
Python クローラーで AttributeError: 'NoneType' オブジェクトに属性 'text' がないエラー。
-
print'の呼び出しに括弧がない Python for Beginners
-
import urllib.parse ImportError: parse という名前のモジュールがありません
-
Pythonのタイトル。学生情報管理システム - アドバンス版 (GUI + MySQLデータベース)
-
TypeError: 'builtin_function_or_method' オブジェクトには '__getitem__' という属性がありません。
-
Pythonの非パッケージ問題で相対インポートを試みる
-
pygalマッピング "AttributeError: 'NoneType' オブジェクトには 'decode' という属性がありません"
最新
-
nginxです。[emerg] 0.0.0.0:80 への bind() に失敗しました (98: アドレスは既に使用中です)
-
htmlページでギリシャ文字を使うには
-
ピュアhtml+cssでの要素読み込み効果
-
純粋なhtml + cssで五輪を実現するサンプルコード
-
ナビゲーションバー・ドロップダウンメニューのHTML+CSSサンプルコード
-
タイピング効果を実現するピュアhtml+css
-
htmlの選択ボックスのプレースホルダー作成に関する質問
-
html css3 伸縮しない 画像表示効果
-
トップナビゲーションバーメニュー作成用HTML+CSS
-
html+css 実装 サイバーパンク風ボタン
おすすめ
-
Pythonです。pandasのiloc, loc, ixの違いと連携について
-
ユニコード・オブジェクトは、ハッシュ・エラーの解決前にエンコードする必要があります。
-
Python Numpyのarrayarrayとmatrixmatrix
-
仮想環境を作成するコマンドが見つからない virtualenv: コマンドが見つからない
-
Python pipを使ったpymysqlモジュールのインストール (Error: ImportError: No module named pymysql)
-
Python3 xlsxwriterモジュールのインストール
-
メール送信を自動化するPython - Blog内のメッセージのメールアドレスを自動で取得して送信
-
Pythonのsum関数でTypeError: unsupported operand type(s) for +: 'int' and 'list' エラーを解決する。
-
Python ネットワークリクエストのエラー "ConnectionRefusedError: [WinError 10061] ターゲットコンピュータがアクティブに拒否したため接続できません"
-
float32とfloat64の本質的な違い(ディープラーニングへの型影響とpythonの活用)。