Android TextViewは、あるテキストのカラー・フォント・サイズを設定する
内容
2、段落内の特定の単語に対して別々のフォントサイズを設定する
前文
TextViewにはたくさんのテキストが表示されますが、すべてのテキストの色、フォント、サイズが均一でない場合があり、この場合、特定の単語を個別に設定する必要があります。
Htmlで実装されたもの
1を使用すると、例えば次のような効果を得ることができます。
1.1、段落内の特定の単語に対して別の色を設定する
![]()
Html.fromHtml(Stringソース)メソッドによるものです。
String str1 = "微信扫码<font color = '#FFB400'>关注公众号</font>,立即开始";
textView.setText(Html.fromHtml(str1));
注:fromHtml(String source)はPI Level 24以上では非推奨です。API Level 24 以上のデバイスでは、2 つの引数を持つメソッドで十分です。
fromHtml(String source, int flags)
 String str1 = "微信扫码<font color = '#FFB400'>关注公众号</font> ,立即开始";

CharSequence charSequence;
if (android.os.Build.VERSION.SDK_INT >= android.os.Build.VERSION_CODES.N) {
     charSequence = Html.fromHtml(str1, Html.FROM_HTML_MODE_LEGACY);
} else {
     charSequence = Html.fromHtml(str1);
}
textView.setText(charSequence);
flags optional parameter:
public static final int FROM_HTML_MODE_COMPACT = 63;
public static final int FROM_HTML_MODE_LEGACY = 0;
public static final int FROM_HTML_OPTION_USE_CSS_COLORS = 256;
public static final int FROM_HTML_SEPARATOR_LINE_BREAK_BLOCKQUOTE = 32;
public static final int FROM_HTML_SEPARATOR_LINE_BREAK_DIV = 16;
public static final int FROM_HTML_SEPARATOR_LINE_BREAK_HEADING = 2;
public static final int FROM_HTML_SEPARATOR_LINE_BREAK_LIST = 8;
public static final int FROM_HTML_SEPARATOR_LINE_BREAK_LIST_ITEM = 4;
public static final int FROM_HTML_SEPARATOR_LINE_BREAK_PARAGRAPH = 1;
public static final int TO_HTML_PARAGRAPH_LINES_CONSECUTIVE = 0;
public static final int TO_HTML_PARAGRAPH_LINES_INDIVIDUAL = 1;
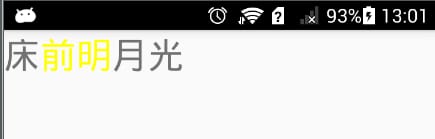
1.2、段落内の特定の単語に対して個別に複数の色を設定する
の効果

TextView tv = findViewById(R.id.tv);
String text1 = "<font color = '#FF0000'>bedside moonlight,</font><br>";
String text2 = "<font color='#00FF00'>Suspicion is the frost on the ground. </font><br>";
String text3 = "<font color=\"#FF00FF\">Raise your head to look at the bright moon,</font><br>";
String text4 = "<font color=\"#0000FF\">Looking down at the hometown. </font><br>";

CharSequence charSequence;
if (android.os.Build.VERSION.SDK_INT >= android.os.Build.VERSION_CODES.N) {
    charSequence = Html.fromHtml(text1 + text2 + text3 + text4, Html.FROM_HTML_MODE_LEGACY);
} else {
    charSequence = Html.fromHtml(text1 + text2 + text3 + text4);
}

tv.setText(charSequence);
2、段落内の特定の単語に対して別々のフォントサイズを設定する
2.1では、xmlでandroid:textSize="30sp"属性を設定し、javaコードで<big>と<small>.を設定します。

        TextView tv = findViewById(R.id.tv);
        String text1 = "<font color = '#FF0000'><big>bedside moonlight,</big></font><br>";
        String text2 = "<font color='#00FF00'><small>Suspected of being frost on the ground. </small></font><br>";
        String text3 = "<font color=\"#FF00FF\">Raise your head to look at the bright moon,</font><br>";
        String text4 = "<font color=\"#0000FF\">Looking down at the hometown. </font><br>";

        CharSequence charSequence;
        if (android.os.Build.VERSION.SDK_INT >= android.os.Build.VERSION_CODES.N) {
            charSequence = Html.fromHtml(text1 + text2 + text3 + text4, Html.FROM_HTML_MODE_LEGACY);
        } else {
            charSequence = Html.fromHtml(text1 + text2 + text3 + text4);
        }

        tv.setText(charSequence);
なお、サイズを設定する <big> と <small> タグは android:textSize="30sp" に基づいて拡大・縮小されます。
2.2、フォントサイズを設定するためのカスタムHtml.TagHandler
実現する効果は以下の通りです。

Androidはhtmlタグにあまり対応していないので、fontタグでサイズを指定しても設定が反映されないことがわかり、ソースコードを確認したところ、以下のようにsize属性が解析されていないことが判明しました。
private void startFont(Editable text, Attributes attributes) {
        String color = attributes.getValue("", "color");
        String face = attributes.getValue("", "face");

        if (!TextUtils.isEmpty(color)) {
            int c = getHtmlColor(color);
            if (c ! = -1) {
                start(text, new Foreground(c | 0xFF000000));
            }
        }

        if (!TextUtils.isEmpty(face)) {
            start(text, new Font(face));
        }
}
そのため、size 属性に対応する必要がある場合は、カスタマイズして Html.TagHandler
TextView tv = findViewById(R.id.tv);

        String str = "The moonlight in front of the bed";
        String str1 = "Suspicion is the frost on the ground. ";
        String text = "<b><myfont size='80px' color='#FF0000'>" + str + "</myfont><br>"
                + "<myfont color='" + "#00FF00" + "', size='" + "40px" + "'>" + str1 + "</myfont& gt;";

        CharSequence charSequence;
        if (android.os.Build.VERSION.SDK_INT >= android.os.Build.VERSION_CODES.N) {
            charSequence = Html.fromHtml(text, Html.FROM_HTML_MODE_LEGACY,null,new HtmlTagHandler("myfont"));
        } else {
            charSequence = Html.fromHtml(text, null, new HtmlTagHandler("myfont"));
        }

        tv.setText(charSequence);
Html.TagHandlerをカスタマイズする
import android.graphics.Color;
import android.text.Editable;
import android.text;
import android.text.Spanned;
import android.text.TextUtils;
import android.text.style.AbsoluteSizeSpan;
import android.text.style.ForegroundColorSpan;

import org.xml.sax.XMLReader;

import java.lang.reflect.Field;
import java.util.HashMap;

public class HtmlTagHandler implements Html.
    private String tagName;

    private int startIndex = 0;

    private int endIndex = 0;

    final HashMap<String, String> attributes = new HashMap<>();

    public HtmlTagHandler(String tagName) {
        this.tagName = tagName;
    }

    @Override
    public void handleTag(boolean opening, String tag, Editable output, XMLReader xmlReader) {
        // Determine if it is the currently required tag
        if (tag.equalsIgnoreCase(tagName)) {
            // parse all attribute values
            parseAttributes(xmlReader);

            if (opening) {
                startHandleTag(tag, output, xmlReader);
            } else {
                endEndHandleTag(tag, output, xmlReader);
            }
        }
    }

    public void startHandleTag(String tag, Editable output, XMLReader xmlReader) {
        startIndex = output.length();
    }

    public void endEndHandleTag(String tag, Editable output, XMLReader xmlReader) {
        endIndex = output.length();

        // Get the value of the attribute
        String color = attributes.get("color");
        String size = attributes.get("size");
        size = size.split("px")[0];

        // set the font size
        if (!TextUtils.isEmpty(size)) {
            output.setSpan(new AbsoluteSizeSpan(Integer.parseInt(size)), startIndex, endIndex,
                    Spanned.SPAN_EXCLUSIVE_EXCLUSIVE);
        }

        // Set the color
        if (!TextUtils.isEmpty(color)) {
            output.setSpan(new ForegroundColorSpan(Color.parseColor(color)), startIndex, endIndex,
                    Spanned.SPAN_EXCLUSIVE_EXCLUSIVE);
        }
    }

    /**
     * Parse all attribute values
     *
     * @param xmlReader
     */
    private void parseAttributes(final XMLReader xmlReader) {
        try {
            Field elementField = xmlReader.getClass().getDeclaredField("theNewElement");
            elementField.setAccessible(true);
            Object element = elementField.get(xmlReader);
            Field attsField = element.getClass().getDeclaredField("theAtts");
            attsField.setAccessible(true);
            Object atts = attsField.get(element);
            Field dataField = atts.getClass().getDeclaredField("data");
            dataField.setAccessible(true);
            String[] data = (String[]) dataField.get(atts);
            Field lengthField = atts.getClass().getDeclaredField("length");
            lengthField.setAccessible(true);
            int len = (Integer) lengthField.get(atts);
            for (int i = 0; i < len; i++) {
                attributes.put(data[i * 5 + 1], data[i * 5 + 4]);
            }
        } catch (Exception e) {
        }
    }
}
注意:<b>タグは、最初の<myfont>タグがないと動作しません。<b>の位置は、どのタグでも動作します。
Html.fromHtml()これは具体的に何をサポートしているかというと、Htmlの以下の部分を見ることができます。
private void handleStartTag(String tag, Attributes attributes) {
        if (tag.equalsIgnoreCase("br")) {
            // We don't need to handle this. TagSoup will ensure that there's a </br> for each <br>
            // so we can safely emit the linebreaks when we handle the close tag.
        } else if (tag.equalsIgnoreCase("p")) {
            startBlockElement(mSpannableStringBuilder, attributes, getMarginParagraph());
            startCssStyle(mSpannableStringBuilder, attributes);
        } else if (tag.equalsIgnoreCase("ul")) {
            startBlockElement(mSpannableStringBuilder, attributes, getMarginList());
        } else if (tag.equalsIgnoreCase("li")) {
            startLi(mSpannableStringBuilder, attributes);
        } else if (tag.equalsIgnoreCase("div")) {
            startBlockElement(mSpannableStringBuilder, attributes, getMarginDiv());
        } else if (tag.equalsIgnoreCase("span")) {
            startCssStyle(mSpannableStringBuilder, attributes);
        } else if (tag.equalsIgnoreCase("strong")) {
            start(mSpannableStringBuilder, new Bold());
        } else if (tag.equalsIgnoreCase("b")) {
            start(mSpannableStringBuilder, new Bold());
        } else if (tag.equalsIgnoreCase("em")) {
            start(mSpannableStringBuilder, new Italic());
        } else if (tag.equalsIgnoreCase("cite")) {
            start(mSpannableStringBuilder, new Italic());
        } else if (tag.equalsIgnoreCase("dfn")) {
            start(mSpannableStringBuilder, new Italic());
        } else if (tag.equalsIgnoreCase("i")) {
            start(mSpannableStringBuilder, new Italic());
        } else if (tag.equalsIgnoreCase("big")) {
            start(mSpannableStringBuilder, new Big());
        } else if (tag.equalsIgnoreCase("small")) {
            start(mSpannableStringBuilder, new Small());
        } else if (tag.equalsIgnoreCase("font")) {
            startFont(mSpannableStringBuilder, attributes);
        } else if (tag.equalsIgnoreCase("blockquote")) {
            startBlockquote(mSpannableStringBuilder, attributes);
        } else if (tag.equalsIgnoreCase("tt")) {
            start(mSpannableStringBuilder, new Monospace());
        } e
小さい スモールフォント フォント フォントタグ ブロッククオート タグの定義 blockquote tt フォントは等幅フォントで表示されます a ハイパーリンク バイドゥ u アンダーライン アンダースコア 上 上付き文字 サブ 添え字 h1-h6 タイトルフォント
これはタイトル1です
タイトル2
タイトル3
4-6がうまくいかなかったので、こんな感じです。
イムグ 画像3, フォントを設定する
フォントを設定するには、まず、このフォント・ライブラリを入手します。
AssetManager mgr = getAssets();// get AssetManager
Typeface tf = Typeface.createFromAsset(mgr, "fonts/comicSans.ttf");//get Typeface based on path
tv.setTypeface(tf);//set the font
2つ目は、スパン経由
TextViewにはsetText(CharSequence text)メソッドがあり、CharSequence型のパラメータを渡します。このパラメータのサブクラスであるSpanableStringとSpanableStringBuilderには共通のsetSpanメソッドがあり、その中に様々なSpanを渡すことができるので、色、サイズ、下線などの機能を設定できます。HtmlもSpanableStringBuilderを介して色、サイズ、太字、下線、その他の機能を実現する方法があります。
2.1, フォントの色を設定する
SpannableString spanString = new SpannableString("bedtime");
// Construct a Span that changes the font color
ForegroundColorSpan span = new ForegroundColorSpan(Color.YELLOW);
//apply this span to the specified range of fonts
spanString.setSpan(span, 1, 3, Spannable.SPAN_EXCLUSIVE_INCLUSIVE);
//set to TextView to show it
tv.setText(spanString);
2.2 setSpan(Object what, int start, int end, int flags)のパラメータ説明について
オブジェクト what : 対応する様々なSpan。
int start : 0から始まる、フォーマットされる部分文字列の開始インデックス
int end: 部分文字列の終わりのインデックス、効果にはこの位置は含まれない。例えば、ここでの数値が2(つまり3文字目)の場合、3文字目には何の効果もありません。
int flags: 以下の4つの値を取る。
Spannable.SPAN_EXCLUSIVE_EXCLUSIVE: 前後とも、つまり指定範囲の前後に新しい文字を挿入しても、新しいスタイルは適用されません。
SPANNABLE.SPAN_EXCLUSIVE_INCLUSIVE: 前を除外し、後を含む。つまり、範囲文字の後に新しい文字が挿入されたときのみ、新しいスタイルが適用されます。
Spannable.SPAN_INCLUSIVE_EXCLUSIVE:前に含まれ、後に除外される。
Spannable.SPAN_INCLUSIVE_INCLUSIVE:表と裏を含む。
2.3, 個々のスパン
まず、さまざまなSpanの間の継承関係を見てみましょう。図から、すべてのSpanが抽象クラスCharacterStyleを統合していることが分かります。
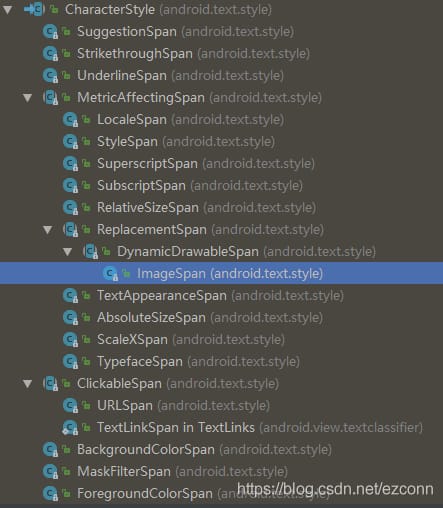
AbsoluteSizeSpan :絶対サイズ範囲、内部に設定されたパラメータは、物理的なピクセル値です。
関連知識
setTextColor(0xFF0000FF); //16進数の色値、0xFF0000FFはint型のデータで、ビット0x|FF|0000FFをグループ化、0xは16進数の色を表すマーカー、FFは透明度、注:ここでは0xFF0000FFは8の色表現でなければなりません。
setTextColor(Color.rgb(255, 255, 255)); /RGBカラー値
setTextColor(Color.parseColor("#FFFFFF")));
// そして、リソースファイルを使った設定です。
setTextColor(getContext.getResources().getColor(R.color.blue)); //リソースファイル取得で設定。場合によっては、R.color.blueはR.string.blueにもなります。
// あるいは、システム独自の色クラスを使用することもできます。
setTextColor(android.graphics.Color.BLUE) とします。
お役に立てれば
フォローといいね!を押してください!あなたのちょっとした行動が私の大きな支えになります。
関連
-
Solve Android 仮想メソッドの呼び出しに失敗する。NULLオブジェクトの参照で
-
コンフィギュレーション 'compile' は廃止され、'implementati solution' に置き換わりました。
-
ADB接続エラーです。ADBサーバーがACKしなかった
-
アプリの実行エラー。デフォルトのアクティビティが見つかりません
-
Android studio java ファイル表示 j burst red
-
Android Studioで「Error:SSL peer shut down incorrectly」というエラーが表示される。
-
Androidレイアウトにおけるmargin,padding,alignの使い分けと違いについて
-
android.content.res.Resources$NotFoundException: 文字列リソースID #0x1 Sinkhole!
-
ARMアセンブリ共通命令 NULL演算 NOP命令
-
java.util.Iterator java.util.List.iterator()' で null オブジェクト参照例外が発生した場合の解決策を紹介します。
最新
-
nginxです。[emerg] 0.0.0.0:80 への bind() に失敗しました (98: アドレスは既に使用中です)
-
htmlページでギリシャ文字を使うには
-
ピュアhtml+cssでの要素読み込み効果
-
純粋なhtml + cssで五輪を実現するサンプルコード
-
ナビゲーションバー・ドロップダウンメニューのHTML+CSSサンプルコード
-
タイピング効果を実現するピュアhtml+css
-
htmlの選択ボックスのプレースホルダー作成に関する質問
-
html css3 伸縮しない 画像表示効果
-
トップナビゲーションバーメニュー作成用HTML+CSS
-
html+css 実装 サイバーパンク風ボタン
おすすめ
-
ADBサーバーがackしない問題の解決策(ADB接続の問題)
-
第20章 OnCheckedChangeListenerイベント (ゼロから学ぶAndroid)
-
selectionに主な型が含まれていないエラー
-
パッケージが見つからないエラー 解決策と jdk の切り替え
-
Android Control - TabLayout Usage Introduction
-
サービスを利用した特別な放送受信者の登録
-
AndroidでデータをExcelファイルに書き出す方法
-
Android画像角丸
-
スピナー実装のダウンメニューとイベントリスニング(グラフィックモード)
-
Android SpinnerのsetSelectionとonItemSelectedイベントのトリガー順について