tkinter モジュールを使った Python 倉庫番ゲーム
少し前にC言語で倉庫番のキャラクター版を作ったのですが、本当に初歩的なものでした。最近Pythonを使ったので、Pythonで倉庫番のグラフィカル・インターフェースを作ってみようと思った。今回はCのように簡単にはいきません。まず、PythonのGUIをあまり使ったことがないので、Webでいろいろと教科書を探し、最終的に特に理由もなく、ただ話題になっているからということでtkinterを選びました。
次に、2つのポイントをお伝えします。ひとつは、このプログラムを実装するまでの過程、もうひとつは、執筆中に考えたことです。
I. はじめに
Development language: Python 3.7
Development tool: PyCharm 2019.2.4
Date: October 2, 2019
Author: ZackSock
今回のプッシュボックスは、C言語版とは異なり、まずグラフィカルなインターフェースを採用し、次にBGMをつけ、さらにさまざまなマップに対応できるようにしました。私は3つのマップを内蔵していますが、それは次のようなものです。
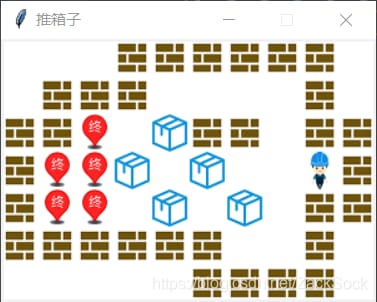
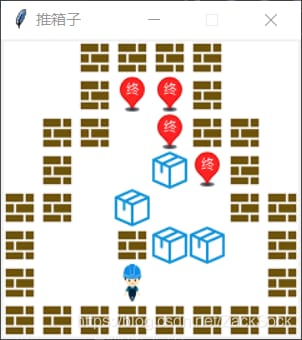
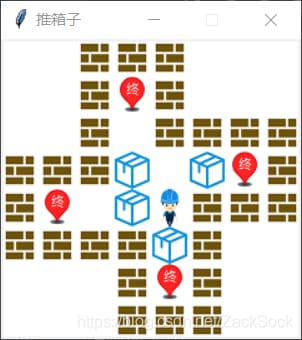
前作よりずっと進化してますね、ハハ。
II. 開発環境
この名前が正しいかどうかわかりませんが、ここでは主に使用するモジュールの話をしています。Pythonは得意ではないので、簡単な説明にとどめておきます。
まず、Python 3.7を使っているのですが、主に2つのモジュールを使っています。 tkinter と パゲーム . 主な用途はやはりtkinterで、pygameは音楽再生に使っています。(pygameに手を出さなかったので、インターフェースは全てtkinterで書きました)。ライブラリのインポート 私はpycharmを使っていますが、インポートは非常に便利です。他のソフトを使う場合は、pipを使ってモジュールをインストールすることも検討できますので、詳しくはブログをご覧ください。 https://www.cnblogs.com/banzhen/p/isimulink.html .
pip install tkinter
pip install pygame
III. 原理分析
1. 地図
マップは考え方としてはあまり変わっておらず、以前と同じ2次元の配列表現を使っています。とはいえ、これが本当に効率がいいとは思えないのですが、書いてみて思いつきました。
2. 移動
移動の面では何度も修正を加え、最初はオリジナルのアルゴリズムに忠実に従いました。これはうまくいったのですが、最初のパスだけでした。マップを修正した後に一連の問題が見つかり、その問題に基づいて実際のエンカウントがもっと複雑になっていることが分かりました。Pythonは{}の代わりに強制インデントを使用しているため、コードは少し見づらいかもしれませんので、ご容赦ください。
引越しの考え方は、おおよそ次のようなものです。
/**
* 0 for blank
* 1 for wall
* 2 for people
* 3 indicates a box
* 4 indicates the end point
* 5 indicates a completed box
* 6 denotes people at the end of the line
*/
I. People
	1、Move direction is blank
		Front set to 2
		Current position is 0
	2、Move direction for the wall
		Direct return
	3、Move direction is the end
		Front set to 6
		The current position is set to 0
	4、Move direction for the completed box
		4.1、Finished box is in front of the box
			return
		4.2、Finished box in front of completed box
			return
		4.3, the completed box is in front of the wall
			return
		4.4, completed box is blank in front
			Completed box in front of set 3
			The front position is set to 6
			The current position is set to 0
		4.5、Finished box in front of the end
			Completed the box in front of set to 5
			The front position is set to 6
			The current position is set to 0
	5、Front for the box
		5.1, the front of the box is blank
			The front position of the box is set to 3
			Front position set to 2
			The current position is set to 0
		5.2, the front of the box for the wall
			return
		5.3, the front of the box for the box
			return
		5.4, the front of the box is the completed box
			return
		5.5, the front of the box is the end
			The position in front of the box is set to 5
			The front position is set to 2
			The current position is set to 0
Second, at the end of the end of the people
	1、Moving direction is blank
		Front position set to 2
		Current position is set to 4
	2、Move in the direction of the wall
		Directlyreturn
	3、Move direction is the end
		Front set to 6
		The current position is set to 4
	4、Move direction for the completed box
		4.1、Finished box is in front of the box
			return
		4.2、Finished box in front of completed box
			return
		4.3, the completed box is in front of the wall
			return
		4.4, completed box is blank in front
			Completed box in front of set 3
			The front position is set to 6
			The current position is set to 4
		4.5、Finished box in front of the end
			Completed the box in front of set to 5
			The front position is set to 6
			The current position is set to 4
	5、Front for the box
		5.1, the front of the box is blank
			The front position of the box is set to 3
			Front position is set to 2
			The current position is set to 4
		5.2, the front of the box for the wall
			return
		5.3, the front of the box for the box
			return
		5.4, the completed box in front of the box
			return
		5.5, the front of the box is the end
			The position in front of the box is set to 5
			The front position is set to 2
			Current position is set to 4
まず、人物の状態には2種類あって、空白に立つ場合と端に立つ場合があります。後でわかったのですが、人が空白にいる場合と端にいる場合の違いは、人が移動した後、人の元の位置の一方を空白の0に、一方を端の4に設定することだけなのです。なので、移動前に人の後ろがどうなっているかを判断することで、一般的なコードを節約することができますね。上のロジックは、以下のように変更することができます。
/**
* 0 means blank
* 1 for wall
* 2 for people
* 3 indicates a box
* 4 indicates the end point
* 5 indicates a completed box
* 6 denotes people at the end of the line
*/
if(current position is 2):
	# i.e. person in the blank
	back = 0
elif(current position is 6):
	# that is, the person is at the end
	back = 4

1, the direction of movement is blank (can be moved)
	Front set to 2
	The current position is back
2, the direction of movement for the wall
	Direct return
3、Moving direction is end (movable)
	Front set to 6
	The current position is set to back
4、Moving direction for the completed box
	4.1、Finished box in front of the box
		return
	4.2、Finished box in front of completed box
		return
	4.3, the completed box is in front of the wall
		return
	4.4, completed box in front of blank (moveable)
		Completed box in front of set 3
		The front position is set to 6
		The current position is set to back
	4.5, has completed the box in front of the end (can be moved)
		Completed box front set to 5
		The front position is set to 6
		The current position is set to back
5, in front of the box
	5.1、Front of the box is blank (movable)
		The front position of the box is set to 3
		Front position set to 2
		The current position is set to back
	5.2, the front of the box for the wall
		return
	5.3, the front of the box for the box
		return
	5.4, the front of the box is the completed box
		return
	5.5, box in front of the end (movable)
		The position in front of the box is set to 5
		The front position is set to 2
		Current position is set to back
IV. ドキュメント分析
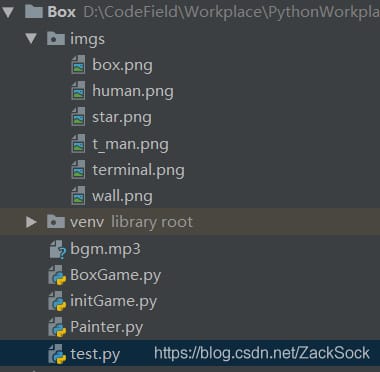
ディレクトリ構成は以下のとおりで、BoxGame、initGame、Painterの3つのメインファイルがあります。それからtestファイルはテスト用で、実用性はありません。次に、各ファイルの機能について説明します。
- BoxGame。ゲームの正面玄関として、主な流れはそこにあります。正直、Pythonは比較的勉強してきたし、Pythonのオブジェクト指向もあまり詳しくないので、このフローはプロセス指向の考え方に近いです。
- initGame: マップデータ、人々の位置、マップサイズ、レベルなど、いくつかのデータを初期化または保存します。
- ペインターです。このファイルではPainterオブジェクトを定義しており、主にマップの描画に使用します
それ以外は画像リソースと音楽リソースだけです。
V. コード解析
1. 箱庭ゲーム
from tkinter import *
from initGame import *
from Painter import Painter
from pygame import mixer

# Create the interface and set the properties
# Create a window
root = Tk()
#Set the window title
root.title("pushbox")
# set the window size, when the brackets for "widhtxheight" form, will be judged to set the width and height here note that "x" is an important identifier
root.geometry(str(width*step) + "x" + str(height*step))
# set margins, when the brackets are "+left+top" form, will be judged as set margins
root.geometry("+400+200")
# This sentence means that width can change 0, height can change 0, prohibit change can also be written as resizable(False, False)
root.resizable(0, 0)

#Play background music
mixer.init()
mixer.music.load('bgm.mp3') #load music
mixer.music.play() #Play music, the song will stop automatically when it finishes playing

#Create a white canvas with the following parameters: parent window, background, height, width
cv = Canvas(root, bg='white', height=height*step, width=width*step)

# Draw the map
painter = Painter(cv, map, step)
painter.drawMap()

#Associate Canvas
cv.pack()

#Define the listener method
def move(event):
	pass

#bind the listener event, the first parameter of the keyboard event is fixed to "

", the second parameter is the method name (no parentheses)

root.bind("
"
, move)
#Enter loop
root.mainloop()
moveのコードは長いので割愛し、後で説明する。BoxGameの主な流れは以下の通りだ。
- モジュールのインポート
- ウィンドウの作成とプロパティの設定
- BGMを再生する
- ドローイングボードの作成
- ドローイングボードに地図を描く
- 窓の上に画板を置く
- ウィンドウをイベントのリスニングに関連付ける
- ゲームがループするようになりました
2. initGame
Some parameters needed for #game
mission = 0
mapList = [
    [
        [0, 0, 1, 1, 1, 0, 0, 0],
        [0, 0, 1, 4, 1, 0, 0, 0],
        [0, 0, 1, 0, 1, 1, 1, 1],
        [1, 1, 1, 3, 0, 3, 4, 1],
        [1, 4, 0, 3, 2, 1, 1, 1],
        [1, 1, 1, 1, 3, 1, 0, 0],
        [0, 0, 0, 1, 4, 1, 0, 0],
        [0, 0, 0, 1, 1, 1, 0, 0], [0, 0, 0, 0, 1, 1, 0, 0]
    ],
    [
        [0, 0, 0, 1, 1, 1, 1, 1, 1, 0],
        [0, 1, 1, 1, 0, 0, 0, 0, 0, 1, 0],
        [1, 1, 4, 0, 3, 1, 1, 1, 0, 1, 1, 1],
        [1, 4, 4, 3, 0, 3, 0, 0, 0, 2, 1],
        [1, 4, 4, 0, 3, 0, 3, 0, 0, 1, 1],
        [1, 1, 1, 1, 1, 1, 1, 0, 0, 1, 0],
        [0, 0, 0, 0, 0, 0, 1, 1, 1, 1, 0], [0, 0, 0, 0, 0, 1, 1, 0]
    ],
    [
        [0, 0, 1, 1, 1, 1, 1, 0, 0],
        [0, 0, 1, 4, 4, 1, 0, 0],
        [0, 1, 1, 0, 4, 1, 1, 0],
        [0, 1, 0, 0, 3, 4, 1, 0],
        [1, 1, 0, 3, 0, 0, 0, 1, 1],
        [1, 0, 0, 1, 3, 3, 0, 1],
        [1, 0, 0, 2, 0, 0, 0, 0, 1],
        [1, 1, 1, 1, 1, 1, 1, 1, 1], [1, 1, 1, 1, 1
    ],
    [
        [1, 1, 1, 1, 1, 1, 1, 1, 1],
        [1, 0, 0, 1, 0, 0, 0, 0, 1],
        [1, 0, 3, 4, 4, 3, 0, 1],
        [1, 2, 3, 4, 5, 0, 1, 1],
        [1, 0, 3, 4, 4, 3, 0, 1],
        [1, 0, 0, 1, 0, 0, 0, 0, 1],
        [1, 1, 1, 1, 1, 1, 1, 1, 1], [1, 1, 1, 1, 1
    ]
]
map = mapList[3]

# of things behind the person
back = 0
#The width and height of the map
width, height = 0, 0
# number of boxes in the map
boxs = 0
# coordinates of the people in the map
x = 0
y = 0
#Screen size
step = 30

def start():
    global width, height, boxs, x, y, map
    # Make loop variables
    m, n = 0, 0
    for i in map:
        for j in i:
            # Get the width, each time the number of inner loops is the same, just record width the first time
            if (n == 0):
                width += 1
            # traversal to the box when the number of boxes + 1
            if (j == 3):
                boxs += 1
            # when 2 or 6, for traversal to people
            if (j == 2 or j == 6):
                x, y = m, n
            m += 1
        m = 0
        n += 1
    height = n
start()
まだレベル切り替えを実装していないので、ここではmapListとmissionはあまり意味がなく、主なパラメータは以下の通りです。
- back:人物の背後にあるもの(先に解析済み)
- width, height: 幅と高さ
- boxs: ボックス数
- x, y: 人物の座標
- step: 各正方形グリッドの辺の長さ、Canvasの画像描画に慣れていないため、30pxに固定しています
initGameにはクラスが定義されていないので、それを参照することは、その中のコードを実行することと同じです。
3. ペインター
from tkinter import PhotoImage, NW

# When drawing an image with Canvas, the image must be a global variable
img = []
class Painter():
    def __init__(self, cv, map, step):
    	"""Painter's constructor, on the cv drawing board, draws a map of size step based on map"""
    	# pass in the drawing board to be used to draw
        self.cv = cv
        #Pass in the map data
        self.map = map
        #pass in the map size
        self.step = step
    def drawMap(self):
        """Used to draw a map based on the map list"""
        # length of the img list
        imgLen = 0
        global img
        #loop variables
        x, y = 0, 0
        for i in self.map:
            for j in list(i):
            	# Record the actual position
                lx = x * self.step
                ly = y * self.step

                # Draw the blank space
                if (j == 0):
                    self.cv.create_rectangle(lx, ly, lx + self.step, ly + self.step,
                                             fill="white", width=0)
                # Draw wall
                elif (j == 1):
                    img.append(PhotoImage(file="imgs/wall.png"))
                    self.cv.create_image(lx, ly, anchor=NW, image=img[imgLen - 1])
                elif (j == 2):
                    img.append(PhotoImage(file="imgs/human.png"))
                    self.cv.create_image(lx, ly, anchor=NW, image=img[imgLen - 1])
                # Draw the box
                elif (j == 3):
                    img.append(PhotoImage(file="imgs/box.png"))
                    self.cv.create_image(lx, ly, anchor=NW, image=img[imgLen - 1])
                elif (j == 4):
                    img.append(PhotoImage(file="imgs/terminal.png"))
                    self.cv.create_image(lx, ly, anchor=NW, image=img[imgLen - 1])
                elif (j == 5):
                    img.append(PhotoImage(file="imgs/star.png"))
                    self.cv.create_image(lx, ly, anchor=NW, image=img[imgLen - 1])
                elif (j == 6):
                    img.append(PhotoImage(file="imgs/t_man.png"))
                    self.cv.create_image(lx, ly, anchor=NW, image=img[imgLen - 1])
                x += 1
            x = 0
            y += 1
ここでは,create_image と create_rectangle の 2 つの cv メソッドが使用されています.
# Draw rectangle
cv.create_rectangle(sx, sy, ex, ey, key=value...)
1, the first two parameters sx, sy (s for start) for the upper left corner coordinates
2, the last two parameters ex, ey (e for end) means the lower right corner coordinates
3, and the key=value... indicates multiple key = value form of parameters (the order is not fixed)
Such as.
# fill color is red
fill = "red"
# border color is black
outline = "black"
#border width is 5
width = 5

Specific use example.
#draw a black rectangle with a side length of 30, in the upper left corner
cv.create_rectangle(0, 0, 30, 30, fill="black", width=0)
続いて、画像の描画です。
#Note here that img must be a global object
self.cv.create_image(x, y, anchor=NW, img)
1, the first two parameters are still coordinates, but here is not necessarily the upper left corner coordinates, x, y default is the center of the picture coordinates
2, anchor=NW, after setting anchor, x, y is the upper left corner of the picture coordinates
3, img is a PhotoImage object (PhotoImage object for the object in tkinter), PhotoImage object is created as follows

# PhotoImage object created by the file path
img = PhotoImage(file="img/img1.png")
私自身がよく知らないので、これ以上詳しくは言えませんが。
次に実際の座標の問題ですが、これは上記のように配列に参照されます。そして、実際のプロットは、特定のピクセルで行う必要があります。描画処理では、矩形と絵の2種類を描く必要があります。
- 矩形。矩形は2つの座標を必要とします。配列座標が (1, 1) の場合、セルの間隔はステップ (30) なので、対応するピクセル座標は (30, 30) となります。(2, 2)は(60, 60)に相当し、(x*step, y*step)となり、終了位置は(x*step+step, y*step+step)となる。
- 画像:画像を描くのに必要な座標は左上の1つだけで、これは前と同じように(x*step, y*step)とします。
上記でもう一つ重要な点があります。私は一番最初にimgリストを定義して、画像オブジェクトを保持するようにしました。最初、1つの画像オブジェクトを使おうとしたのですが、画像を描画するときに1つしか表示されないので、代わりにimgリストを使おうと考えたら、うまくいったのです。(あまりしっかり勉強していないので、うまく説明できませんが)。
画像の描画には2つのステップがあります。
# Based on the array elements, create the corresponding image object and add it to the end of the list
img.append(PhotoImage(file="imgs/wall.png"))

# When passing in the image object parameter, use img[imgLen - 1], imgLen is the current length of the list, and imgLen-1 is the last element, the image object just created
self.cv.create_image(lx, ly, anchor=NW, image=img[imgLen - 1])

def move(event):
    global x, y, boxs, back, mission,mapList, map
    direction = event.char

    # Determine what's behind the person
    # People in the margin
    if (map[y][x] == 2):
        back = 0 # speak back set to blank
    # People at the end of the line
    elif (map[y][x] == 6):
        back = 4 # set back to the end point

	# If the press is w
    if(direction == 'w'):
    	#Get the coordinates in front of the direction of movement
        ux, uy = x, y-1
        #If the front is a wall, directly return
        if(map[uy][ux] == 1):
            return
        # The front is blank (moveable)
        if (map[uy][ux] == 0):
            map[uy][ux] = 2 # Set the front to human
        # Set front to end
        elif (map[uy][ux] == 4):
            map[uy][ux] = 6 # Set the front to the end

        # Front as completed box
        elif (map[uy][ux] == 5):
        	# completed boxes in front of the box completed boxes or walls can not be moved
            if (map[uy - 1][ux] == 3 or map[uy - 1][ux] == 5 or map[uy - 1][ux] == 1):
                return
            # Completed preceded by blank (moveable)
            elif (map[uy - 1][ux] == 0):
                map[uy - 1][ux] = 3 # box moves forward
                map[uy][ux] = 6 # completed box at the original end, after the person moved up is 6
                boxs += 1 # box moved out, the number of boxes to +1
            # has been completed in front of the box is the end (can be moved)
            elif (map[uy - 1][ux] == 4):
                map[uy - 1][ux] = 5 # the front of the front set to completed boxes
                map[uy][ux] = 6 # the front of the box was originally the end, after the person moved up is 6
        # The front for the box
        elif (map[uy][ux] == 3):
            # The box can not be moved
            if (map[uy - 1][ux] == 1 or map[uy - 1][ux] == 3 or map[uy - 1][ux] == 5):
                return
            # The front of the box is blank
            elif (map[uy - 1][ux] == 0):
                map[uy - 1][ux] = 3
                map[uy][ux] = 2
            # The front of the box is the end
            elif (map[uy - 1][ux] == 4):
                map[uy - 1][ux] = 5
                map[uy][ux] = 2
                boxs -= 1

        # The previous data only changed the direction of movement, the current position is still 2 or 6, then set the current position to back
        map[y][x] = back
        # record the position after the move
        y = uy

    # Clear the screen and draw the map
    cv.delete("all")
    painter.drawMap()
    if(boxs == 0):
        print("Game over")
4.移動
def move(event):
    global x, y, boxs, back, mission,mapList, map
    direction = event.char

    # Determine what's behind the person
    # People in the margin
    if (map[y][x] == 2):
        back = 0 # speak back set to blank
    # People at the end of the line
    elif (map[y][x] == 6):
        back = 4 # set back to the end point

	# If the press is w
    if(direction == 'w'):
    	#Get the coordinates in front of the direction of movement
        ux, uy = x, y-1
        #If the front is a wall, directly return
        if(map[uy][ux] == 1):
            return
        # The front is blank (moveable)
        if (map[uy][ux] == 0):
            map[uy][ux] = 2 # Set the front to human
        # Set front to end
        elif (map[uy][ux] == 4):
            map[uy][ux] = 6 # Set the front to the end

        # Front as completed box
        elif (map[uy][ux] == 5):
        	# completed boxes in front of the box completed boxes or walls can not be moved
            if (map[uy - 1][ux] == 3 or map[uy - 1][ux] == 5 or map[uy - 1][ux] == 1):
                return
            # Completed preceded by blank (moveable)
            elif (map[uy - 1][ux] == 0):
                map[uy - 1][ux] = 3 # box moves forward
                map[uy][ux] = 6 # completed box at the original end, after the person moved up is 6
                boxs += 1 # box moved out, the number of boxes to +1
            # has been completed in front of the box is the end (can be moved)
            elif (map[uy - 1][ux] == 4):
                map[uy - 1][ux] = 5 # the front of the front set to completed boxes
                map[uy][ux] = 6 # the front of the box was originally the end, after the person moved up is 6
        # The front for the box
        elif (map[uy][ux] == 3):
            # The box can not be moved
            if (map[uy - 1][ux] == 1 or map[uy - 1][ux] == 3 or map[uy - 1][ux] == 5):
                return
            # The front of the box is blank
            elif (map[uy - 1][ux] == 0):
                map[uy - 1][ux] = 3
                map[uy][ux] = 2
            # The front of the box is the end
            elif (map[uy - 1][ux] == 4):
                map[uy - 1][ux] = 5
                map[uy][ux] = 2
                boxs -= 1

        # The previous data only changed the direction of movement, the current position is still 2 or 6, then set the current position to back
        map[y][x] = back
        # record the position after the move
        y = uy

    # Clear the screen and draw the map
    cv.delete("all")
    painter.drawMap()
    if(boxs == 0):
        print("Game over")
他の方向コードは非常に類似しているため、ここでは1つの方向のみを取り上げています。唯一の違いは、前面の座標と前面の座標を次のように指定することである。
- 前方:前方 ux,uy=x,y-1, 前方 ux,uy-1 の前方
- 下:前 ux,uy=x,y+1, 前 ux,yu+1 の前
- 左側:前面ux,uy=x-1,y、前面ux-1,uyの前面
- 右側:前面 ux,uy=x+1,y, 前面 ux+1,uyの手前側
VI. 概要
私自身のPython言語に対する理解不足のため、ブログを書く上で不明瞭な説明や間違いがあることは避けられませんので、大変申し訳ありませんが、ご容赦いただければ幸いです。
このゲームはよりプロセス指向の考え方を用いており、改良の余地がたくさんあります。Pythonの人にもやってもらうことにします。 クレバー_ホイ 修正後のコードがよくわからないので、オリジナルのコードを共有します。ソースコードの両方のコピーをアップロードします、よろしくお願いします。
-
オリジナル版:リンク https://pan.baidu.com/s/1NSmOeSlpHqU1OFFTcS_kcA 抽出コード: r0ba
-
改良版:リンク https://pan.baidu.com/s/1-_uiZKRdH-OBVq1-ES9JaA 抽出コードです。53yt
関連
-
Pythonです。pandasのiloc, loc, ixの違いと連携について
-
undefinedImportError: 必要な依存関係['Numpy']がありません。
-
Python は '' で '__main__' モジュールを見つけることができません。
-
adb デバイス オフライン
-
Pythonの実行時にSyntaxError: invalid syntaxが発生した場合の対処方法
-
Pythonインストールモジュールエラー AttributeError: モジュール 'pip' には 'main' という属性がありません。
-
[Python 標準ライブラリ] math--math 関数
-
Python Djangoプロジェクトログクエリシステム
-
jupyter notebookのアンインストールで "The jupyter" distribution was not found 問題が発生する。
-
plt.acorr() 関数の使用例 - ValueError: object too deep for desired array (オブジェクトが深すぎて、必要な配列が得られない)
最新
-
nginxです。[emerg] 0.0.0.0:80 への bind() に失敗しました (98: アドレスは既に使用中です)
-
htmlページでギリシャ文字を使うには
-
ピュアhtml+cssでの要素読み込み効果
-
純粋なhtml + cssで五輪を実現するサンプルコード
-
ナビゲーションバー・ドロップダウンメニューのHTML+CSSサンプルコード
-
タイピング効果を実現するピュアhtml+css
-
htmlの選択ボックスのプレースホルダー作成に関する質問
-
html css3 伸縮しない 画像表示効果
-
トップナビゲーションバーメニュー作成用HTML+CSS
-
html+css 実装 サイバーパンク風ボタン
おすすめ
-
'dict' オブジェクトには 'has_key' という属性がありません。
-
Resolve "ImportError: cannot import name 'imresize'"."
-
問題解決しました。Pythonを起動しても「ImportError: No module named site" というエラーでPythonを起動する。
-
python3 のモジュール "importlib._bootstrap" に "SourceFileLoader" という属性がない問題を解決する。
-
AttributeError: モジュール 'time' には属性 'clock' がありません。
-
PyQt5演習:matplotlibでプロットする
-
Python|ModuleNotFoundErrorを解決する。utils' という名前のモジュールがありません。
-
妖精が跳ねるのを見たことがありますか?pythonで小さな妖精のコードバウンス動画を作ろう
-
dict_keys' オブジェクトはインデックス作成ソリューションに対応していません。
-
Pycharmの未解決の参照問題