Springboot2 統合 oauth2
1. 背景
springboot 1.5.X から springboot 2.0.0 へのプロジェクトのアップグレードに伴い、コンポーネント API と依存パッケージが変更されました。
プロジェクトの全デモ コードクラウド
2.春のセキュリティ
Spring Security入門から上級までのチュートリアルシリーズ http://www.spring4all.com/article/428
-
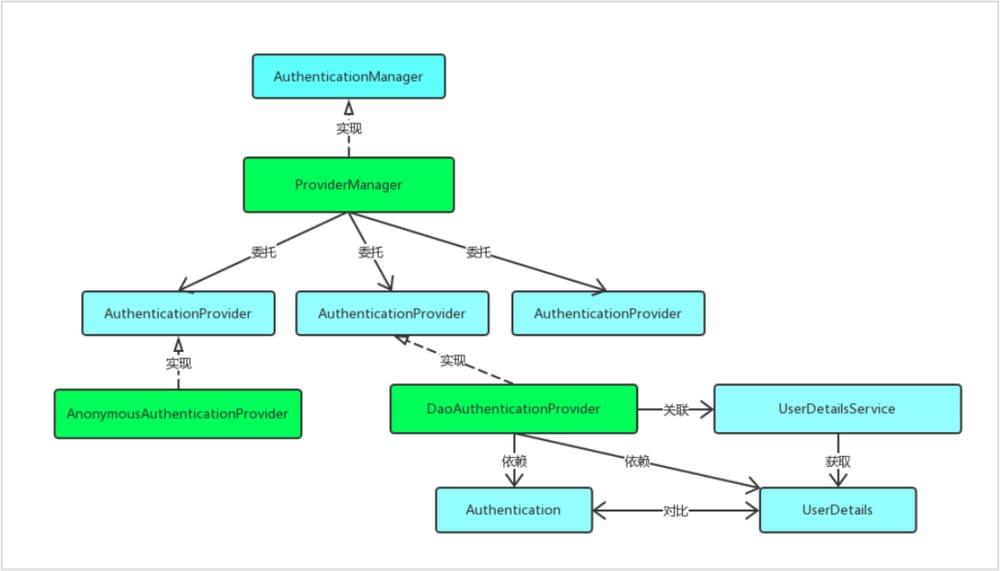
スプリングセキュリティアーキテクチャ図
-
認証プロセス

3.OAuth2について
- OAuth2 の基本概念 URL:http://www.ruanyifeng.com/blog/2014/05/oauth_2_0.html
- OAuth2は3つのパートに分かれています:1認証サーバー 2リソースサーバー 3サードパーティアプリケーション
- OAuth2 には 4 つの認証モードがあります:1 認証コードモード 2 簡易モード 3 パスワードモード 4 クライアントモード
4. springboot2+oauth2使用時の注意点
- プロジェクトのビルド参照URLです。
https://blog.csdn.net/qq_19671173/article/details/79748422
http://wiselyman.iteye.com/blog/2411813
4.1. pom.xml ファイルに依存パッケージの変更をインポートする
        <! -- springboot2.0 has integrated oauth2.0 with security -->
        <dependency>
            <groupId>org.springframework.boot</groupId>
            <artifactId>spring-boot-starter-security</artifactId>
        </dependency>
        <! -- Since some annotations and APIs were removed from spring security 5.0, the following dependency packages need to be imported -- >
        <dependency>
            <groupId>org.springframework.security.oauth.boot</groupId>
            <artifactId>spring-security-oauth2-autoconfigure</artifactId>
            <version>2.0.0.RELEASE</version>
        </dependency>
        <! -- redis-related dependency packages -->
        <dependency>
            <groupId>org.springframework.boot</groupId>
            <artifactId>spring-boot-starter-data-redis</artifactId>
        </dependency>
        <dependency>
            <groupId>org.apache.commons</groupId>
            <artifactId>commons-pool2</artifactId>
        </dependency>
4.2. トークンを格納するために RedisTokenStore を直接使用すると、NoSuchMethodError RedisConnection.set([B[B]V エラー)
解決策 独自の MyRedisTokenStore を作成し、RedisTokenStore クラスのコードをコピーして、conn.set(accessKey, serializedAccessToken) から conn.stringCommands().set( accessKey, serializedAccessToken) にコードを変更すること。
4.3. フロントエンドとバックエンドを分離した場合、クロスドメインに問題がある
解決策
- 解決策1 バックエンドでcorsFilterを登録する
import org.springframework.boot.web.servlet.FilterRegistrationBean;
import org.springframework.context.annotation;
import org.springframework.context.annotation;
import org.springframework.core;
import org.springframework.web.cors;
import org.springframework.web.cors.UrlBasedCorsConfigurationSource;
import org.springframework.web.filter.CorsFilter;

@Configuration
public class CorsConfig {
    private CorsConfiguration buildConfig() {
        CorsConfiguration corsConfiguration = new CorsConfiguration();
        // 1
        corsConfiguration.addAllowedOrigin("*");
        // 2
        corsConfiguration.addAllowedHeader("*");
        // 3
        corsConfiguration.addAllowedMethod("*");
        corsConfiguration.setAllowCredentials(true);
        return corsConfiguration;
    }

    @Bean
    public FilterRegistrationBean corsFilter() {
        UrlBasedCorsConfigurationSource source = new UrlBasedCorsConfigurationSource();
        // step 4
        source.registerCorsConfiguration("/*", buildConfig());
        FilterRegistrationBean bean = new FilterRegistrationBean(new CorsFilter(source));
        bean.setOrder(Ordered.HIGHEST_PRECEDENCE);
        return bean;
    }
}
- オプション2、スタータークラスでIOCコンテナにBeanを追加する。
@SpringBootApplication
public class ZuulServerApplication {

    public static void main(String[] args) {
        SpringApplication.run(ZuulServerApplication.class, args);
    }

    /**
     * Solve the cross-domain problem of front- and back-end separation
     *
     * @return
     */
    @Bean
    public CorsFilter corsFilter() {
        final UrlBasedCorsConfigurationSource source = new UrlBasedCorsConfigurationSource();
        final CorsConfiguration config = new CorsConfiguration();
        config.setAllowCredentials(true);
        config.addAllowedOrigin("*");
        config.addAllowedHeader("*");
        config.addAllowedMethod("*");
        source.registerCorsConfiguration("/*", config);
        return new CorsFilter(source);
    }

}
4.4. フロントエンドとバックエンドの分離、ログインページをフロントエンドに配置した場合のログインの不具合
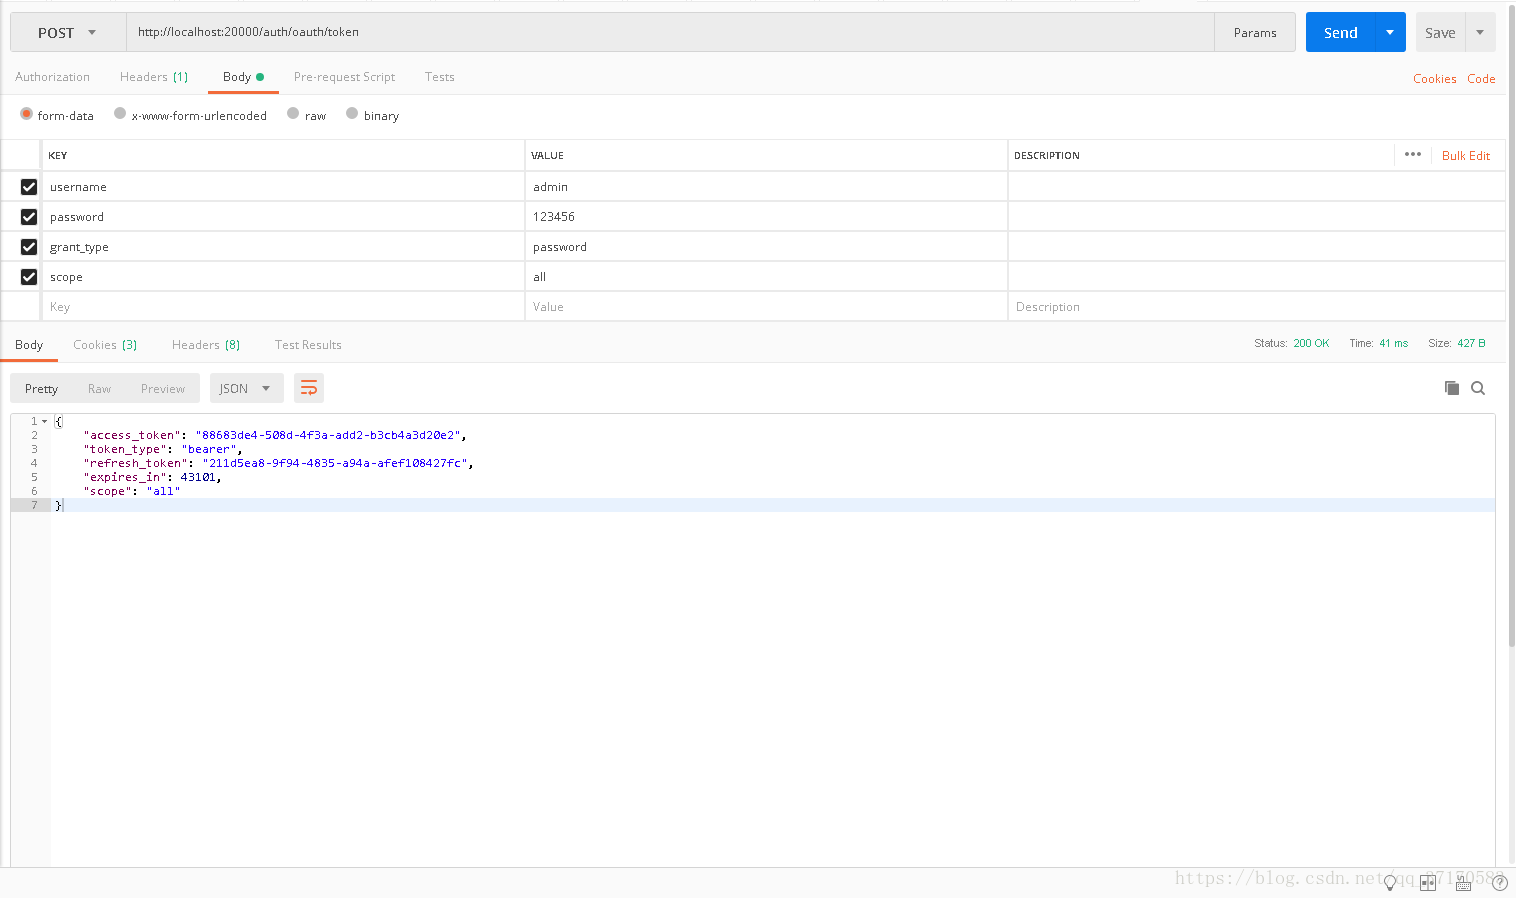
解決方法 パスワードによる認証モード
- http://localhost:20000/auth/oauth/token にアクセスするために post リクエストを使用します。
- リクエストヘッダに新しいヘッダを追加します:key=Authorization, value=Basic Y2xpZW50OnNlY3JldA==
(Y2xpZW50OnNlY3JldA==は64エンコード、フォーマット:client:secret)
-
フォームデータで渡すパラメータ:username(ユーザーアカウント)、password(ユーザーパスワード)、grant_type(固定値:パスワード)、scope(スコープ)。
4.5. リソースサーバーへのアクセス
- 認証サーバからトークンを取得した場合、リソースサーバにアクセスする方法は次の3つです。
- ヘッダで運ぶ:key=Authorization, value=bearer 797c4200-8b10-4a2b-8764-33397749a8f7
- URLのスプライス: http://localhost:8088/user?access_token=797c4200-8b10-4a2b-8764-33397749a8f7
- フォーム形式: name=access_token, value=797c4200-8b10-4a2b-8764-33397749a8f7 の場合。
4.6. Spring セキュリティパスワードの設定に関する問題
- Spring Security 5.0以降のシークレットパスワードの設定は、{暗号化方式}の形式である必要があります。+ 暗号化されたパスワード
- 現在のバージョン5では、暗号化方式に対応しました。
bcrypt - BCryptPasswordEncoder (エンコーディングにも使用されます)
ldap - LdapShaPasswordEncoder (パスワードエンコーダ)
MD4 - Md4PasswordEncoder(パスワードエンコーダ
MD5 - new MessageDigestPasswordEncoder("MD5")
noop - NoOpPasswordEncoder(ノーオプパスワードエンコーダー
pbkdf2 - Pbkdf2PasswordEncoder
scrypt - SCryptPasswordEncoder。
SHA-1 - new MessageDigestPasswordEncoder("SHA-1")
SHA-256 - 新しい MessageDigestPasswordEncoder("SHA-256")
sha256 - スタンダードパスワードエンコーダ
4.7. spring securityのロールで保護されたインターフェイスへのアクセスを制限する
- 設定クラスまたはスタータークラスにアノテーション @EnableGlobalMethodSecurity(securedEnabled = true)を追加します。
@EnableOAuth2Sso
@Configuration
@EnableGlobalMethodSecurity(securedEnabled = true)
public class SecurityConfig extends WebSecurityConfigurerAdapter{
    @Override
    protected void configure(HttpSecurity http) throws Exception {
        http.authorizeRequests()
                . antMatchers("/index")
                .permitAll()
                .anyRequest()
                .authenticated();
    }
}
- コントローラのクラスまたはメソッドにアノテーションを追加する @Secured("ROLE_ADMIN")
package com.bici.controller;

import org.springframework.security.access.annotation.Secured;
import org.springframework.security.core.Authentication;
import org.springframework.security.core.context.SecurityContextHolder;
import org.springframework.stereotype;
import org.springframework.web.bind.annotation;
import org.springframework.web.bind.annotation;
import org.springframework.web.bind.annotation;
import org.springframework.web.bind.annotation;

import javax.servlet.http.HttpServletRequest;
import javax.servlet.http.HttpSession;

/**
 * @author: [email protected]
 * @date: 2018/4/17
 */
@RestController
@RequestMapping("/client")
@Secured("ROLE_ADMIN")
public class ClientController {

    @GetMapping("/user")
    public Authentication getUser() {
        Authentication authentication = SecurityContextHolder.getContext().getAuthentication();
        return authentication;
    }

    @GetMapping("/index")
    @Secured("ROLE_USER")
    public String index() {
        return "index";
    }
}
4.8. データベースに保存されている暗号化された暗号文を、カスタム暗号を使用して検証する
- EnableWebSecurityアノテーションのメソッドにコードを記述します。
import com.bici.encrypt.EncryptUtil;
import org.springframework.beans.factory.annotation.Autowired;
import org.springframework.beans.factory.annotation.Qualifier;
import org.springframework.context.annotation;
import org.springframework.security.authentication.AuthenticationManager;
import org.springframework.security.config.annotation.authentication.builders.AuthenticationManagerBuilder;
import org.springframework.security.config.annotation.method.configuration.EnableGlobalMethodSecurity;
import org.springframework.security.config.annotation.web.builders.HttpSecurity;
import org.springframework.security.config.annotation.web.configuration.EnableWebSecurity;
import org.springframework.security.config.annotation.web.configuration.WebSecurityConfigurerAdapter;
import org.springframework.security.core.userdetails.UserDetailsService;
import org.springframework.security.crypto.password;

@EnableWebSecurity
public class SecurityConfig extends WebSecurityConfigurerAdapter {

    @Bean
    @Override
    public AuthenticationManager authenticationManagerBean() throws Exception {
        return super.authenticationManagerBean();
    }

    @Qualifier("userDetailsService")
    @Autowired
    private UserDetailsService userDetailsService;

    @Override
    protected UserDetailsService userDetailsService() {
        // Custom user information class
        return this.userDetailsService;
    }

    @Override
    protected void configure(AuthenticationManagerBuilder auth) throws Exception {
        auth.userDetailsService(userDetailsService).passwordEncoder(new PasswordEncoder(){
            @Override
            public String encode(CharSequence charSequence) {
                // encrypt
                return EncryptUtil.hashPasswordAddingSalt(charSequence.toString());
            }
            @Override
            public boolean matches(CharSequence charSequence, String s) {
                // Password check
                return EncryptUtil.isValidPassword(charSequence.toString(), s);
            }
        }) ;
    }
}
4.9. 戻り値通知の設定によるトークンの取得
ここでトークンとユーザー名をキャッシュに保存しておけば、ユーザーを強制的にオフラインにする必要があるときに、ユーザー名でキャッシュからトークンを検索して
ConsumerTokenServices
は、その
revokeToken(token)
メソッドを使用します。
package com.zkane.aspect;

import org.aspectj.lang.annotation.AfterReturning;
import org.aspectj.lang.annotation.Aspect;
import org.aspectj.lang.annotation.Pointcut;
import org.springframework.beans.factory.annotation.Autowired;
import org.springframework.http.HttpRequest;
import org.springframework.http.ResponseEntity;
import org.springframework.security.core.Authentication;
import org.springframework.security.core.context;
import org.springframework.security.oauth2.common.OAuth2AccessToken;
import org.springframework.stereotype.Component;
import org.springframework.web.context.request.RequestContextHolder;
import org.springframework.web.context.request.ServletRequestAttributes;

import javax.servlet.http.HttpServlet;
import javax.servlet.http.HttpServletRequest;

/**
 * @author: [email protected]
 * @review:
 * @date: 2018/8/24
 */
@Aspect
@Component
public class TokenAspect {

    @Pointcut("execution(* org.springframework.security.oauth2.provider.endpoint.TokenEndpoint.postAccessToken(...)) ")
    private void token() {
    }

    @AfterReturning(returning = "obj", pointcut = "token()")
    public void doAfterReturning(ResponseEntity<OAuth2AccessToken> obj) throws Exception {
        HttpServletRequest request = ((ServletRequestAttributes) RequestContextHolder.getRequestAttributes()).getRequest();
        // Print the user name
        System.out.println(request.getParameter("username"));
        // print the token
        System.out.println(obj.getBody().getValue());
    }
}
5. 不備な点またはその後の改善点
5.1. データに保存されたクライアント情報
- sqlステートメントの作成
CREATE TABLE `oauth_client_details` (
  `client_id` varchar(256) NOT NULL,
  `resource_ids` varchar(256) DEFAULT NULL,
  `client_secret` varchar(256) DEFAULT NULL,
  `scope` varchar(256) DEFAULT NULL,
  `authorized_grant_types` varchar(256) DEFAULT NULL, `authorized_grant_types` varchar(256) DEFAULT NULL,
  `web_server_redirect_uri` varchar(256) DEFAULT NULL,
  `authorities` varchar(256) DEFAULT NULL,
  `access_token_validity` int(11) DEFAULT NULL,
  `refresh_token_validity` int(11) DEFAULT NULL,
  `additional_information` varchar(4096) DEFAULT NULL,
  `autoapprove` varchar(256) DEFAULT NULL,
  PRIMARY KEY (`client_id`)
) ENGINE=InnoDB DEFAULT CHARSET=utf8;

INSERT INTO oauth_client_details (
	client_id,
	resource_ids,
	client_secret,
	scope,
	authorized_grant_types,
	web_server_redirect_uri,
	authorities,
	access_token_validity,
	refresh_token_validity,
	additional_information,
	autoapprove
)
VALUES
	(
		'client',
		NULL,
		'{noop}secret',
		'all',
		'password,authorization_code,refresh_token,implicit,client_credentials',
		NULL,
		NULL,
		NULL,
		NULL,
		NULL,
		'true'
	);
- クライアント情報をjdbcとして設定する
@Configuration
@EnableAuthorizationServer
public class ServerConfig extends AuthorizationServerConfigurerAdapter {
    @Override
    public void configure(ClientDetailsServiceConfigurer clients) throws Exception {
        clients.jdbc(dataSource);
    }
}
5.2. フロントエンドとバックエンドの分離、シングルサインオン問題への対応
- 現在、オンラインでダウンロード可能なデモを通じて、サードパーティアプリケーションのフロントエンドとバックエンドを分離してログインする方法について調べていない。
- サードパーティアプリケーションは、一般的にリクエストによってページが転送されると、認証センターにログインしに行きます。つまり、フロントエンドとバックエンドが分離されていない場合、アノテーションの@EnableOAuth2Ssoを使用します。
- 解決策の提案:フロントエンドから独自のログインページにジャンプし、ログイン成功後にトークンを使って元のシステムに戻る。
5.3. フロントエンドのjsonを返すときのパスワードエラーは、カスタムリターンコンテンツを実装していません。
{
    "error": "invalid_grant",
    "error_description": "Bad credentials"
}
アップデート 2018-04-28
フロントエンドに返すログインエラーメッセージのカスタマイズ
- spring-security-core5.0.3.RELEASE ⇄ Springframework_zh_CN.properties を resources ディレクトリにコピーします。
- スタートアップクラスにコードを記述する
@SpringBootApplication
public class Application {
    public static void main(String[] args) {
        SpringApplication.run(Application.class, args);
    }

    @Bean
    public ReloadableResourceBundleMessageSource messageSource() {
        ReloadableResourceBundleMessageSource messageSource = new ReloadableResourceBundleMessageSource();
        messageSource.setBasename("classpath:messages");
        return messageSource;
    }
}
- 効果を表示するために、必要に応じてmessages_zh_CN.propertiesにerror_descriptionを記述します。
{
    "error": "invalid_grant",
    "error_description": "Account not registered, please contact admin"
}
関連
-
ブラウザの警告 ダウンロードしたフォントのデコードに失敗しました システムページのフォントアイコンが読み込まれていません(オンライン環境のフォントアイコンが表示されていません)。
-
リソースの読み込みに失敗しました: サーバーはステータス 404 で応答しました ()
-
[問題解決】JSONパースエラー。不正な非引用符合文字 ((CTRL-CHAR, code 13)): を使ってエスケープする必要があります。
-
java.nio.charset.MalformedInputException を解決します。Input length = 1 (mybatisバインディングが失敗する2つの理由)
-
ローカルリソースのロードが許可されていません。エラー解決
最新
-
nginxです。[emerg] 0.0.0.0:80 への bind() に失敗しました (98: アドレスは既に使用中です)
-
htmlページでギリシャ文字を使うには
-
ピュアhtml+cssでの要素読み込み効果
-
純粋なhtml + cssで五輪を実現するサンプルコード
-
ナビゲーションバー・ドロップダウンメニューのHTML+CSSサンプルコード
-
タイピング効果を実現するピュアhtml+css
-
htmlの選択ボックスのプレースホルダー作成に関する質問
-
html css3 伸縮しない 画像表示効果
-
トップナビゲーションバーメニュー作成用HTML+CSS
-
html+css 実装 サイバーパンク風ボタン
おすすめ
-
ハートビート・エフェクトのためのHTML+CSS
-
HTML ホテル フォームによるフィルタリング
-
HTML+cssのボックスモデル例(円、半円など)「border-radius」使いやすい
-
HTMLテーブルのテーブル分割とマージ(colspan, rowspan)
-
ランダム・ネームドロッパーを実装するためのhtmlサンプルコード
-
Html階層型ボックスシャドウ効果サンプルコード
-
QQの一時的なダイアログボックスをポップアップし、友人を追加せずにオンラインで話す効果を達成する方法
-
sublime / vscodeショートカットHTMLコード生成の実装
-
HTMLページを縮小した後にスクロールバーを表示するサンプルコード
-
html のリストボックス、テキストフィールド、ファイルフィールドのコード例