Pythonクローラー共通ライブラリリクエスト、beautifulsoup、selenium、xpathまとめ
Pythonクローラー共通ライブラリまとめ:requests, beautifulsoup, selenium, xpath まとめ

記事の目次
高速サードパーティライブラリをインストールすることを忘れないでください、Pythonはしばしばサードパーティライブラリをインストールする必要がある、元のダウンロード速度は非常に遅いですが、国内のミラーを使用することは非常に高速です
pip3 install -i https://pypi.tuna.tsinghua.edu.cn/simple package name
公式URLです。
リクエスト
<ブロッククオート公式ドキュメントのリクエスト https://docs.python-requests.org/zh_CN/latest/

<ブロッククオートクロールするには、まず URL をリクエストする必要があります。そこで、requests モジュールの出番です。requests は python 用の HTTP クライアントライブラリで、urllib や urllib2 と似ています。urllib や urllib2 に比べて、requests モジュールの構文はずっと単純です。公式サイトにも書いてある通りです。
リクエストモジュールの紹介
httpリクエストの送信とレスポンスデータの取得
requests モジュールはサードパーティ製のモジュールで、python (仮想) 環境に追加でインストールする必要があります。
pip/pip3 install requests
#https://beishan.blog.csdn.net/
import requests
# target url
url = 'https://www.baidu.com'
# send a get request to the target url
response = requests.get(url)
# Print the response
print(response.text)
リクエストベース
リクエストモジュールは get リクエストを送信します
import requests
url = 'https://www.baidu.com'
# Send a get request to the target url
response = requests.get(url)
# Print the response
# print(response.text)
print(response.content.decode()) # Pay attention here!
レスポンス応答オブジェクト
<ブロッククオートこれは、コーデックが異なる文字セットを使用しているためです。中国語の文字化けの問題を解決するために、次のソリューションを使用してみてください。
charset
- response.text は chardet モジュールによって推測されたエンコードされた文字セットに従って requests モジュールによってデコードされた結果です。
- ネットワークで送信される文字列はbyte型なので、response.text = response.content.decode('the presumed encoded character set')となります。
-
ウェブページのソースコードを検索して
response.content.decode()で、そのエンコードされた文字セットを参照しようとすると、不正確なものがあることに気が付く
response.textとresponse.contentの違いについて
-
<マーク
レスポンス.テキスト
- タイプ: str
- デコードの種類。リクエストモジュールは自動的に、HTTP ヘッダと推定されるテキストエンコーディングに基づいて、レスポンスのエンコーディングについて推測します。
-
<マーク
レスポンス.コンテンツ
- タイプ:バイト
- デコードタイプ:指定なし
中国語の文字化けを解消する
response.contentのデコードによる中国語の文字化けの解消
-
response.content.decode("GBK")デフォルトのutf-8 -
# https://beishan.blog.csdn.net/ # 1.2.3-Other common properties of response import requests # target url url = 'https://www.baidu.com' # Send a get request to the target url response = requests.get(url) # Print the response # print(response.text) # print(response.content.decode()) # Pay attention here! print(response.url) # Print the url of the response print(response.status_code) # Print the status code of the response print(response.request.headers) # Print the request headers of the response object print(response.headers) # Print the response headers print(response.request._cookies) # Print the cookies carried by the request print(response.cookies) # Print the cookies carried in the response -
一般的な符号化文字集合
- utf-8
- gbk
- gb2312
- アスキューコード
- アイソ8859-1
その他、レスポンス応答オブジェクトの共通プロパティまたはメソッド
import requests
url = 'https://www.baidu.com'
response = requests.get(url)
print(response.content.decode())
# Print the request header information for the response to the corresponding request
print(response.request.headers)
リクエストのハンズオン
リクエストモジュールはリクエストを送信します
ヘッダ付きリクエストの送信
Baiduの1ページ目を取得するコードを書いてみましょう。
import requests

url = 'https://www.baidu.com'

headers = {"User-Agent": "Mozilla/5.0 (Windows NT 10.0; Win64; x64) AppleWebKit/537.36 (KHTML, like Gecko) Chrome/54.0.2840.99 Safari/537.36"}

# Bring the User-Agent in the request header to simulate a browser sending the request
response = requests.get(url, headers=headers)

print(response.content)

# Print the request header information
print(response.request.headers)
ブラウザからUser-Agentをコピーし、ヘッダー辞書を構築します。以下のコードが完了したら、コードを実行し、結果を確認します。
?
パラメータを指定してリクエストを送信する
<ブロッククオート
Baiduの検索を使用すると、URLアドレスに
import requests

headers = {"User-Agent": "Mozilla/5.0 (Windows NT 10.0; Win64; x64) AppleWebKit/537.36 (KHTML, like Gecko) Chrome/54.0.2840.99 Safari/537.36"}

url = 'https://www.baidu.com/s?wd=python'

response = requests.get(url, headers=headers)
そして、そのクエスチョンマークの後に続くものがリクエストパラメータで、クエリストリングとも呼ばれます。
urlにパラメータを持ち、パラメータを含むurlに直接リクエストを行う。
import requests

headers = {"User-Agent": "Mozilla/5.0 (Windows NT 10.0; Win64; x64) AppleWebKit/537.36 (KHTML, like Gecko) Chrome/54.0.2840.99 Safari/537.36"}

# This is the target url
# url = 'https://www.baidu.com/s?wd=python'

# The result is the same with or without the question mark at the end
url = 'https://www.baidu.com/s?'

# The request parameter is a dictionary i.e. wd=python
kw = {'wd': 'python'}

# Launch the request with the request parameters and get the response
response = requests.get(url, headers=headers, params=kw)

print(response.content)
paramsでパラメータの辞書を持ち歩く
1. リクエストパラメーターの辞書を構築する
2. パラメータ辞書をparamsに設定し、インターフェイスにリクエストを送信する
import requests

url = 'https://github.com/USER_NAME'

# Construct a dictionary of request headers
headers = {
    # The User-Agent copied from the browser
    'User-Agent': 'Mozilla/5.0 (Windows NT 10.0; Win64; x64) AppleWebKit/537.36 (KHTML, like Gecko) Chrome/67.0.3396.87 Safari/537.36',
    # Cookies copied from the browser
    'Cookie': 'xxx here is the cookie string copied over'
}

# The cookie string is carried in the dictionary of request header parameters
resp = requests.get(url, headers=headers)

print(resp.text)
- ブラウザからUser-AgentとCookieをコピーします。
- ブラウザのリクエストヘッダーフィールドと値は、headersパラメータにあるものと一致しなければならない
- headersリクエストパラメーター辞書のCookieキーに対応する値は、文字列
response = requests.get(url, timeout=3)
タイムアウトパラメーターtimeoutの使用
<ブロッククオートネットサーフィンをしていると、ネットワークが不安定になり、リクエストしても結果が出ず、時間がかかることがよくあります。
クローラーでは、結果を得るまでに時間がかかるリクエストはプロジェクト全体を非常に非効率にしてしまうので、特定の時間内に結果を返すか、エラーを報告するように強制する必要があるのです。
-
タイムアウトパラメーターtimeoutの使用方法
import requests url = 'https://twitter.com' response = requests.get(url, timeout=3) # Set timeout response = requests.post(url, data) data -
timeout=3 の意味は、リクエストを送信してから3秒以内にレスポンスを返す。
pip3 install -i https://pypi.tuna.tsinghua.edu.cn/simple beautifulsoup4
ポストリクエストの送信方法
-
from bs4 import BeautifulSoup html_doc = """The Dormouse's story The Dormouse's story
Once upon a time there were three little sisters; and their names were Elsie , Lacie and Tillie ; and they lived at the bottom of a well.
...
""" soup = BeautifulSoup(html_doc,"lxml") soup.title <title>The Dormouse's story</title> soup.title.name 'title' soup.title.string "The Dormouse's story" soup.title.text "The Dormouse's story" soup.title.parent.name 'head' soup.p <p class="title"><b>The Dormouse's story</b></p> soup.p.name 'p' soup.p["class"] ['title'] soup.a <a class="sister" href="http://example.com/elsie" id="link1">Elsie</a> soup.find("a") <a class="sister" href="http://example.com/elsie" id="link1">Elsie</a> soup.find_all("a") [<a class="sister" href="http://example.com/elsie" id="link1">Elsie</a>, <a class="sister" href="http://example.com/lacie" id="link2">Lacie</a>, <a class="sister" href="http://example.com/tillie" id="link3">Tillie</a>] for link in soup.find_all("a"): print(link.get("href")) http://example.com/elsie http://example.com/lacie http://example.com/tillie print(soup.get_text()) The Dormouse's story The Dormouse's story Once upon a time there were three little sisters; and their names were Elsie, Lacie and Tillie; and they lived at the bottom of a well. ... パラメータは辞書を受け取ります
-
requests モジュールの send-post リクエスト関数の他のパラメータは、 send-get リクエストのパラメータと同じです。
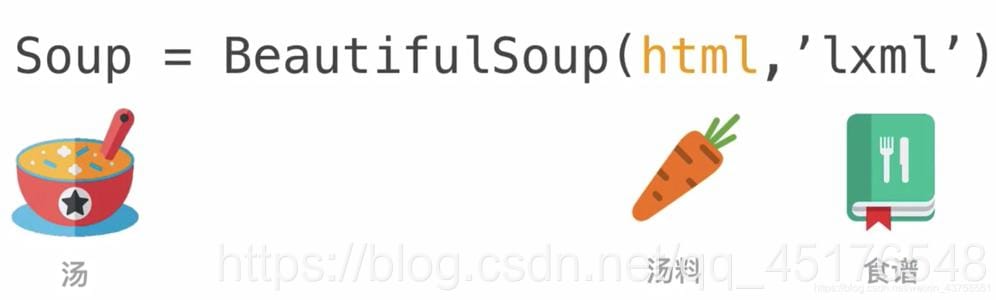
ビューティフルスープ
<ブロッククオートBeautifulSoup公式ドキュメント https://beautifulsoup.readthedocs.io/zh_CN/v4.4.0/
<ブロッククオートBeautiful Soupは、HTMLやXMLファイルからデータを抽出することができるPythonライブラリです。お気に入りのコンバータを使って、通常の方法でドキュメントをナビゲートしたり、検索したり、修正したりすることができます。
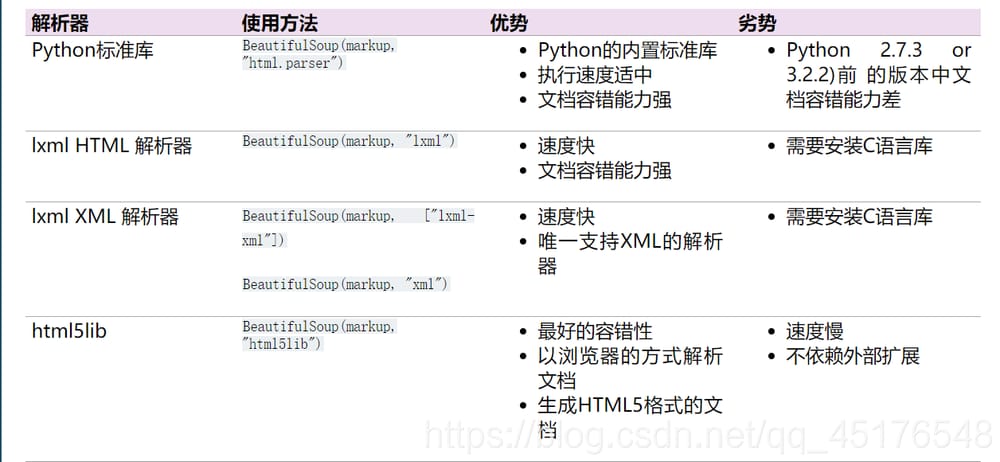
一般的なインタープリターの長所と短所
共通アクション
<ブロッククオートインストール方法
soup = BeautifulSoup('
Extremely bold
')
tag = soup.b
tag

<b class="boldest">Extremely bold</b>

type(tag)

bs4.element.Tag
輸入するだけ
tag.name

'b'
tag.name = "blockquote"
tag

<blockquote class="boldest">Extremely bold</blockquote>
tag["class"]

['boldest']

tag.attrs

{'class': ['boldest']}
構造化データをナビゲートする簡単な方法
tag["class"] = "verybold"
tag["id"] = 1
tag

<blockquote class="verybold" id="1">Extremely bold</blockquote>

del tag["class"]
tag

<blockquote id="1">Extremely bold</blockquote>

css_soup = BeautifulSoup('
')
css_soup.p['class']

['body', 'strikeout']

css_soup = BeautifulSoup('
')
css_soup.p['class']

['body']
tag.string

'Extremely bold'

type(tag.string)

bs4.element.NavigableString
tag.string.replace_with("No longer bold")
tag

<blockquote id="1">No longer bold</blockquote>
markup = "
comment

'Hey, buddy. want to buy a used parser?'
print(soup.prettify())

<html>
 <body>
  <b>
   <! --Want to buy a used parser?-->
  </b>
 </body>
</html>

from bs4 import CData
cdata = CData("A CDATA block")
comment.replace_with(cdata)
print(soup.b.prettify())

<b>
 <! [CDATA[A CDATA block]]>
</b>

html_doc = """

The Dormouse's story
The Dormouse's story
Once upon a time there were three little sisters; and their names were

Elsie
,

Lacie
 and

Tillie
;
and they lived at the bottom of a well.
...

"""

from bs4 import BeautifulSoup

soup = BeautifulSoup(html_doc,"html.parser")
soup.head

<head><title>The Dormouse's story</title></head>

soup.title

<title>The Dormouse's story</title>
soup.body.b

<b>The Dormouse's story</b>
soup.a

<a class="sister" href="http://example.com/elsie" id="link1">Elsie</a>
soup.find_all("a")

[<a class="sister" href="http://example.com/elsie" id="link1">Elsie</a>,
 <a class="sister" href="http://example.com/lacie" id="link2">Lacie</a>,
 <a class="sister" href="http://example.com/tillie" id="link3">Tillie</a>]

head_tag = soup.head
head_tag

<head><title>The Dormouse's story</title></head>

head_tag.contents

[<title>The Dormouse's story</title>]

head_tag.contents[0]

<title>The Dormouse's story</title>

head_tag.contents[0].contents

["The Dormouse's story"]
from selenium import webdriver

# If driver is not added to the environment variable, you need to assign the absolute path of driver to the executable_path parameter
# driver = webdriver.Chrome(executable_path='/home/worker/Desktop/driver/chromedriver')

# If driver adds environment variables, you don't need to set executable_path
driver = webdriver.Chrome()

# Make a request to a url
driver.get("http://www.itcast.cn/")

# Save the web page as an image, screenshots will not work with Google Chrome versions 69 and above
# driver.save_screenshot("itcast.png")

print(driver.title) # Print the title of the page

# Exit the simulated browser
driver.quit() # Be sure to quit! There will be residual processes if you don't exit!
from selenium import webdriver

# Specify the absolute path to the driver
driver = webdriver.PhantomJS(executable_path='/home/worker/Desktop/driver/phantomjs')
# driver = webdriver.Chrome(executable_path='/home/worker/Desktop/driver/chromedriver')

# Make a request to a url
driver.get("http://www.itcast.cn/")

# Save the page as a screenshot
driver.save_screenshot("itcast.png")

# Exit the simulated browser
driver.quit() # Be sure to quit! There will be residual processes if you don't quit!
import time
from selenium import webdriver

# Instantiate the driver object by specifying the path to the chromedriver, which is placed in the current directory.
# driver = webdriver.Chrome(executable_path='. /chromedriver')
# chromedriver has added environment variables
driver = webdriver.Chrome()

# Control browser access to the url address
driver.get("https://www.baidu.com/")

# Search for 'python' in the Baidu search box
driver.find_element_by_id('kw').send_keys('python')
# Click 'Baidu search'
driver.find_element_by_id('su').click()

time.sleep(6)
# Exit the browser
driver.quit()

webdriver.Chrome(executable_path='. /chromedriver')
driver.find_element_by_id('kw').send_keys('python')
driver.find_element_by_id('su').click()
driver.find_element_by_id('su').click()
pip install lxml
from lxml import etree
/li/a/@href This should get the content of the href
/li/a/text() This gets the text content

h=etree.HTML(response.text)#response.text is the source code of the page
h.xpath('//img') #Find all img nodes,
h.xpath('//div').xpath('. //img')#find all img nodes under all divs
<a class="sister" href="http://example.com/elsie" id="link1">Elsie</a>
soup.find_all("a")
[<a class="sister" href="http://example.com/elsie" id="link1">Elsie</a>,
 <a class="sister" href="http://example.com/lacie" id="link2">Lacie</a>,
 <a class="sister" href="http://example.com/tillie" id="link3">Tillie</a>]
ドキュメントからすべての < a> タグへのリンクを検索します。
for link in soup.find_all("a"):
    print(link.get("href"))
http://example.com/elsie
http://example.com/lacie
http://example.com/tillie
ドキュメント内のすべてのテキストコンテンツを取得する
print(soup.get_text())
The Dormouse's story

The Dormouse's story
Once upon a time there were three little sisters; and their names were
Elsie,
Lacie and
Tillie;
and they lived at the bottom of a well.
...
タグや属性で取得する
- タグには多くのメソッドや属性があり、ドキュメントツリーの走査やドキュメントツリーの検索について詳しく説明されています。ここでは、タグの属性の中で最も重要な、名前と属性について紹介します。
soup = BeautifulSoup('
Extremely bold
')
tag = soup.b
tag
<b class="boldest">Extremely bold</b>
type(tag)
bs4.element.Tag
名前属性
- 各タグにはそれぞれ名前があり、.nameから取得されます。
tag.name
'b'
- タグの名前が変更されると、現在のBeautiful Soupオブジェクトが生成するすべてのHTMLドキュメントに影響します
tag.name = "blockquote"
tag
<blockquote class="boldest">Extremely bold</blockquote>
複数の属性
- タグは多くの属性を持つことができます。 は "class" 属性で、値は "boldest" です。タグの属性は、辞書と同じように操作します。
tag["class"]
['boldest']
tag.attrs
{'class': ['boldest']}
- タグの属性は、追加、削除、変更が可能です。ここでも、タグの属性は辞書と同じように操作されます
tag["class"] = "verybold"
tag["id"] = 1
tag
<blockquote class="verybold" id="1">Extremely bold</blockquote>
del tag["class"]
tag
<blockquote id="1">Extremely bold</blockquote>
マルチバリュー属性
css_soup = BeautifulSoup('
')
css_soup.p['class']
['body', 'strikeout']
css_soup = BeautifulSoup('
')
css_soup.p['class']
['body']
トラバース可能な文字列
- 文字列は多くの場合、タグの中に含まれています。Beautiful SoupはNavigableStringクラスを使って、タグの中の文字列をラップしています。
tag.string
'Extremely bold'
type(tag.string)
bs4.element.NavigableString
-
NavigableString文字列は、PythonのUnicode文字列と同じです。
また、ドキュメントツリーの走査や検索に含まれる機能の一部もサポートしています。
unicode()メソッドを使用すると、NavigableStringオブジェクトを直接Unicode文字列に変換することができます。 -
タグに含まれる文字列は編集できませんが、replace_with()メソッドで他の文字列に置き換えることができます。
tag.string.replace_with("No longer bold")
tag
<blockquote id="1">No longer bold</blockquote>
コメントと特殊文字列
- ドキュメントのコメント欄
markup = "
'Hey, buddy. want to buy a used parser?'
type(comment)
bs4.element.Comment
- Commentオブジェクトは、特殊な型のNavigableStringオブジェクトである。
comment
'Hey, buddy. want to buy a used parser?'
しかし、HTML文書に表示される場合、Commentオブジェクトは特別な書式を使って出力されます。
print(soup.prettify())
<html>
 <body>
  <b>
   <! --Want to buy a used parser?-->
  </b>
 </body>
</html>
from bs4 import CData
cdata = CData("A CDATA block")
comment.replace_with(cdata)
print(soup.b.prettify())
<b>
 <! [CDATA[A CDATA block]]>
</b>
ドキュメントツリーのトラバース
html_doc = """

The Dormouse's story
The Dormouse's story
Once upon a time there were three little sisters; and their names were

Elsie
,

Lacie
 and

Tillie
;
and they lived at the bottom of a well.
...

"""
from bs4 import BeautifulSoup
soup = BeautifulSoup(html_doc,"html.parser")
子ノード
タグは、そのタグの子である複数の文字列や他のタグを含むことができます。Beautiful Soupは、子ノードを操作したり、トラバースしたりするためのプロパティを多数提供しています。
soup.head
<head><title>The Dormouse's story</title></head>
soup.title
<title>The Dormouse's story</title>
これはタグを取得するための小技で、ドキュメントツリーのタグの中でこのメソッドを複数回呼び出すことができます。次のコードは、タグの1つ目を取得します。 タグを使用します。
soup.body.b
<b>The Dormouse's story</b>
属性を指すことで、現在の名前の最初のタグだけを取得することができます。
soup.a
<a class="sister" href="http://example.com/elsie" id="link1">Elsie</a>
find_allメソッド
すべてのタグを取得したい場合、または複数のタグを名前で取得したい場合は、ツリーを検索するで説明されているメソッドを使用する必要があります、例: find_all()
soup.find_all("a")
[<a class="sister" href="http://example.com/elsie" id="link1">Elsie</a>,
 <a class="sister" href="http://example.com/lacie" id="link2">Lacie</a>,
 <a class="sister" href="http://example.com/tillie" id="link3">Tillie</a>]
.contentsと.children
head_tag = soup.head
head_tag
<head><title>The Dormouse's story</title></head>
head_tag.contents
[<title>The Dormouse's story</title>]
head_tag.contents[0]
<title>The Dormouse's story</title>
head_tag.contents[0].contents
["The Dormouse's story"]
セレン

セレン公式ドキュメント https://www.selenium.dev/selenium/docs/api/py/api.html
セレン入門
クロームブラウザの動作効果
<ブロッククオートchromedriverをダウンロードし、seleniumモジュールをインストールした後、以下のコードを実行し、実行を確認します。
from selenium import webdriver

# If driver is not added to the environment variable, you need to assign the absolute path of driver to the executable_path parameter
# driver = webdriver.Chrome(executable_path='/home/worker/Desktop/driver/chromedriver')

# If driver adds environment variables, you don't need to set executable_path
driver = webdriver.Chrome()

# Make a request to a url
driver.get("http://www.itcast.cn/")

# Save the web page as an image, screenshots will not work with Google Chrome versions 69 and above
# driver.save_screenshot("itcast.png")

print(driver.title) # Print the title of the page

# Exit the simulated browser
driver.quit() # Be sure to quit! There will be residual processes if you don't exit!
phantomjsインターフェースレスブラウザの動作例
<ブロッククオートPhantomJSはWebkitベースのヘッドレスブラウザで、Webサイトをメモリ上にロードし、ページ上でJavaScriptを実行します。 http://phantomjs.org/download.html
from selenium import webdriver

# Specify the absolute path to the driver
driver = webdriver.PhantomJS(executable_path='/home/worker/Desktop/driver/phantomjs')
# driver = webdriver.Chrome(executable_path='/home/worker/Desktop/driver/chromedriver')

# Make a request to a url
driver.get("http://www.itcast.cn/")

# Save the page as a screenshot
driver.save_screenshot("itcast.png")

# Exit the simulated browser
driver.quit() # Be sure to quit! There will be residual processes if you don't quit!
ヘッドレスブラウザとヘッド付きブラウザの使用シナリオ
- 通常、開発時にはランタイムで何が起こっているかを確認する必要があるため、通常はヘッダーブラウザを使用します
- プロジェクトが完成してデプロイする場合、プラットフォームは通常、オペレーティングシステムのサーバー版を使用し、適切に実行するためにヘッドレスブラウザを使用する必要があります
セレニウムの働きとその効果
<ブロッククオートブラウザのネイティブAPIを利用し、よりオブジェクト指向のSelenium WebDriver APIのセットにラップして、ブラウザページの要素を直接操作したり、ブラウザ自体を操作したりします(スクリーンショット、ウィンドウサイズ、起動、終了、プラグインのインストール、証明書の設定、などなど)。
seleniumのインストールと簡単な使い方
<ブロッククオート
エッジブラウザの例はこちらのブログで、クロームブラウザの駆動も同様です
エッジブラウザを駆動するセレン
-
chromedriverの環境設定
- Windows環境でchromedriver.exeがあるディレクトリを環境変数pathのパスに設定する必要があります。
- linux/mac環境では、chromedriverのディレクトリをシステムのPATH環境変数に設定する
seleniumの簡単な使い方
<ブロッククオート次に、Baiduの検索をコードでシミュレートしてみます。
import time
from selenium import webdriver

# Instantiate the driver object by specifying the path to the chromedriver, which is placed in the current directory.
# driver = webdriver.Chrome(executable_path='. /chromedriver')
# chromedriver has added environment variables
driver = webdriver.Chrome()

# Control browser access to the url address
driver.get("https://www.baidu.com/")

# Search for 'python' in the Baidu search box
driver.find_element_by_id('kw').send_keys('python')
# Click 'Baidu search'
driver.find_element_by_id('su').click()

time.sleep(6)
# Exit the browser
driver.quit()
-
webdriver.Chrome(executable_path='. /chromedriver')executable パラメータは、ダウンロードしたクロメドライバファイルのパスを指定します。 -
driver.find_element_by_id('kw').send_keys('python')id属性の値が'kw'であるタグを探し、そこに文字列'python'を入力します。 -
driver.find_element_by_id('su').click()id属性の値がsuであるタグを探し、クリックします。- クリック機能は、タグのjsのクリックイベントをトリガーにして動作します。
タグに値 'kw' を指定し、そこに文字列 'python' を入力します。
-
driver.find_element_by_id('su').click()id属性の値がsuであるタグを探し、クリックします。 - click関数は、タグのjsをクリックするイベントを発生させます。
xpathを使ってデータを抽出するクロールのための簡単な構文です。
lxml
リクエストの公式ドキュメント https://lxml.de/
pip install lxml
- モジュールのインポート
from lxml import etree
- xpathを使用してテキストまたはhrefの内容を取得する
/li/a/@href This should get the content of the href
/li/a/text() This gets the text content
etreeの使用方法
h=etree.HTML(response.text)#response.text is the source code of the page
h.xpath('//img') #Find all img nodes,
h.xpath('//div').xpath('. //img')#find all img nodes under all divs
xpathのシンタックス
シンボル
XPath はパス表現を使用して XML ドキュメント内のノードを選択します。ノードは、パスまたはステップをたどることで選択されます。
インスタンス
述語
述語を用いたパス表現

ここで終わりです。あなたのお役に立てれば幸いです。もちろん、学ぶことに終わりはありません。これらはクロールの基礎に過ぎず、より多くのポーズはあなた自身で探求する必要があります。https://beishan.blog.csdn.net/。
- Tableauデータ分析-Chapter01 棒グラフ、積み上げグラフ、ヒストグラム
- Tableauデータ分析-Chapter02 データ前処理、折れ線グラフ、円グラフ
- Tableauデータ分析-Chapter03 基本テーブル、ツリーチャート、バブルチャート、ワードクラウド
- Tableauデータ分析-Chapter04 マーカーチャート、ガントチャート、ウォーターフォールチャート
- Tableauデータ分析-Chapter05データセットのマージ、シンボリックマップ
- Tableau Data Analysis-Chapter06 Filled Maps、Multidimensional Maps、Hybrid Maps
- Tableau Data Analysis-Chapter07ポリゴンマップ、バックグラウンドマップ
- Tableauデータ分析-Chapter08 データレイヤリング、データグループ化、データセット
- Tableauデータ分析-第09章 粒度、集計、比率
- Tableauデータ分析-Chapter10 母集団ピラミッド、ファネルチャート、ボックスラインチャート
- Tableau Data Analysis-Chapter11 Range-Line Charts, Skew Charts(レンジライン・チャート、スキュー・チャート
- Tableauデータ分析-第12章 ネットワークプロット、アークプロット
- Tableauデータ分析-第13章 レーダープロット、バンププロット
- Tableauデータ解析-第14章 線形回帰、時系列解析
関連
-
Python は '' で '__main__' モジュールを見つけることができません。
-
PythonがNameError: name '_name_' is not definedのようなエラーを発生させる。
-
AttributeError: 'function' オブジェクトに 'split' 属性がない Solution
-
ImportError: scipy'という名前のモジュールがありません。
-
TypeError: 'str' と 'int' のインスタンスの間で '<' はサポートされていません。
-
Python で実行 TypeError: + でサポートされていないオペランド型: 'float' および 'str'.
-
[Python] ValueError: サポートされていない pickle プロトコルです。5 解決方法
-
Mac環境でのbrewコマンドが見つからないエラーの解決方法
-
Python Numpy.ndarray ValueError: 代入先が読み取り専用です。
-
AttributeError: 'dict' オブジェクトには 'iteritems' という属性がありません。
最新
-
nginxです。[emerg] 0.0.0.0:80 への bind() に失敗しました (98: アドレスは既に使用中です)
-
htmlページでギリシャ文字を使うには
-
ピュアhtml+cssでの要素読み込み効果
-
純粋なhtml + cssで五輪を実現するサンプルコード
-
ナビゲーションバー・ドロップダウンメニューのHTML+CSSサンプルコード
-
タイピング効果を実現するピュアhtml+css
-
htmlの選択ボックスのプレースホルダー作成に関する質問
-
html css3 伸縮しない 画像表示効果
-
トップナビゲーションバーメニュー作成用HTML+CSS
-
html+css 実装 サイバーパンク風ボタン
おすすめ
-
PythonのエラーNo module named 'pkg_resources' を解決する。
-
Pythonインストールモジュールエラー AttributeError: モジュール 'pip' には 'main' という属性がありません。
-
AttributeError: モジュール 'tensorflow' には 'enable_eager_execution' という属性がない。
-
仮想環境を作成するコマンドが見つからない virtualenv: コマンドが見つからない
-
python3.x: urllib2' という名前のモジュールがない
-
Pythonを学んだ後、このまとめを整理するために夜更かしすることに...。
-
Python による pyserial 経由でのシリアルポートの読み取りと書き込み
-
TypeError: バイトライクオブジェクトで文字列パターンを使用できない
-
Python ネットワークリクエストのエラー "ConnectionRefusedError: [WinError 10061] ターゲットコンピュータがアクティブに拒否したため接続できません"
-
ガールフレンドが深夜12時に彼女をベッドに急がせるよう頼んだが、私はそれをしないパイソンを持っています。