Pythonでナンバープレート自動認識システムを作ろう!楽しくて実用的です。
前文
しばらく前、PyQt5で次の2つの記事が書かれました。 Pythonでクールな自作音楽プレーヤーを作る は、その カスタムデスクトップアニメーションウィジェット ファンから「なぜPyQt5を使うのか」と聞かれることがあるのですが?ファンの方から、なぜPyQt5を使うのか、PyQt5で仕事をしたことがないのですが、この開発例をもう少し教えてくださいと質問されました。
今日は引き続き、実際の事例を紹介しながら、PythonのPyQt5を使ったナンバープレート認識システムの開発を紹介しますよ。
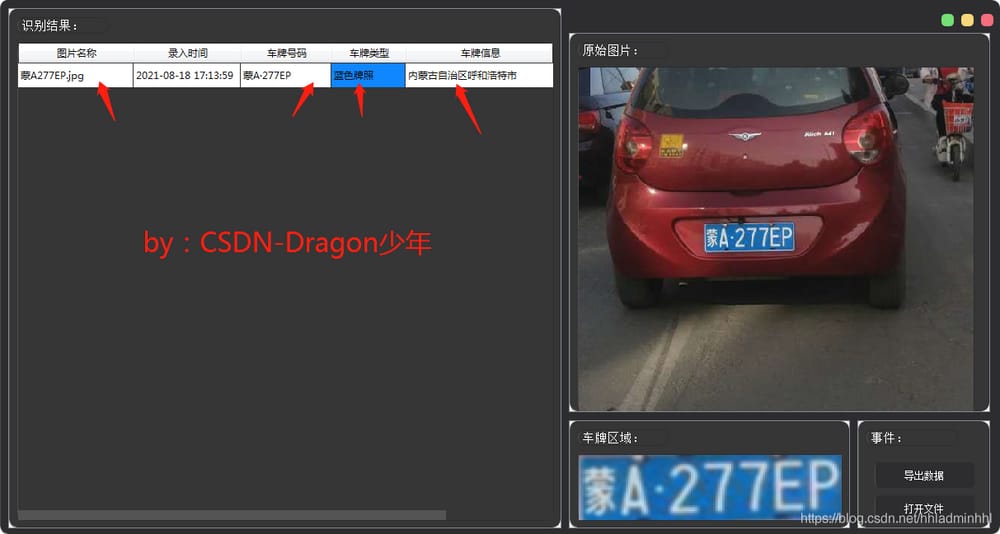
まず、完成したナンバープレート認識システムを見てみましょう。
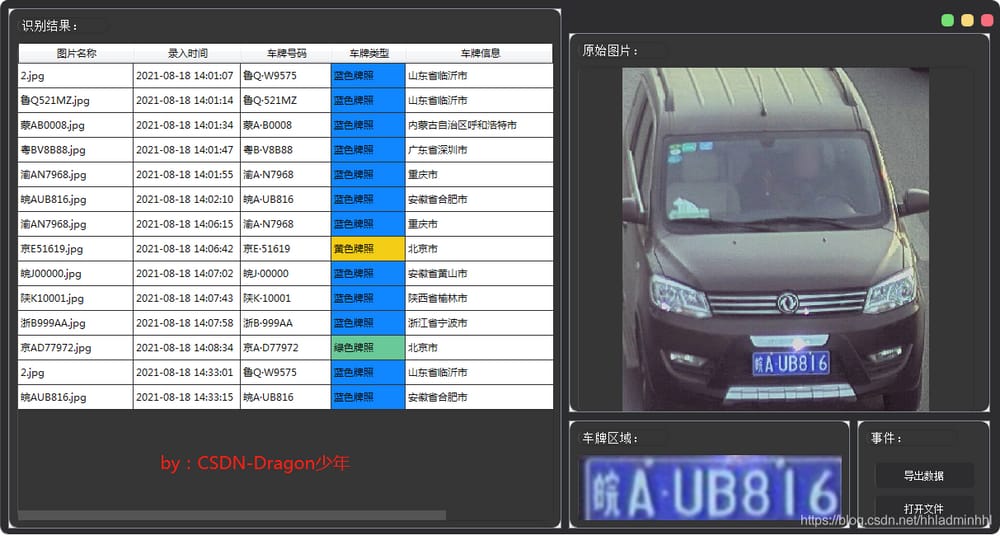
次に、このナンバープレート自動認識システムの実装方法について説明します。
記事の最後に直接スキップする ファン限定特典をゲット
I. コア機能設計
一般的に、我々はまず、ナンバープレート認識システムの機能に応じて、UIインタフェースの構築設計、画面レイアウトのレイアウトを実施する必要があります。第二に、このナンバープレート認識システム車両画像読書認識ディスプレイ、ナンバープレートROI領域の画像取得、ナンバープレート認識結果出力表示の我々の主な機能である。
結果出力表示では、主に、画像名の読み取り、入力時間の読み取り、ナンバープレート番号の認識、ナンバープレートの色の認識、ナンバープレートの場所への帰属の認識などを行います。また、ナンバープレート認識システムのデータ情報をエクスポートして、ローカルに保存することも可能です。
要件を分解すると、コアとなる機能は大きく以下のように整理されます。
-
UIデザイン タイポグラフィ レイアウト
- 認識情報表示のための左の領域は、画像名、読み取り入力時間、認識ナンバープレート番号、認識ナンバープレート色、認識ナンバープレートが情報に属していることを含む
- 右側は 3 つの区域に分けることができましたり、上の区域は窓を含んでいます最小になります、最大になります、近い機能; 中間区域は車の映像の読書を示します; 底区域はナンバー プレートの表示区域、映像の読書、ナンバー プレートの情報蓄積機能を含んでいます
-
ナンバープレート認識
- 画像読み取りによるナンバープレート領域抽出出力
- ナンバープレート自動認識結果出力
-
ナンバープレート情報表示収納
- 自動認識結果に基づくナンバープレート情報の表示
- 認識対象として入力された車両のナンバープレート認識情報の保存
II. 実装手順
1. UIデザインレイアウト
ナンバープレート認識に必要な機能を踏まえて、まずは UIレイアウト設計 私たちはまだ pyqt5 . コアとなる設計コードは以下の通りです。
# author: CSDN-Dragon Junior
def setupUi(self, MainWindow):
    MainWindow.setObjectName("MainWindow")
    MainWindow.resize(1213, 670)
    MainWindow.setFixedSize(1213, 670) # set the form fixed size
    MainWindow.setToolButtonStyle(QtCore.Qt.ToolButtonIconOnly)
    self.centralwidget = QtWidgets.QWidget(MainWindow)
    self.centralwidget.setObjectName("centralwidget")
    self.scrollArea = QtWidgets.QScrollArea(self.centralwidget)
    self.scrollArea.setGeometry(QtCore.QRect(690, 40, 511, 460))
    self.scrollArea.setWidgetResizable(True)
    self.scrollArea.setObjectName("scrollArea")
    self.scrollAreaWidgetContents = QtWidgets.QWidget()
    self.scrollAreaWidgetContents.setGeometry(QtCore.QRect(0, 0, 500, 489))
    self.scrollAreaWidgetContents.setObjectName("scrollAreaWidgetContents")
    self.label_0 = QtWidgets.QLabel(self.scrollAreaWidgetContents)
    self.label_0.setGeometry(QtCore.QRect(10, 10, 111, 20))
    font = QtGui.QFont()
    font.setPointSize(11)
    self.label_0.setFont(font)
    self.label_0.setObjectName("label_0")
    self.label = QtWidgets.QLabel(self.scrollAreaWidgetContents)
    self.label.setGeometry(QtCore.QRect(10, 40, 481, 420))
    self.label.setObjectName("label")
    self.label.setAlignment(Qt.AlignCenter)
    self.scrollArea.setWidget(self.scrollAreaWidgetContents)
    self.scrollArea_2 = QtWidgets.QScrollArea(self.centralwidget)
    self.scrollArea_2.setGeometry(QtCore.QRect(10, 10, 671, 631))
    self.scrollArea_2.setWidgetResizable(True)
    self.scrollArea_2.setObjectName("scrollArea_2")
    self.scrollAreaWidgetContents_1 = QtWidgets.QWidget()
    self.scrollAreaWidgetContents_1.setGeometry(QtCore.QRect(0, 0, 669, 629))
    self.scrollAreaWidgetContents_1.setObjectName("scrollAreaWidgetContents_1")
    self.label_1 = QtWidgets.QLabel(self.scrollAreaWidgetContents_1)
    self.label_1.setGeometry(QtCore.QRect(10, 10, 111, 20))
    font = QtGui.QFont()
    font.setPointSize(11)
    self.label_1.setFont(font)
    self.label_1.setObjectName("label_1")
    self.tableWidget = QtWidgets.QTableWidget(self.scrollAreaWidgetContents_1)
    self.tableWidget.setGeometry(QtCore.QRect(10, 40, 651, 581)) # 581))
    self.tableWidget.setObjectName("tableWidget")
    self.tableWidget.setColumnCount(5)
    self.tableWidget.setColumnWidth(0, 140) # set the width of 1 column
    self.tableWidget.setColumnWidth(1, 130) # set the width of 2 columns
    self.tableWidget.setColumnWidth(2, 110) # set the width of 3 columns
    self.tableWidget.setColumnWidth(3, 90) # set the width of 4 columns
    self.tableWidget.setColumnWidth(4, 181) # set the width of 5 columns
    self.tableWidget.setHorizontalHeaderLabels(["ImageName", "EntryTime", "LicenseNumber", "LicenseType", "LicenseInfo"])
    self.tableWidget.setRowCount(self.RowLength)
    self.tableWidget.verticalHeader().setVisible(False) # hide vertical table header)
    self.tableWidget.setEditTriggers(QAbstractItemView.NoEditTriggers)
    self.tableWidget.raise_()
    self.scrollArea_2.setWidget(self.scrollAreaWidgetContents_1)
    self.scrollArea_3 = QtWidgets.QScrollArea(self.centralwidget)
    self.scrollArea_3.setGeometry(QtCore.QRect(690, 510, 341, 131))
    self.scrollArea_3.setWidgetResizable(True)
    self.scrollArea_3.setObjectName("scrollArea_3")
    self.scrollAreaWidgetContents_3 = QtWidgets.
    self.scrollAreaWidgetContents_3.setGeometry(QtCore.QRect(0, 0, 339, 129))
    self.scrollAreaWidgetContents_3.setObjectName("scrollAreaWidgetContents_3")
    self.label_2 = QtWidgets.QLabel(self.scrollAreaWidgetContents_3)
    self.label_2.setGeometry(QtCore.QRect(10, 10, 111, 20))
    font = QtGui.QFont()
    font.setPointSize(11)
    self.label_2.setFont(font)
    self.label_2.setObjectName("label_2")
    self.label_3 = QtWidgets.QLabel(self.scrollAreaWidgetContents_3)
    self.label_3.setGeometry(QtCore.QRect(10, 40, 321, 81))
    self.label_3.setObjectName("label_3")
    self.scrollArea_3.setWidget(self.scrollAreaWidgetContents_3)
    self.scrollArea_4 = QtWidgets.QScrollArea(self.centralwidget)
    self.scrollArea_4.setGeometry(QtCore.QRect(1040,
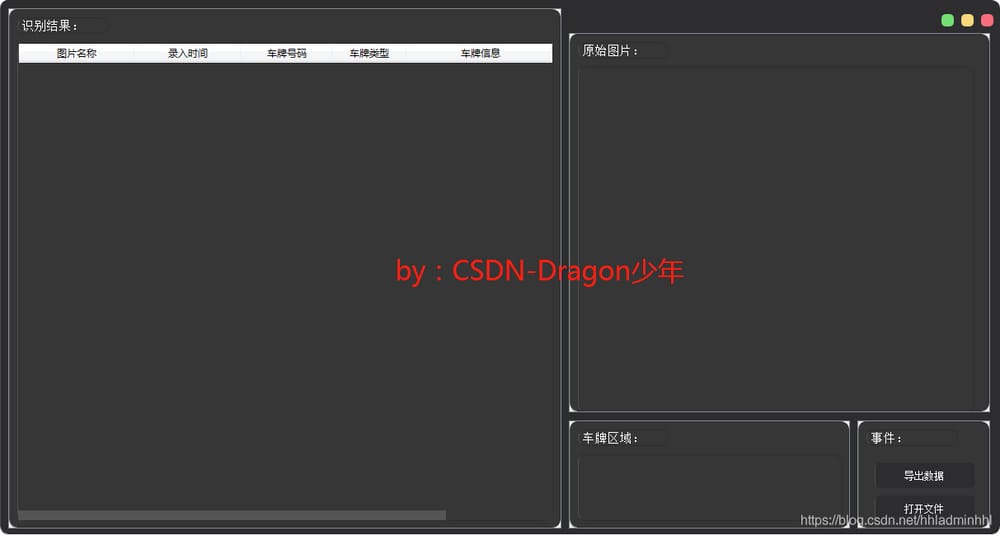
UIの実装は以下のように動作します。
2. ナンバープレート認識
次に、2つのコア機能を実装する必要があります。 ナンバープレートROI領域 そして ナンバープレート自動認識 機能を提供します。
ナンバープレートROI領域抽出。
読み取った車両画像をもとに、ナンバープレートROI領域抽出のための前処理を行いますが、これは主にOpencvの画像処理関連知識ポイントによって行われます。主に、画像ノイズ除去、2値化、エッジ輪郭抽出、矩形領域補正、青緑黄ナンバープレート色位置認識などがあります。コアとなるコードは以下の通りです。
# author: CSDN-Dragon Junior
# pretreatment
def pretreatment(self, car_pic):
    if type(car_pic) == type(""):
        img = self.__imreadex(car_pic)
    else:
        img = car_pic
    pic_hight, pic_width = img.shape[:2]

    if pic_width > self.MAX_WIDTH:
        resize_rate = self.MAX_WIDTH / pic_width
        img = cv2.resize(img, (self.MAX_WIDTH, int(pic_hight * resize_rate)),
                         interpolation=cv2.INTER_AREA) # image resolution adjustment
    blur = self.cfg["blur"]
    # Gaussian denoising
    if blur > 0:
        img = cv2.GaussianBlur(img, (blur, blur), 0)
    oldimg = img
    img = cv2.cvtColor(img, cv2.COLOR_BGR2GRAY)
    kernel = np.ones((20, 20), np.uint8)
    img_opening = cv2.morphologyEx(img, cv2.MORPH_OPEN, kernel) # open operation
    img_opening = cv2.addWeighted(img, 1, img_opening, -1, 0); # fuse with previous opening result
    # cv2.imshow('img_opening', img_opening)

    # Find the edge of the image
    ret, img_thresh = cv2.threshold(img_opening, 0, 255, cv2.THRESH_BINARY + cv2.THRESH_OTSU) # binarize
    img_edge = cv2.Canny(img_thresh, 100, 200)
    # cv2.imshow('img_edge', img_edge)

    # Use open and close operations to make the image edge a whole
    kernel = np.ones((self.cfg["morphologyr"], self.cfg["morphologyc"]), np.uint8)
    img_edge1 = cv2.morphologyEx(img_edge, cv2.MORPH_CLOSE, kernel) # close operation
    img_edge2 = cv2.morphologyEx(img_edge1, cv2.MORPH_OPEN, kernel) # open operation
    # cv2.imshow('img_edge2', img_edge2)
    # cv2.imwrite('. /edge2.png', img_edge2)
    # Find the rectangular area formed by the whole image edge, there may be many, the license plate is in one of the rectangular area
    image, contours, hierarchy = cv2.findContours(img_edge2, cv2.RETR_TREE, cv2.CHAIN_APPROX_SIMPLE)
    contours = [cnt for cnt in contours if cv2.contourArea(cnt) > self.Min_Area]
    # Exclude rectangular areas that are not license plates one by one
    car_contours = []
    for cnt in contours:
        # box selection Generate minimum outer rectangle Return value (center(x,y), (width,height), rotation angle)
        rect = cv2.minAreaRect(cnt)
        # print('width and height:',rect[1])
        area_width, area_height = rect[1]
        # Select the area whose width is greater than its height
        if area_width < area_height:
            area_width, area_height = area_height, area_width
        wh_ratio = area_width / area_height
        # print('Aspect ratio:',wh_ratio)
        # require rectangular area aspect ratio between 2 and 5.5, 2 to 5.5 is the license plate aspect ratio, the rest of the rectangle excluded
        if wh_ratio > 2 and wh_ratio < 5.5:
            car_contours.append(rect)
            box = cv2.boxPoints(rect)
            box = np.int0(box)
    # Rectangular areas may be skewed rectangles and need to be corrected to use color positioning
    card_imgs = []
    for rect in car_contours:
        if rect[2] > -1 and rect[2] < 1: # create angles so that left, high, right, low get the correct values
            angle = 1
        else:
            angle = rect[2]
        rect = (rect[0], (rect[1][0] + 5, rect[1][1] + 5), angle) # expand the range to avoid the edge of the license plate being excluded
        box = cv2.boxPoints(rect)
        heigth_point = right_point = [0, 0]
        left_point = low_point = [pic_width, pic_hight]
        for point in box:
            if left_point[0] > point[0]:
                left_point = point
            if low_point[1] > point[1]:
                low_point = point
            if heigth_point[1] < point[1]:
                heigth_point = point
            if right_point[0] < point[0]:
                right_point = point
        if left_point[1] <= right_point[1]: # positive angle
            new_right_point = [right_point[0], heigth_point[1]]
            pts2 = np.float32([left_point, heigth_point, new_right_point]) # The characters just need to be changed in height
            pts1 = np.float32([left_point, heigth_point, right_point])
            M = cv2.getAffineTransform(pts1, pts2)
            dst = cv2.warpAffine(oldimg, M, (pic_width, pic_hight))
            self.__point_limit(new_right_point)
            self.__point_limit(heigth_point)
            self.__point_limit(left_point)
            card_img = dst[int(left_point[1]):int(heigth_point[1]), int(left_point[0]):int(new_right_point[0])]
            card_imgs.append(card_img)

        elif left_point[1] > right_point[1]: # negative angle

            new_left_point = [left_point[0], heigth_point[1]]
            pts2 = np.float32([new_left_point, heigth_point, right_point]) # The characters just need to be changed in height
            pts1 = np.float32([left_point, heigth_point, right_point])
            M = cv2.getAffineTransform(pts1, pts2)
            dst = cv2.warpAffine(oldimg, M, (pic_width, pic_hight))
            self.__point_limit(right_point)
            self.__point_limit(heigth_point)
            self.__point_limit(new_left_point)
            card_img = dst[int(right_point[1]):int(heigth_point[1]), int(new_left_point[0]):int(right_point[0])]
            card_imgs.append(card_img)
    # Use color positioning to exclude rectangles that are not license plates, currently only blue, green and yellow license plates are recognized
    colors = []
    for card_index, card_img in enumerate(card_imgs):
        green = yellow = blue = black = white = 0
        try:
            # There is a possibility that the conversion failed due to an error in the rectangle correction above
            card_img_hsv = cv2.cvtColor(card_img, cv2.COLOR_BGR2HSV)
        except:
            print('BGR to HSV failed')
            card_imgs = colors = None
            return card_imgs, colors

        if card_img_hsv is None:
            continue
        row_num, col_num = card_img_hsv.shape[:2]
        card_img_count = row_num * col_num

        # Determine the color of the license plate
        for i in range(row_num):
            for j in range(col_num):
                H = card_img_hsv.item(i, j, 0)
                S = card_img_hsv.item(i, j, 1)
                V = card_img_hsv.item(i, j, 2)
                if 11 < H <= 34 and S > 34: # Image resolution adjustment
                    yellow += 1
                elif 35 < H <= 99 and S > 34: # Image resolution adjustment
                    green += 1
                elif 99 < H <= 124 and S > 34: # Image resolution adjustment
                    blue += 1

                if 0 < H < 180 and 0 < S < 255 and 0 < V < 46:
                    black += 1
                elif 0 < H < 180 and 0 < S < 43 and 221 < V < 225:
                    white += 1
        color = "no"
        # print('yellow: {:<6}green: {:<6}blue: {:<6}'.format(yellow,green,blue))

        limit1 = limit2 = 0
        if yellow * 2 >= card_img_count:
            color = "yellow"
            limit1 = 11
            limit2 = 34 # Some images are colored greenish
        elif green * 2 >= card_img_count:
            color = "green"
            limit1 = 35
            limit2 = 99
        elif blue * 2 >= card_img_count:
            color = "blue"
            limit1 = 100
            limit2 = 124 # Some pictures are colored purple
        elif black + white >= card_img_count * 0.7:
            color = "bw"
        # print(color)
        colors.append(color)
        # print(blue, green, yellow, black, white, card_img_count)
        if limit1 == 0:
            continue

        # reposition according to the color of the license plate, narrow the edge of the non-plate border
        xl, xr, yh, yl = self.accelerate_place(card_img_hsv, limit1, limit2, color)
        if yl == yh and xl == xr:
            continue
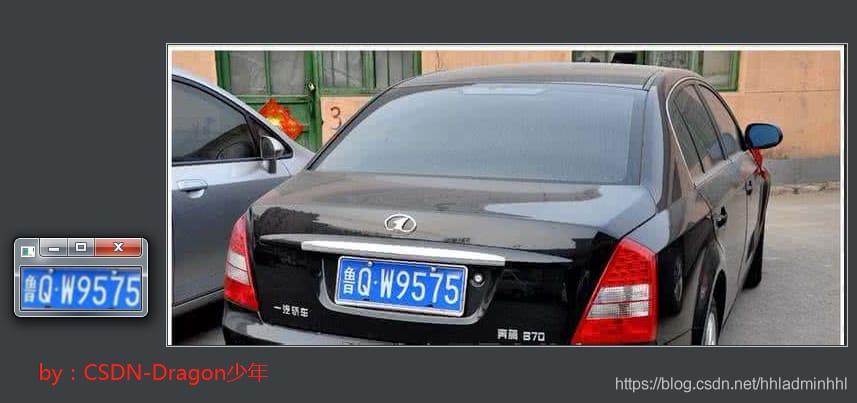
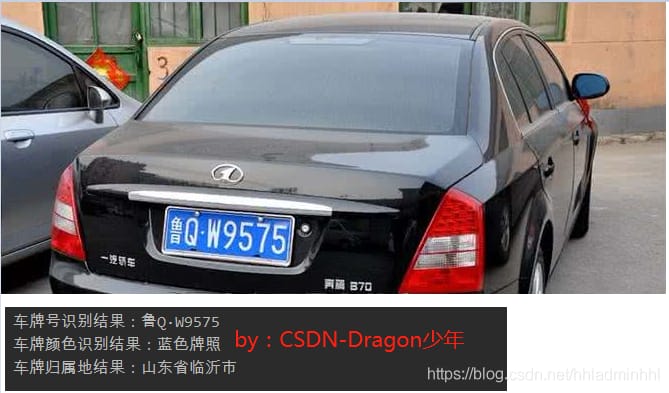
この時点で、ナンバープレートのROI領域とプレートカラーを以下のように出力することができます。
自動ナンバープレート認識。
ナンバープレート認識ブロガーがOpencvとSVMをベースに自作した認識システムですが、コードが長いのでこの記事では紹介しません(
もし興味があれば、プライベートメッセージでソースコードを入手することができます。
). 本記事では、Baidu AIの呼び出しを紹介します。
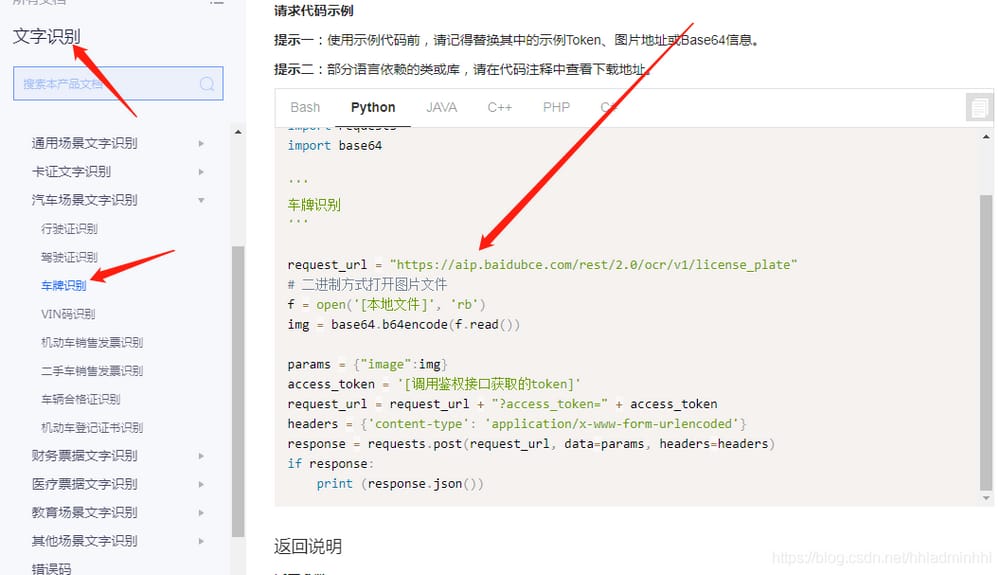
ナンバープレート認識インターフェース
-
Baidu AIオープンプラットフォーム リンク
また、認識も非常に優れています。
ここで、ナンバープレート認識アプリケーションを作成するための
APIキーとシークレットキー
後でナンバープレート認識検出インタフェースを呼び出す際に使用します。

の方法について提供されている公式ヘルプドキュメントを見ることができます。
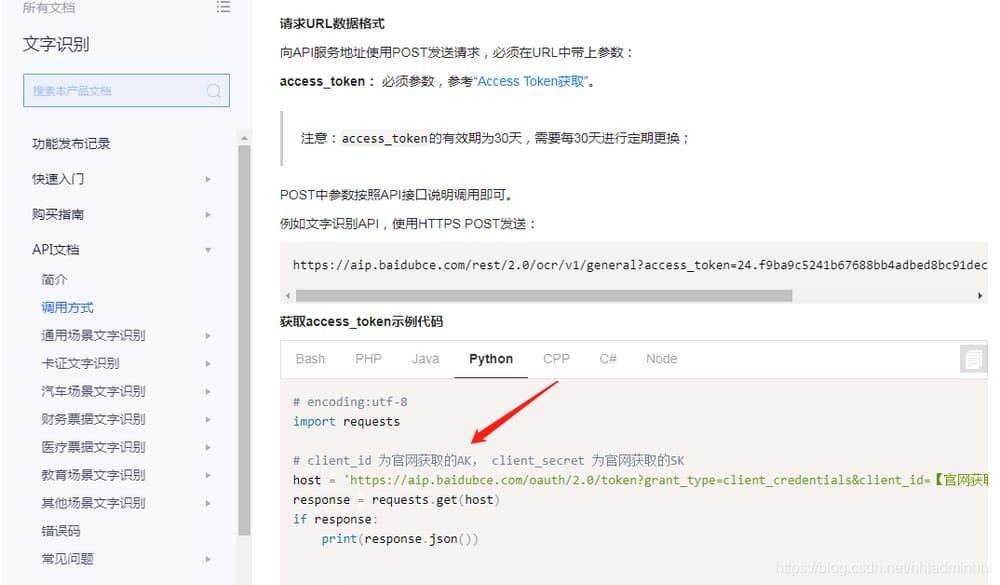
リクエストURLデータ形式を呼び出し、APIサービスアドレスにPOSTでリクエストを送信する
URLには必ずパラメータが必要です
アクセストークン
API KeyとSecret Keyは、バックエンドから生成することができます。この場合のAPI KeyとSecret Keyは、上記で説明したものです。
次に、ナンバープレート認識インターフェースを呼び出すサンプルコードを見てみましょう。
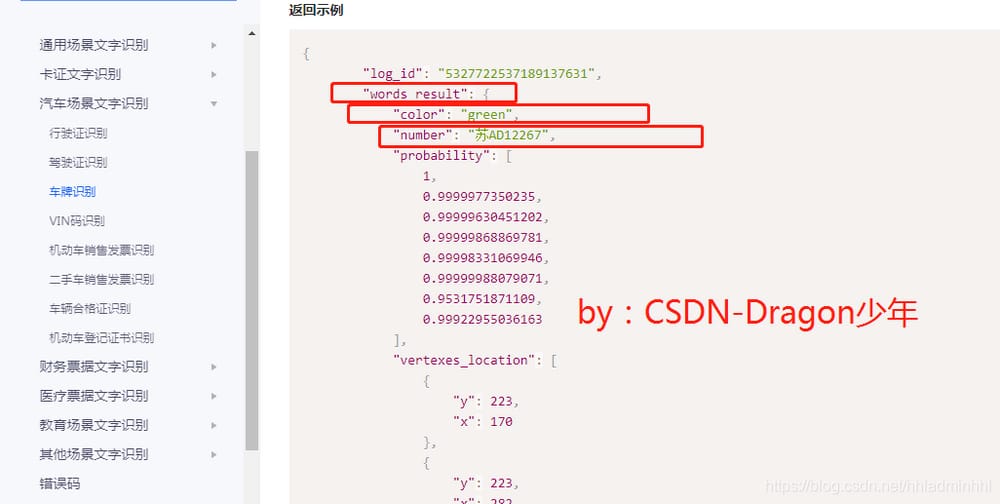
では、どうやって認識されたナンバーを取得するのでしょうか?
単語_結果辞書
ここで
カラーはナンバープレートの色
numberはナンバープレートの略
. こうすることで、認識されたナンバープレートの色とナンバープレートを知ることができるんです。
ナンバープレート認識のインターフェース呼び出しフローは基本的に明確であり、以下のようにコード実装の準備が整っています。
# author: CSDN-Dragon Junior
def get_token(self):
    host = 'https://aip.baidubce.com/oauth/2.0/token?grant_type=client_credentials&client_id=' + self.client_id + '&client_secret=' + self.client_secret
    response = requests.get(host)
    if response:
        token_info = response.json()
        token_key = token_info['access_token']
    return token_key

# author: CSDN-Dragon Junior
def get_license_plate(self, car_pic):
    result = {}
    card_imgs, colors = self.pretreatment(car_pic)
    request_url = "https://aip.baidubce.com/rest/2.0/ocr/v1/license_plate"
    # Binary way to open image files
    f = open(car_pic, 'rb')
    img = base64.b64encode(f.read())
    params = {"image": img}
    access_token = self.get_token()
    request_url = request_url + "?access_token=" + access_token
    headers = {'content-type': 'application/x-www-form-urlencoded'}
    response = requests.post(request_url, data=params, headers=headers)
    if response:
        print(response.json())
        license_result = response.json()['words_result']['number']
        card_color = response.json()['words_result']['color']
        if license_result ! = []:
            result['InputTime'] = time.strftime("%Y-%m-%d %H:%M:%S")
            result['Type'] = self.cardtype[card_color]
            result['Picture'] = card_imgs[0]
            result['Number'] = ''.join(license_result[:2]) + '-' + ''.join(license_result[2:])
            try:
                result['From'] = ''.join(self.Prefecture[license_result[0]][license_result[1]])
            except:
                result['From'] = 'unknown'
            return result
    else:
        return None
これにより、プレートの色とプレート番号がわかり、次のようになります。
3. ナンバープレート情報表示収納
3.1 ナンバープレート情報表示
# author: CSDN-Dragon Junior
def __show(self, result, FileName):
    # Display the table
    self.RowLength = self.RowLength + 1
    if self.RowLength > 18:
        self.tableWidget.setColumnWidth(5, 157)
    self.tableWidget.setRowCount(self.RowLength)
    self.tableWidget.setItem(self.RowLength - 1, 0, QTableWidgetItem(FileName))
    self.tableWidget.setItem(self.RowLength - 1, 1, QTableWidgetItem(result['InputTime']))
    self.tableWidget.setItem(self.RowLength - 1, 2, QTableWidgetItem(result['Number']))
    self.tableWidget.setItem(self.RowLength - 1, 3, QTableWidgetItem(result['Type']))
    if result['Type'] == 'Blue License':
        self.tableWidget.item(self.RowLength - 1, 3).setBackground(QBrush(QColor(3, 128, 255)))
    elif result['Type'] == 'Green License':
        self.tableWidget.item(self.RowLength - 1, 3).setBackground(QBrush(QColor(98, 198, 148)))
    elif result['Type'] == 'yellow license':
        self.tableWidget.item(self.RowLength - 1, 3).setBackground(QBrush(QColor(242, 202, 9)))
    self.tableWidget.setItem(self.RowLength - 1, 4, QTableWidgetItem(result['From']))
    self.tableWidget.item(self.RowLength - 1, 4).setBackground(QBrush(QColor(255, 255, 255)))
    # Display the recognized license plate position
    size = (int(self.label_3.width()), int(self.label_3.height()))
    shrink = cv2.resize(result['Picture'], size, interpolation=cv2.INTER_AREA)
    shrink = cv2.cvtColor(shrink, cv2.COLOR_BGR2RGB)
    self.QtImg = QtGui.QImage(shrink[:], shrink.shape[1], shrink.shape[0], shrink.shape[1] * 3,
                              QtGui.QImage.Format_RGB888)
    self.label_3.setPixmap(QtGui.QPixmap.fromImage(self.QtImg))
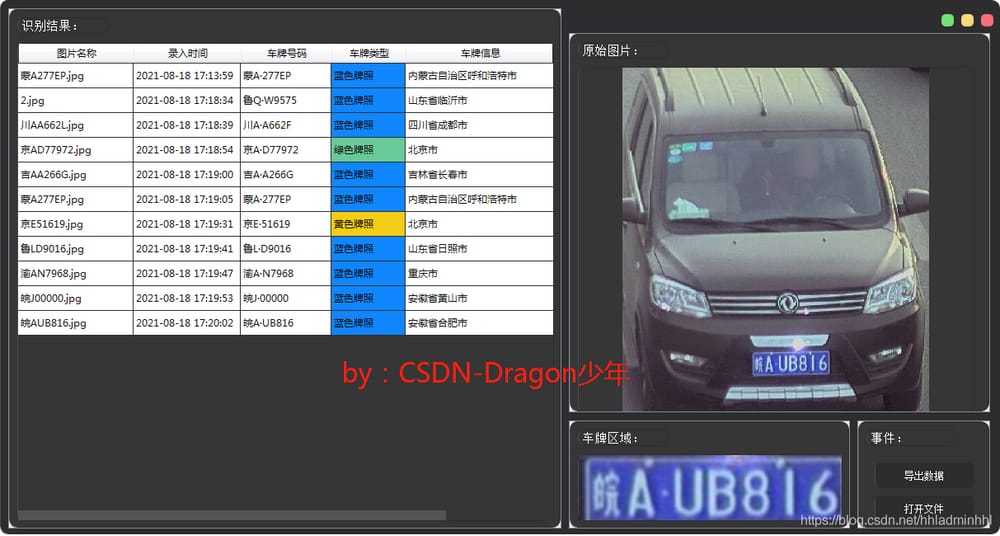
その効果は次の通りです。
3.2 情報の輸出保管。
# author: CSDN-Dragon Junior
def __writexls(self, DATA, path):
    wb = xlwt.Workbook();
    ws = wb.add_sheet('Data');
    # DATA.insert(0, ['file name', 'entry time', 'license plate number', 'license plate type', 'license plate information'])
    for i, Data in enumerate(DATA):
        for j, data in enumerate(DATA):
            ws.write(i, j, data)
    wb.save(path)
    QMessageBox.information(None, "Success", "Data saved! ", QMessageBox.Yes)
def __writecsv(self, DATA, path):
    f = open(path, 'w')
    # DATA.insert(0, ['file name', 'entry time', 'license plate number', 'license plate type', 'license plate information'])
    for data in DATA:
        f.write((',').join(data) + '\n')
    f.close()
    QMessageBox.information(None, "Success", "Data saved! ", QMessageBox.Yes)

def __writeFiles(self):
    path, filetype = QFileDialog.getSaveFileName(None, "Save as", self.ProjectPath,
                                                 "Excel Workbook(*.xls);;CSV (comma separated)(*.csv)")
    if path == "": # Not selected
        return
    if filetype == 'Excel Workbook(*.xls)':
        self.__writexls(self.Data, path)
    elif filetype == 'CSV (comma separated)(*.csv)':
        self.__writecsv(self.Data, path)
その効果は次の通りです。
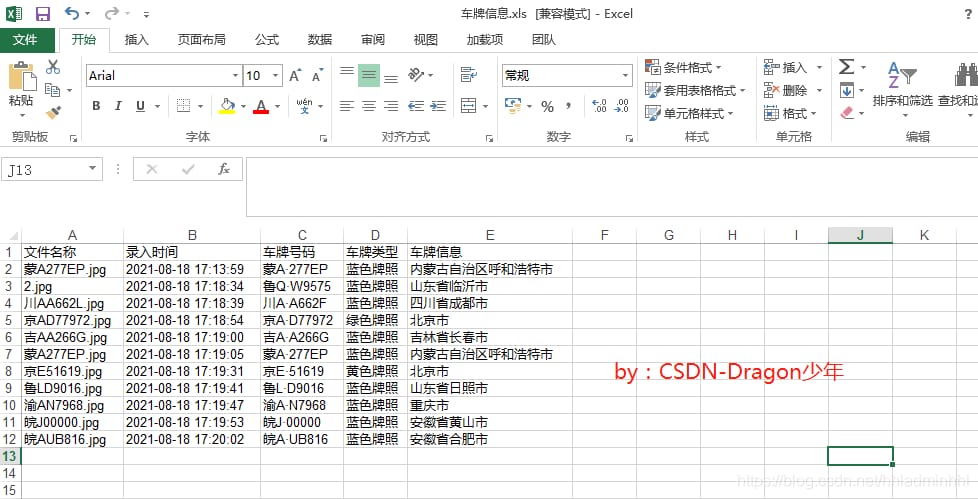
ナンバープレート情報データを以下のようにエクスポートします。
これで、自動ナンバープレート認識システムの全貌が明らかになりました。
<スパン
ソースコードとデータをアップロードしました。記事の最後にある公開番号に従って、[ソースコード]と返信すると、完全なソースコードを入手することができます。
過去のイシューからPythonのハイライトをご紹介します。
Pythonでピアノの自動演奏スクリプトを一緒に作って、実際に"City in the Sky"を弾いてみました!
エキサイティングなソースコードのバックナンバーは、以下の公開番号から入手できます。
関連
-
チェックされていないruntime.lastError: 接続を確立できませんでした。受信側が存在しません。
-
ImportError: scipyという名前のモジュールがない(解決済み)
-
Pythonがエラーを報告する AttributeError:'numpy.ndarray' オブジェクトに 'index' という属性がない
-
Pythonインストールモジュールエラー AttributeError: モジュール 'pip' には 'main' という属性がありません。
-
Python Next SyntaxError: print' の呼び出しに括弧がありません。print(" ") のことですか?
-
scipyという名前のモジュールがない場合の解決策|エラー
-
virtualenvwrapperのコンフィギュレーションエラー
-
OperationalError: データベースファイルを開くことができない Solution
-
Pythonのタイトル。学生情報管理システム - アドバンス版 (GUI + MySQLデータベース)
-
Pycharmの未解決の参照問題
最新
-
nginxです。[emerg] 0.0.0.0:80 への bind() に失敗しました (98: アドレスは既に使用中です)
-
htmlページでギリシャ文字を使うには
-
ピュアhtml+cssでの要素読み込み効果
-
純粋なhtml + cssで五輪を実現するサンプルコード
-
ナビゲーションバー・ドロップダウンメニューのHTML+CSSサンプルコード
-
タイピング効果を実現するピュアhtml+css
-
htmlの選択ボックスのプレースホルダー作成に関する質問
-
html css3 伸縮しない 画像表示効果
-
トップナビゲーションバーメニュー作成用HTML+CSS
-
html+css 実装 サイバーパンク風ボタン
おすすめ
-
PythonがNameError: name '_name_' is not definedのようなエラーを発生させる。
-
ORMにおけるトランザクションとロック、Ajaxによる非同期リクエストと部分リフレッシュ、Ajaxによるファイルアップロード、日時指定Json、マルチテーブルクエリブックのシステム
-
Pythonエラー解決] 'urllib2'という名前のモジュールがない解決方法
-
移動平均のPython実装
-
pythonのstring()モジュール
-
ValueErrorです。変数 `x` と `y` のどちらも数値でないように見えます。
-
Python3+BeautifulSoupがUnicodeEncodeErrorを報告:'charmap' codec can't encode characters in position
-
Python - pickleファイルの異なるPython環境への変換
-
パイソン] Python パイソンミニゲーム - 欲張りスネークアドベンチャー
-
エンコード問題:UnicodeDecodeError: 'utf-8' コーデックは、位置のバイト 0xb3 をデコードできません。