Androidの開発過程で発生した問題点を記録しました。
<スパン 180508更新
デモのオンラインダウンロード ローカルのスタジオ版とデモ版の不一致に対応
2つの変更点
1 プロジェクトのbuild.gradleにあるクラスパス
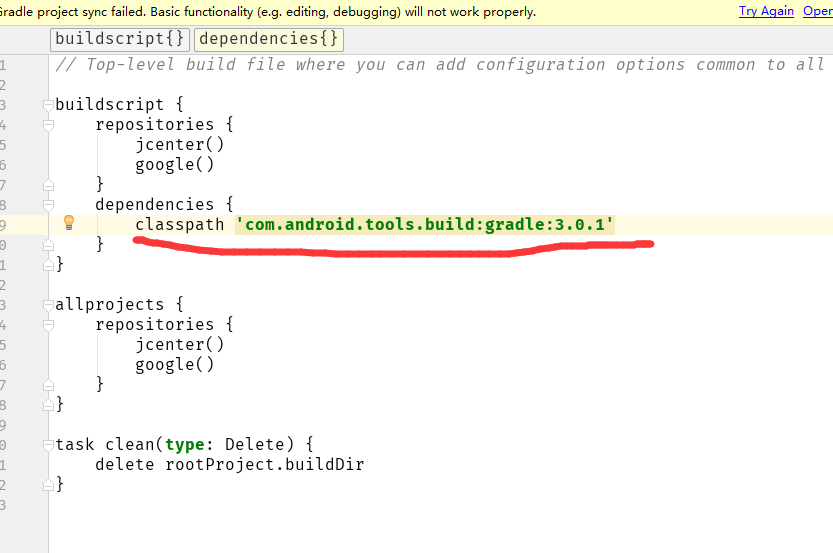
distributionUrl address
その後、クリーンビルド・リビルドが行われる
<スパン 1. 同じincludeをXMLの中で複数回使用することはできますか?
http://www.apkbus.com/android-104152-1-1.html
Androidにおけるincludeタグの使用について
http://blog.csdn.net/wangljgood/article/details/6556175
アンドロイドボタンを中央下部に配置
Set the weight outside the button to 1.0

http://www.cnblogs.com/gzggyy/archive/2013/05/17/3083218.html

http://www.eoeandroid.com/forum.php?mod=viewthread&tid=564
http://blog.csdn.net/feng88724/article/details/6318430
http://www.360doc.com/content/13/0102/22/6541311_257754535.shtml
http://blog.csdn.net/aminfo/article/details/7847761
http://blog.csdn.net/xsl1990/article/details/19125193
http://www.cnblogs.com/bavariama/archive/2013/01/29/2881225.html
http://www.oschina.net/question/97118_34523
http://www.eoeandroid.com/thread-67329-1-1.html

The android:scaleType controls how the image is resized/moved to match the size of the ImageView.

ScaleType / android:scaleType values are different in meaning.

CENTER /center is centered according to the original size of the image, when the length/width of the image exceeds the length/width of the View, the centered part of the image is intercepted and displayed.

CENTER_CROP / centerCrop expands the size of the image to make it equal to or larger than the length (width) of the View.

CENTER_INSIDE / centerInside centers the content of the image, making the image length/width equal to or smaller than the View's length/width by scaling down or original size.

FIT_CENTER / fitCenter to scale up/down the image to the width of the View and center it.

FIT_END / fitEnd scales the image up/down to the width of the View and displays it in the lower part of the View

FIT_START / fitStart scales the image up/down to the width of the View, displaying it in the upper part of the View

FIT_XY / fitXY to display the image without scaling up/down to the size of the View

MATRIX / matrix Use matrix to draw and dynamically shrink and enlarge the image to display it.
3. ボタン形状
<application
 android:name="xxx.MyApplication">

Problem: Using some classes under v4 package such as viewpager or fragmentActivity, when we press F3 we can't see the source code, this time we need to associate the source code, the association of the source code is not the same as the association of the android source code.

Solution.

1, first create a configuration file in the project libs directory: android-support-v4.jar.properties (this is recommended)

2, find the src source code address of android-support-v4 in the directory of the SDK you installed

My address is: D:\eclipse\android-sdk\extras\android\compatibility\v4\src

3. Edit the android-support-v4.jar.properties file as follows (note the double slash)

src = D:\\eclipse\\\android-sdk\\\extras\\\\android\\\compatibility\\\v4\\src

4, close your own project and then open it, at this time go in and select ViewPager after F3 you can see the source code.

5、Congratulations: the source code of android-support-v4 has been successfully associated with it.
<スパン アニメーション
Java->Code Style->Formatter in window's Preferences

By this step is to find the Ctrl+Shift+F formatting template, which cannot be modified directly here. Because it is the default template of eclipse, which is read-only.

We can new a Formatter, and then click edit to modify the template.

I modify the template is mainly to modify that Ctrl+Shift+F after changing my code for more lines.

Modify the Line Wrapping tab in the tab, there is a Maximum line with: 80 (default).

Here the default is 80 we can change it to 120, so that no more than 120 characters will not be line wrap!

Any other formatting you need can be modified in here. Of course you can also export your custom format, the export is xml format. Later in other places

You can also import. This way you don't have to customize it anymore.

http://androiddoc.qiniudn.com/
イメージビューの拡大縮小
Eclipse setting up unformatted comments
<スパン アンドロイドの時差を取得する方法は?
エラー解決方法を使用する前に、必ずImagingLoaderを使用して設定してください。
imageLoader.init (ImageLoaderConfiguration.createDefault(MainActivity.this));
8.java.lang.StackOverflowError(スタックオーバーフローエラー
StackOverflowの問題は、通常、プログラム内のデッドループや再帰的な呼び出しによって引き起こされます。
9.java.lang.ClassCastException: android.app.Application は MyApplication に変換できない問題
この例外の原因は、プロジェクトに新しいアプリケーションクラス (public class Application extends android.app.Application) を追加した後、クラス宣言が manifest.xml に追加されていないため、コンパイラーが例外をスローしたことです: java.lang.Application Extends android.app.Application Extends android.app.Application Extends android.app.Application Extends android.app.Application Extends android.app.Application Extensions. ClassCastException: android.app.Application は android_serialport_api.sample.Application に変換されませんでした。
<スパン 回避策、manifest.xmlに追加します。[html] プレーンコピーを表示する
byzanz
Installation and use of byzanz

Installation under Ubuntu

  sudo add-apt-repository ppa:fossfreedom/byzanz
sudo apt-get update sudo apt-get install byzanz

You can complete the recording process with the following command.
byzanz-record -d 40 -x 0 -y 0 -w 400 -h 320 byzanz-demo.gif

Where.

    -d 40 is the duration of the recording for 40 seconds
    -x 0 is the horizontal coordinate of the recording area
    -y 0 the vertical coordinate of the recording area, remember: the top right corner of the screen is the origin (0,0)
    -w 400 the width of the recording area
    -h 320 The height of the recording area

byzanz-demo.gif Saved filename

Detailed parameters can be viewed via byzanz-record --help.
http://www.tuicool.com/articles/YFJrem

Also: GIF screen recorder for windows V2.0
10. event.getAction()。
11. android-support-v4 と android-support-v13 が依存関係リストにあります。
12. android-support-v4 のソースコードを関連付ける方法
This method is called when the state changes, where arg0 has three states (0, 1, 2). arg0 == 1 means it is scrolling, arg0 == 2 means it is done, and arg0 == 0 means it is not doing anything.

When the page starts sliding, the three states change in the order (1, 2, 0)
という方法もあります。 http://blog.csdn.net/leon90dm/article/details/8521939、試していません。
上記はEclipseでのやり方ですが、androidstudioではもっと簡単です。
13. eclipseの設定を変更する Ctrl + Shift + Fの長さ
int CC [] ={1,2,3}; When the array is defined and initialized, the length of the array is set and is 3
 and the array can no longer be reassigned as it was when it was defined
but one by one
CC[0]=1;
CC[1]=2;
CC[2]=3;
Array constants can only be used in initializers It seems to say that arrays cannot be used for initialization

Add the property android:overScrollMode="always" to the XML for the ScrollView

Method 1, set it when the control is initialized

gridView.setSelector(new ColorDrawable(COLOR.TRANSPARENT));
setSelector(new ColorDrawable(Color.TRANSPARENT)); listView.setSelector(new ColorDrawable(Color.TRANSPARENT)).

Method 2, set the listSelector property in the layout file


<GridView
	android:listSelector="@android:color/transparent"
	android:numColumns="auto_fit"
	android:columnWidth="50dp"
	android:stretchMode="spacingWidth"
	android:layout_weight="1.0"
	android:layout_height="0dip"
	android:layout_width="match_parent"/>

<ListView
	android:listSelector="@android:color/transparent"
	android:layout_height="match_parent"
	android:layout_width="match_parent"/>

Of course, you can also customize the effect you want.

We recommend using method 2 to decouple the logic code from the layout file.
android-develop ミラーパス [強調]。
	       The background image disappears to a black background when the listview is dragged. Wait until the dragging is done before our own background image shows up.

	Workaround.

	      In xml: android:scrollingCache="false" or android:cacheColorHint="#00000000"

	     In the code: setScrollingCacheEnabled(false) or setCacheColorHint(0) or setCacheColorHint(Color.TRANSPARENT);

	Question 2.

	    The top and bottom edges of the listview have black shadows.

	Solution.

	   In xml: android:fadingEdge="none"

	  In code: setFadingEdgeLength(0);

Workaround.

Set the LinearLayout as a child in the ScrollView and put the other Views in the LinearLayout.
<スパン Google、調和された後、VPN経由または上記のミラーパスにアクセスする。
15.fragment Andriod開発秘話~Fragmentの遅延ロードについて
アクティビティは、ビューページャー(または他のコンテナ)内で複数のフラグメントと組み合わせて使用されることがあります。各フラグメントがローカルまたはネットワークからデータを読みに行く必要がある場合、アクティビティが最初に作成されるときに多くのリソースを初期化する必要が出てきます。このような結果では、確かに満足できないでしょう。そこで、このフラグメントに切り替わったときに、初期化だけに行くようにできないでしょうか。
答えは、このスニペットの setUserVisibleHint メソッドにあります。 http://blog.csdn.net/maosidiaoxian/article/details/38300627
フラグメントの隠蔽と表示と組み合わせて使用する。
切り替え時に複数のフラグメントを再インスタンス化しないようにする
http://www.yrom.net/blog/2013/03/10/fragment-switch-not-restart/
Android版GridViewへのheaderViewの追加について
グリッドウィズヘッダーリストアダプタ StickyGridHeaders / (英語) http://www.eoeandroid.com/blog-696650-48907.html
18.Eclipseで書式なしコメントを設定する
                    ViewParent parent = getParent();
                    if (parent ! = null) {
                        parent.requestDisallowInterceptTouchEvent(true);
                    }

In a pure layout, just set all but the bottommost view to weight 1.
解決方法は以下の通りです。Windows - > Prefer - > java - > Code Style - > Formatting - > Edit - > Comments "Enable Javadoc comment formatting" のチェックを外してください。
19.android-overdraw-to-refresh
20. LinuxダイナミックGIF画像記録
byzanz
Installation and use of byzanz

Installation under Ubuntu

  sudo add-apt-repository ppa:fossfreedom/byzanz
sudo apt-get update sudo apt-get install byzanz

You can complete the recording process with the following command.
byzanz-record -d 40 -x 0 -y 0 -w 400 -h 320 byzanz-demo.gif

Where.

    -d 40 is the duration of the recording for 40 seconds
    -x 0 is the horizontal coordinate of the recording area
    -y 0 the vertical coordinate of the recording area, remember: the top right corner of the screen is the origin (0,0)
    -w 400 the width of the recording area
    -h 320 The height of the recording area

byzanz-demo.gif Saved filename

Detailed parameters can be viewed via byzanz-record --help.
http://www.tuicool.com/articles/YFJrem

Also: GIF screen recorder for windows V2.0
ビューページワイヤレスループ
http://www.cnblogs.com/xinye/archive/2013/06/09/3129140.html
23. public void onPageScrollStateChanged (int arg0)
This method is called when the state changes, where arg0 has three states (0, 1, 2). arg0 == 1 means it is scrolling, arg0 == 2 means it is done, and arg0 == 0 means it is not doing anything.

When the page starts sliding, the three states change in the order (1, 2, 0)
24.
eclipse.ini ファイルに -Dorg.eclipse.swt.browser.DefaultType = mozilla を追加し、クリーンアップすれば OK クリーンアップコマンドを実行する
26.viewpagerはギャラリー(1画面に複数のスニペット)効果を実装しています。
27. svn コマンド
svn add コマンドでファイルを追加すると、毎回対応するフォルダに移動するので、追加したいファイルが同じフォルダにない場合は、以下のように --force で簡単に追加できます $ svn add * --force http: //developer.51cto.com/art/201005/201633.htm
もちろん今はstudioがsvn gitのようなコード管理ツールと統合されているので、直接使うのも簡単です。
配列定数はイニシャライザーのみで使用可能です。
int CC [] ={1,2,3}; When the array is defined and initialized, the length of the array is set and is 3
 and the array can no longer be reassigned as it was when it was defined
but one by one
CC[0]=1;
CC[1]=2;
CC[2]=3;
Array constants can only be used in initializers It seems to say that arrays cannot be used for initialization
29.アンドロイドプラグイン
30. スクロールビューはコンテンツが少なくなってもスクロールできる
Add the property android:overScrollMode="always" to the XML for the ScrollView
31.gridview / listviewクリック時間アンドロイドのデフォルトの背景は、黄色の背景を削除する方法選択されたときです
Method 1, set it when the control is initialized

gridView.setSelector(new ColorDrawable(COLOR.TRANSPARENT));
setSelector(new ColorDrawable(Color.TRANSPARENT)); listView.setSelector(new ColorDrawable(Color.TRANSPARENT)).

Method 2, set the listSelector property in the layout file


<GridView
	android:listSelector="@android:color/transparent"
	android:numColumns="auto_fit"
	android:columnWidth="50dp"
	android:stretchMode="spacingWidth"
	android:layout_weight="1.0"
	android:layout_height="0dip"
	android:layout_width="match_parent"/>

<ListView
	android:listSelector="@android:color/transparent"
	android:layout_height="match_parent"
	android:layout_width="match_parent"/>

Of course, you can also customize the effect you want.

We recommend using method 2 to decouple the logic code from the layout file.
リストビューの質問1には、他に2つの根本的な問題があります。
	       The background image disappears to a black background when the listview is dragged. Wait until the dragging is done before our own background image shows up.

	Workaround.

	      In xml: android:scrollingCache="false" or android:cacheColorHint="#00000000"

	     In the code: setScrollingCacheEnabled(false) or setCacheColorHint(0) or setCacheColorHint(Color.TRANSPARENT);

	Question 2.

	    The top and bottom edges of the listview have black shadows.

	Solution.

	   In xml: android:fadingEdge="none"

	  In code: setFadingEdgeLength(0);
32. ScrollViewは1つの子しかサポートしない、ScrollViewは1つの直接の子しかホストできないという報告
Workaround.

Set the LinearLayout as a child in the ScrollView and put the other Views in the LinearLayout.
33. ビューページャーはスペーシングとキャッシングを設定する
viewPager.setOffscreenPageLimit (TOTAL_COUNT)を実行します。 viewPager.setPageMargin (getResources() getDimensionPixelSize(R.dimen.page_margin)));
34. ファーストレベル・キャッシングとセカンドレベル・キャッシングの意味は何ですか?
第1レベルのキャッシュをスタティックRAMキャッシュと呼び、第2レベルは後から追加されるダイナミックRAMキャッシュと呼びます。
キャッシュを拡張すればするほど、より多くのデータをキャッシュすることができ、システムの高速化につながります。
キャッシュは通常スタティックRAMで、これは非常に高速です。
が、スタティックRAMは集積度が低く(同じデータを保存する場合、スタティックRAMはダイナミックRAMの6倍)、その分
価格が高い(スタティックRAMは同じ容量でダイナミックRAMの4倍)、そして
このことから、スタティックRAMをキャッシュとして拡張することは、非常に愚かな行為であり
しかし、システムの性能と速度を向上させるためには、キャッシュを拡張することが必要であることを
そこで妥協案として、元のスタティックRAMのキャッシュを拡張する代わりに、高速なダイナミックRAMをキャッシュとして追加し
これらの高速ダイナミックRAMは、通常のダイナミックRAMより高速ですが、元のスタティックRAMキャッシュより低速であり
元のスタティックRAMキャッシュを1次キャッシュ、後から追加されたダイナミックRAMを2次キャッシュと呼んでいます。
1次キャッシュも2次キャッシュも、その内容はメモリ上の頻繁にアクセスされるデータの複製(マッピング)であり、高速CPUによる低速メモリへのアクセスを軽減するために存在する。
35. パフォーマンスの最適化: HashMap で <integer, object> の代わりに SparseArray を使用する。
http://blog.csdn.net/haukey/article/details/8200404
36. コード指定
http://liuzhichao.com/p/1781.html#more-1781
// 念のため、パレンタルブロックを無効にしてください。
                    ViewParent parent = getParent();
                    if (parent ! = null) {
                        parent.requestDisallowInterceptTouchEvent(true);
                    }
38. linerlayoutレイアウト、親ビューの下にビューを割り当てる方法
In a pure layout, just set all but the bottommost view to weight 1.
39の左側にあるガラ
もし、左右に画像を追加するだけなら、EditeViewのプロパティの一つであるandroid:drawableLeftを使えば、テキストの左側にdrawableを出力できます。 もし、真ん中やランダムに画像を追加するなら、グラフィックスが混ざるようにEditViewを書き直さなければなりません!(笑)
40. 暗号化アルゴリズム
41.01-07 15:34:23.160:E / AndroidRuntime (1932): caused by: java.lang.UnsatisfiedLinkError: AESをロードすることができませんでした:findLibraryはnullを返しました。
01-07 15:37:43.240:E / AndroidRuntime (2537): java.lang.UnsatisfiedLinkError: native method not found: com.jetsun.hbfc.core.AESCoder.decryptCNew :()Ljava / lang / String;
01-07 15:37:43.230:D / dalvikvm (2537): JNI_OnLoad が /data/data/com.jetsun.hbfc/lib/libAES.so 0x4160abe0 で見つからず、初期化をスキップしている。
01-07 15:37:43.230: W / dalvikvm (2537): ネイティブ Lcom / jetsun / hbfc / core / AESCoder; .decryptCNew :() Ljava / lang / String のための実装が見つかりませんでした。
変換せずに整数にするポインタを返す【デフォルトで有効
01-07 17:51:47.520: D / dalvikvm (12438): JNI_OnLoad が /data/data/com.jetsun.hbfc/lib/libAES.so の 0x41601a80 で見つからず、 init をスキップ 01-07 17:51:47.525: I / JNIMsg(12438): jclass == NULL 01-07 17:51:47.525: I / JNIMsg(12438): ステップ 1: jclass がうまく始まってます! 01-08 17:51:47.525: JNIMsg(124391): jclass == NULL 01-08 17:52:52.525: I / Dalvikvm の jclass がうまく始まっています! 01-08 17:52:52.525: JNIMsg(124391) 01-07 17:51:47.525: I / JNIMsg(12438): encryptC == NULL 01-07 17:51:47.525: I / JNIMsg(12438): encryptC == NULL: ステップ 2: decryptC new failed 01-07 17:51:47.525: I / JNIMsg( 12438): Step 2: decryptC メソッドの準備ができました。
41.jniベーシック
android __android_log_print print function__ ソースコード http://blog.csdn.net/sno_guo/article/details/8143050 JNIフィールドディスクリプタ "([Ljava / lang / String;)V"。 http: / / fgsink.blog.163 .com / ブログ / 静的 / 16716997020124310169911 / 。 jniの機能解説 http://blog.csdn.net/caimouse/article/category/661872/2 Android NDKベースの学習の旅 ----- C言語からJavaへの呼び出し http:// www.cnblogs.com/luxiaofeng54/archive/2011/08/17/2142000.html JNI_OnLoad が見つかりません... init をスキップしています。 http://stackoverflow.com/questions/11798054/no-jni-onload-found-in-skipping- init eclipse ndkの設定に関する詳細説明 http://www.cnblogs.com/chenjiajin/archive/2012/04/12/2444188.html Android NDKベースのラーニングジャーニー
Ndkハイライト集計
http://www.cnblogs.com/chenjiajin/archive/2012/04/12/2444188.html http://www.cnblogs.com/luxiaofeng54/archive/2011/08/17/2142000.html http:// blog.csdn.net/caimouse/article/details/6853795 http://fgsink.blog.163.com/blog/#m=0&t=1&c=fks_084071081085086066085080094095085080086066082095095068084
暗号化
固定鍵によるAES暗号化 http://fenglingcorp.iteye.com/blog/586600 アンドロイドRsaアルゴリズム 暗号化 平文 - >公開鍵 - >暗号文 暗号文 - >鍵 - >平文 http://blog.sina.com.cn/s/blog_6568e7880100x8r9.html javaの暗号化・復号化の技術 著者 http://snowolf.iteye.com/blog/379860 AndroidのAES暗号化アルゴリズムとその実装 http: // blog .csdn.net / randyjiawenjie / article / details / 6587986 AES暗号化・復号化 for Android http://www.cnblogs.com/carlosk/archive/2012/05/18/2507975.html
暗号化方式 AES 暗号化方式 AES / CBC / PKCS5Padding 暗号化ベクトル iv secretkey secret 符号化方式 utf-8
43. プロガードの使用
難読化されたときに難読化されない部分。
44.ソケット
ソケットの簡単な使い方
http://www.cnblogs.com/harrisonpc/archive/2011/03/31/2001565.html
インスタントメッセージング
xmppによるOpenfireの導入と展開 openfire smack開発 [1]
http://blog.csdn.net / しみそ / 記事 / 詳細 / 8816558
Openfire + Spark チャットデモ
http://www.apkbus.com/android-69413-1-1.html
<スパン
オープンファイア
のAndroidクライアント実装は
http://download.csdn.net/detail/ sky_monkey / 5820879 #comments
45. オーディオコーデック
FFmpeg の Android 用プラットフォームへの移植 - コンパイル http://blog.csdn.net/gobitan/article/details/22750719#reply
46.f5ロードバランシング
Pocket Navigator - APPアーキテクチャとナビゲーションデザイン http://www.yixieshi.com/ucd/13188.html
APPナビゲーションデザインの手順は、大きく分けて以下の3つです。
APPフレームワークの仕上げ:情報アーキテクチャまたはタスク分析
<スパン フレームワークの階層判定:フラットvsツリー
<スパン ナビゲーションに特化した表現:コントロールフォームと配置
48. モバイルアプリのアーキテクチャ設計
http://blog.csdn.net/uxyheaven/article/details/38041091 レイヤードアーキテクチャ+MVCによるモバイルアプリの設計 http://www.cnblogs.com/Logen/archive/2012/11/08/2760638.html
アンダーソン・ファイン オープンソース・プロジェクト
http://blog.csdn.net/caesardadi/article/details/21091645
50. GDB による JNI コードのデバッグ
Android NDKアプリケーションの原則 http://shihongzhi.com/ndk/ NDK開発ガイド - Android NDKの概要 http://hualang.iteye.com/blog/1135105
英語で"Make unlimited use"を使用できないようにする。
解決策 ターミナル sogou-qimpanel &
関連
-
adb connect device offline エラー解決
-
armeabi-v7a、arm64-v8a、armeabi、x86、x86_64の違いについて
-
Android プロジェクトのライブラリに armeabi-v7a、armeabi、x86 が追加されました。
-
第20章 OnCheckedChangeListenerイベント (ゼロから学ぶAndroid)
-
AndroidでFragmentを使用すると、Fragmentの内部コントロールを取得できず、findViewById()の結果がNullになる - 解決済み
-
リターンスタックpopBackStack()のAndroidフラグメント、リターンonResumeの問題
-
MyEclipseの起動時に以下のようなエラーが発生したため、ログファイルを参照してください。
-
Androidです。ListView.addHeaderView()の使用方法と注意点
-
Androidスレッドの詳細
-
android.content.res.Resources$NotFoundException: 文字列リソースID #0x1
最新
-
nginxです。[emerg] 0.0.0.0:80 への bind() に失敗しました (98: アドレスは既に使用中です)
-
htmlページでギリシャ文字を使うには
-
ピュアhtml+cssでの要素読み込み効果
-
純粋なhtml + cssで五輪を実現するサンプルコード
-
ナビゲーションバー・ドロップダウンメニューのHTML+CSSサンプルコード
-
タイピング効果を実現するピュアhtml+css
-
htmlの選択ボックスのプレースホルダー作成に関する質問
-
html css3 伸縮しない 画像表示効果
-
トップナビゲーションバーメニュー作成用HTML+CSS
-
html+css 実装 サイバーパンク風ボタン
おすすめ
-
AndroidStudioのコンパイル時のエラーを解決します。構成 ':classpath' のすべてのアーティファクトを解決できませんでした。
-
JSONException: java.lang.String は JSONObject ソリューションに変換できません。
-
Androidにおけるメッセージの仕組みの分析 - 解決策。ビュー階層を作成した元のスレッドだけが、そのビューに触れることができる。
-
アプリケーションがメインスレで仕事をしすぎている可能性がある
-
アンドロイドのdrawableフォルダ配下の各種xmlスタイルファイルの使用方法について詳しく解説しています
-
Androidのボトムナビゲーションバー、3つのスタイルとインプリメンテーション
-
android:paddingとandroid:marginの違いについて。
-
サービスを利用した特別な放送受信者の登録
-
Android画像角丸
-
Androidエラー:このターゲットで使用できるCPU/ABIシステムイメージがありません。