Androidリストウィジェット開発詳細
久しぶりのブログ更新なので、今回はAndroidのリストウィジェットの実装方法を勉強します。
このページをアプリの中に実装すれば、Androidの基礎を少しかじった子供なら誰でも簡単に書けると思います。しかし、Widgetの中に入れるとなると、そう簡単にはいかないかもしれません。なぜなら、Widgetは我々のアプリのプロセスではなく、システムのSystemServerのプロセスで実行されるからです。Whf!が我々のAppのプロセスにないことに驚かれるかもしれませんね。ということは、アプリでできるような View コントロールの操作はできないということでしょうか?答えは「イエス」です。しかし、あまり心配しないでください。リモートプロセスでインターフェイスを更新するために、Google dad は私たちのために特別に RemoteViews クラスを提供してくれています。名前から、RemoteViewsはViewだと思われるかもしれませんが、そうではなく、RemoteViewsは単なるView構造体なのです。リモートプロセス内のインターフェイスを表示・更新することができます。今日実装するリストウィジェットは、RemoteVeiwをベースにしています。
では、次にデスクトップウィジェットの実装方法を学びましょう。まず、ウィジェットを実装するためのいくつかのコアステップをリストアップします。
- ウィジェットページのレイアウト
- ウィジェットの設定情報
- AppWidgetProviderを理解する
- リスト適応のためのRemoteViewsFactory
- クリックのイベント処理
I. ウィジェットインターフェースの実装
1. ウィジェットページのレイアウト まず、以下の内容でレイアウトファイルlayout_widget.xmlを作成します。
レイアウトのListViewコントロールを見ると、今の時代にListViewを使うなんてと笑ってしまいますが、RecyclerViewがいいんじゃないでしょうか?そう、読んで字の如く、サポートされていないのです。Widgetで好きなものを使うことはできないし、ネイティブで使うのが不安なら自作でコントロールすることもできない。申し訳ありませんが、ウィジェットはそれをサポートしていません。つまり、ウィジェットには多くの制限があるのです。では、ウィジェットでサポートされているコントロールを見てみましょう。
<ブロッククオート
RemoteViewsオブジェクト(ひいてはApp Widget)は、以下のレイアウトクラスをサポートすることができます。
フレームレイアウト
リニアレイアウト
RelativeLayout
グリッドレイアウト
そして、以下のウィジェットクラス。
アナログ時計
ボタン
クロノメーター
画像ボタン
画像ビュー
プログレスバー
テキストビュー
ビューフリッパー
リストビュー
GridView
スタックビュー
AdapterViewFlipper
これらのクラスの子孫はサポートされていません。
上記の Views のリストに加え、Android ネイティブの Views やカスタム Views を含む他のすべての Views は Widgets ではサポートされていません。したがって、ウィジェットページの制限に基づくクールなアニメーションとは、基本的におさらばです。
II. ウィジェット設定情報
設定情報は、主にウィジェットの幅や高さ、ズームモード、更新間隔など、いくつかのプロパティを設定するためのものです。res/xmlディレクトリに、好きな名前で新しいwidget_provider.xmlファイルを作成する必要があります。このファイルの内容は、以下のとおりです(参考用)。
Finally, we need to reference this file when registering the AppWidgetProvider in AndroidManifest, using the following.
public class ListWidgetProvider extends AppWidgetProvider {
private static final String TAG = "WIDGET";
public static final String REFRESH_WIDGET = "com.oitsme.REFRESH_WIDGET";
public static final String COLLECTION_VIEW_ACTION = "com.oitsme.COLLECTION_VIEW_ACTION";
public static final String COLLECTION_VIEW_EXTRA = "com.oitsme.COLLECTION_VIEW_EXTRA";
private static Handler mHandler = new Handler();
private Runnable runnable=new Runnable() {
@Override
public void run() {
hideLoading(Utils.getContext());
Toast.makeText(Utils.getContext(), "Refresh successful", Toast.LENGTH_SHORT).show();
}
};
@Override
public void onUpdate(Context context, AppWidgetManager appWidgetManager,
int[] appWidgetIds) {
Log.d(TAG, "ListWidgetProvider onUpdate");
for (int appWidgetId : appWidgetIds) {
// Get the view corresponding to the AppWidget
RemoteViews remoteViews = new RemoteViews(context.getPackageName(), R.layout.layout_widget);
// Set the intent that responds to "button(bt_refresh)"
Intent btIntent = new Intent().setAction(REFRESH_WIDGET);
PendingIntent btPendingIntent = PendingIntent.getBroadcast(context, 0, btIntent, PendingIntent.FLAG_UPDATE_CURRENT);
remoteViews.setOnClickPendingIntent(R.id.tv_refresh, btPendingIntent);
// Set the adapter for "ListView".
// (01) intent: The intent corresponding to starting ListWidgetService(RemoteViewsService).
// (02) setRemoteAdapter: Set the adapter of gridview.
// to associate ListView with ListWidgetService by setRemoteAdapter
// for the purpose of updating the ListView via ListWidgetService
Intent serviceIntent = new Intent(context, ListWidgetService.class);
remoteViews.setRemoteAdapter(R.id.lv_device, serviceIntent);
// Set the intent template that responds to "ListView"
// Description: "Collection control (such as GridView, ListView, StackView, etc.)" contains many child elements, such as GridVi
For the above code, let's focus on the onUpdate() method. In onUpdate() we implement two main functions, the first function is to click on events outside the ListView, such as clicking on "Refresh" to update the widget. The second function is to adapt the ListView and implement the click event of the Item control inside the ListView. In this method, we first get an instance of RemoteView, which corresponds to the View of our Widget layout, and the comments are written in detail about the implementation of the click event, so we won't explain too much here. The point is to understand how to implement and adapt the ListView, see the next section for details.
IV.RemoteViewsFactory implementation of list adaptation
We mentioned RemoteViewsFactory above. This class is actually analogous to the Adapter of ListView, which exists to adapt the data of ListView. Only here it is implemented by replacing Adapter with RemoteViews. Take a look at the code in the ListRemoteViewsFactory.
class ListRemoteViewsFactory implements RemoteViewsService.RemoteViewsFactory {
private final static String TAG="Widget";
private Context mContext;
private int mAppWidgetId;
private static List
With RemoteViewsFactory, you also need RemoteViewsService to associate with the ListView. Let's look at the implementation class of RemoteViewsService, ListWidgetService, which is very simple and only overrides the onGetViewFactory method.
public class ListWidgetService extends RemoteViewsService {
@Override
public RemoteViewsService.RemoteViewsFactory onGetViewFactory(Intent intent) {
return new ListRemoteViewsFactory(this, intent);
}
}
// Set the adapter for "ListView".
// (01) intent: The intent corresponding to starting ListWidgetService(RemoteViewsService)
// (02) setRemoteAdapter: Set the adapter of the ListView
// to associate ListView with ListWidgetService by setRemoteAdapter
// for the purpose of updating the ListView via ListWidgetService
Intent serviceIntent = new Intent(context, ListWidgetService.class);
remoteViews.setRemoteAdapter(R.id.lv_device, serviceIntent);
V. Click event handling
I'm sure we all know about event clicks in widgets and adapting ListViews. For example, we can't set an event listener to the control to handle it in the dropback method like we can in the app after we clicked refresh in the widget. We mentioned at the beginning of the article that widgets rely on broadcasts, so when we click on a refresh we are actually just sending out a broadcast. If we don't handle the broadcast then the click event is meaningless. So, let's look at the second more important method in ListWidgetProvider, onReceive(). This method is relatively simple, as long as we handle the particular broadcast accordingly.
@Override
public void onReceive(Context context, Intent intent) {
String action = intent.getAction();
AppWidgetManager appWidgetManager = AppWidgetManager.getInstance(context);
if (action.equals(COLLECTION_VIEW_ACTION)) { // handle the events in the list
// accept the broadcast of the "ListView" click event
int type = intent.getIntExtra("Type", 0);
int appWidgetId = intent.getIntExtra(AppWidgetManager.EXTRA_APPWIDGET_ID,
AppWidgetManager.INVALID_APPWIDGET_ID);
int index = intent.getIntExtra(COLLECTION_VIEW_EXTRA, 0);
switch (type) {
case 0:
Toast.makeText(context, "item" + index, Toast.LENGTH_SHORT).show();
break;
case 1:
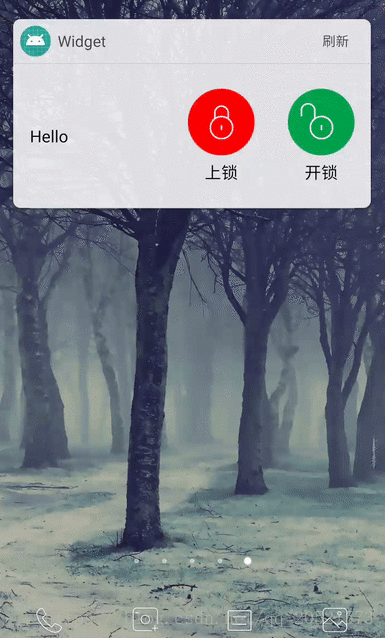
Toast.makeText(context, "lock" + index, Toast.LENGTH_SHORT).show();
break;
case 2:
Toast.makeText(context, "unlock"+index, Toast.LENGTH_SHORT).show();
break;
}
} else if (action.equals(REFRESH_WIDGET)) {// Handle refresh events
// accept the broadcast of the "bt_refresh" click event
Toast.makeText(context, "Refresh... ", Toast.LENGTH_SHORT).show();
final AppWidgetManager mgr = AppWidgetManager.getInstance(context);
final ComponentName cn = new ComponentName(context,ListWidgetProvider.class);
ListRemoteViewsFactory.refresh();
mgr.notifyAppWidgetViewDataChanged(mgr.getAppWidgetIds(cn),R.id.lv_device);
mHandler.postDelayed(runnable,2000);
showLoading(context);
}
super.onReceive(context, intent);
}
Finally, don't forget that ListWidgetProvider is the broadcast and ListWidgetService is the service, both of which we need to register in the AndroidManifest file at
https://developer.android.com/guide/topics/appwidgets/
Source code download
Open Source Library Recommendations
BannerViewPager
An infinite rotation library with powerful features based on ViewPager2 implementation. Supports multiple page switching effects and indicator styles.
ViewPagerIndicator
An indicator for ViewPager and ViewPager2 that supports multiple slider styles and sliding modes
public class ListWidgetProvider extends AppWidgetProvider {
private static final String TAG = "WIDGET";
public static final String REFRESH_WIDGET = "com.oitsme.REFRESH_WIDGET";
public static final String COLLECTION_VIEW_ACTION = "com.oitsme.COLLECTION_VIEW_ACTION";
public static final String COLLECTION_VIEW_EXTRA = "com.oitsme.COLLECTION_VIEW_EXTRA";
private static Handler mHandler = new Handler();
private Runnable runnable=new Runnable() {
@Override
public void run() {
hideLoading(Utils.getContext());
Toast.makeText(Utils.getContext(), "Refresh successful", Toast.LENGTH_SHORT).show();
}
};
@Override
public void onUpdate(Context context, AppWidgetManager appWidgetManager,
int[] appWidgetIds) {
Log.d(TAG, "ListWidgetProvider onUpdate");
for (int appWidgetId : appWidgetIds) {
// Get the view corresponding to the AppWidget
RemoteViews remoteViews = new RemoteViews(context.getPackageName(), R.layout.layout_widget);
// Set the intent that responds to "button(bt_refresh)"
Intent btIntent = new Intent().setAction(REFRESH_WIDGET);
PendingIntent btPendingIntent = PendingIntent.getBroadcast(context, 0, btIntent, PendingIntent.FLAG_UPDATE_CURRENT);
remoteViews.setOnClickPendingIntent(R.id.tv_refresh, btPendingIntent);
// Set the adapter for "ListView".
// (01) intent: The intent corresponding to starting ListWidgetService(RemoteViewsService).
// (02) setRemoteAdapter: Set the adapter of gridview.
// to associate ListView with ListWidgetService by setRemoteAdapter
// for the purpose of updating the ListView via ListWidgetService
Intent serviceIntent = new Intent(context, ListWidgetService.class);
remoteViews.setRemoteAdapter(R.id.lv_device, serviceIntent);
// Set the intent template that responds to "ListView"
// Description: "Collection control (such as GridView, ListView, StackView, etc.)" contains many child elements, such as GridVi
For the above code, let's focus on the onUpdate() method. In onUpdate() we implement two main functions, the first function is to click on events outside the ListView, such as clicking on "Refresh" to update the widget. The second function is to adapt the ListView and implement the click event of the Item control inside the ListView. In this method, we first get an instance of RemoteView, which corresponds to the View of our Widget layout, and the comments are written in detail about the implementation of the click event, so we won't explain too much here. The point is to understand how to implement and adapt the ListView, see the next section for details.
IV.RemoteViewsFactory implementation of list adaptation
We mentioned RemoteViewsFactory above. This class is actually analogous to the Adapter of ListView, which exists to adapt the data of ListView. Only here it is implemented by replacing Adapter with RemoteViews. Take a look at the code in the ListRemoteViewsFactory.
class ListRemoteViewsFactory implements RemoteViewsService.RemoteViewsFactory {
private final static String TAG="Widget";
private Context mContext;
private int mAppWidgetId;
private static List
With RemoteViewsFactory, you also need RemoteViewsService to associate with the ListView. Let's look at the implementation class of RemoteViewsService, ListWidgetService, which is very simple and only overrides the onGetViewFactory method.
public class ListWidgetService extends RemoteViewsService {
@Override
public RemoteViewsService.RemoteViewsFactory onGetViewFactory(Intent intent) {
return new ListRemoteViewsFactory(this, intent);
}
}
// Set the adapter for "ListView".
// (01) intent: The intent corresponding to starting ListWidgetService(RemoteViewsService)
// (02) setRemoteAdapter: Set the adapter of the ListView
// to associate ListView with ListWidgetService by setRemoteAdapter
// for the purpose of updating the ListView via ListWidgetService
Intent serviceIntent = new Intent(context, ListWidgetService.class);
remoteViews.setRemoteAdapter(R.id.lv_device, serviceIntent);
V. Click event handling
I'm sure we all know about event clicks in widgets and adapting ListViews. For example, we can't set an event listener to the control to handle it in the dropback method like we can in the app after we clicked refresh in the widget. We mentioned at the beginning of the article that widgets rely on broadcasts, so when we click on a refresh we are actually just sending out a broadcast. If we don't handle the broadcast then the click event is meaningless. So, let's look at the second more important method in ListWidgetProvider, onReceive(). This method is relatively simple, as long as we handle the particular broadcast accordingly.
@Override
public void onReceive(Context context, Intent intent) {
String action = intent.getAction();
AppWidgetManager appWidgetManager = AppWidgetManager.getInstance(context);
if (action.equals(COLLECTION_VIEW_ACTION)) { // handle the events in the list
// accept the broadcast of the "ListView" click event
int type = intent.getIntExtra("Type", 0);
int appWidgetId = intent.getIntExtra(AppWidgetManager.EXTRA_APPWIDGET_ID,
AppWidgetManager.INVALID_APPWIDGET_ID);
int index = intent.getIntExtra(COLLECTION_VIEW_EXTRA, 0);
switch (type) {
case 0:
Toast.makeText(context, "item" + index, Toast.LENGTH_SHORT).show();
break;
case 1:
Toast.makeText(context, "lock" + index, Toast.LENGTH_SHORT).show();
break;
case 2:
Toast.makeText(context, "unlock"+index, Toast.LENGTH_SHORT).show();
break;
}
} else if (action.equals(REFRESH_WIDGET)) {// Handle refresh events
// accept the broadcast of the "bt_refresh" click event
Toast.makeText(context, "Refresh... ", Toast.LENGTH_SHORT).show();
final AppWidgetManager mgr = AppWidgetManager.getInstance(context);
final ComponentName cn = new ComponentName(context,ListWidgetProvider.class);
ListRemoteViewsFactory.refresh();
mgr.notifyAppWidgetViewDataChanged(mgr.getAppWidgetIds(cn),R.id.lv_device);
mHandler.postDelayed(runnable,2000);
showLoading(context);
}
super.onReceive(context, intent);
}
Finally, don't forget that ListWidgetProvider is the broadcast and ListWidgetService is the service, both of which we need to register in the AndroidManifest file at
https://developer.android.com/guide/topics/appwidgets/
Source code download
Open Source Library Recommendations
BannerViewPager
An infinite rotation library with powerful features based on ViewPager2 implementation. Supports multiple page switching effects and indicator styles.
ViewPagerIndicator
An indicator for ViewPager and ViewPager2 that supports multiple slider styles and sliding modes
関連
-
Android プロジェクトのライブラリに armeabi-v7a、armeabi、x86 が追加されました。
-
Android プロジェクト コンパイル時に com.android.builder.internal.aapt.v2.Aapt2Exception に遭遇しました。AAPT2 エラー: 詳細はログを確認してください。
-
Androidで「デフォルトのアクティビティが見つからない」問題を解決する
-
Android ViewPager のエラーです。NULLオブジェクトの参照で仮想メソッドxxxを呼び出そうとした
-
BUG: android アクティビティはエクスポートされるか、インテント・フィルタを含む必要があります。
-
オーディオとビデオを再生するための資産と生でAndroidの練習
-
ライブ画面録画のAndroid実装 (a) ScreenRecorderの簡易解析
-
Android Studio がエラーを報告します。指定された名前に一致するリソースが見つかりませんでした
-
Android TextViewは、あるテキストのカラー・フォント・サイズを設定する
-
原因:android.content.res.Resources$NotFoundException。文字列リソースID #0x0
最新
-
nginxです。[emerg] 0.0.0.0:80 への bind() に失敗しました (98: アドレスは既に使用中です)
-
htmlページでギリシャ文字を使うには
-
ピュアhtml+cssでの要素読み込み効果
-
純粋なhtml + cssで五輪を実現するサンプルコード
-
ナビゲーションバー・ドロップダウンメニューのHTML+CSSサンプルコード
-
タイピング効果を実現するピュアhtml+css
-
htmlの選択ボックスのプレースホルダー作成に関する質問
-
html css3 伸縮しない 画像表示効果
-
トップナビゲーションバーメニュー作成用HTML+CSS
-
html+css 実装 サイバーパンク風ボタン
おすすめ
-
Android Studio + Gradle またはコマンドラインを使用した Android apk の署名とパッケージング
-
Androidでコンストラクタのインテントを解決できない原因と解決策
-
android studio3.2 a pitfall: リソースの処理に失敗しました。詳細は上記の aapt の出力を参照してください。
-
RecyclerView がアダプタが接続されていませんと表示され、レイアウトソリューションをスキップする
-
Android フロントカメラのビデオ録画に失敗しました (MediaRecorder: start failed: -19)
-
jniとjavaの間でbytearrayを受け渡しする
-
Rは変数に解決できない
-
app'の実行エラーです。ターゲットデバイスが見つかりませんでした。
-
React Native エラー。アプリケーション XXX は登録されていません ソリューション
-
ARMアセンブリ共通命令 NULL演算 NOP命令