Android ビューの階層構造
参考にしてください。
1. AndroidアプリのsetContentViewとLayoutInflaterの読み込み解決機構のソースコード解析
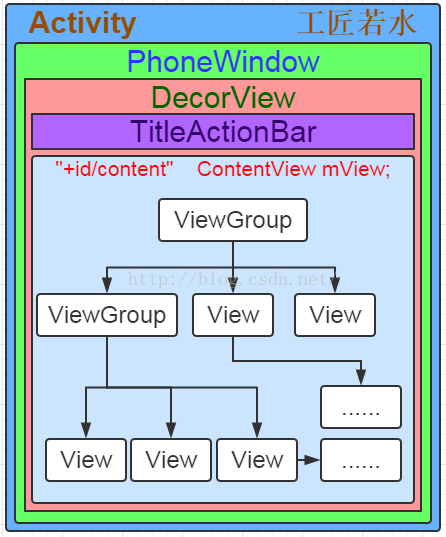
アンドロイドのビュー階層がなぜこのようなレイアウトになっているのかわからなかったが、今ようやく理解できた。実は上の画像にはちょっと問題があって、実はDecorWindowの中にid statusBarBackgroudとid navigationBarBackgroundという別のビューがあって、それぞれ電話の上部にあるステータスバーと電話の下部にあるナビゲーションバーを表現しているんですね。
Activityでのレイアウトの読み込みは、onCreate atでsetContentViewメソッドを呼び出すことで開始されます。
    @Override
    protected void onCreate(Bundle savedInstanceState) {
        // TODO Auto-generated method stub
        super.onCreate(savedInstanceState);
        setContentView(R.layout.main_layout);
        ButterKnife.bind(this);
    }
Activity には setContentView オーバーロードされたメソッドがあり、1つは layoutid 用、もう1つはビューを直接渡すためのものです。
    public void setContentView(@LayoutRes int layoutResID) {
        getWindow().setContentView(layoutResID);
        initWindowDecorActionBar();
    }
	public void setContentView(View view) {
        getWindow().setContentView(view);
        initWindowDecorActionBar();
    }
実際には、すべての呼び出しはPhoneWindowのsetContentViewメソッドです。 initWindowDecorActionBarは、アクションバーを一目で分かるように初期化します。
    @Override
    public void setContentView(int layoutResID) {
        // Note: FEATURE_CONTENT_TRANSITIONS may be set in the process of installing the window
        // decor, when theme attributes and the like are crystalized.
        // before this happens.
        if (mContentParent == null) {
            installDecor();// If mContentParent is the AC use installDecor, initialize
        } else if (!hasFeature(FEATURE_CONTENT_TRANSITIONS)) {
            mContentParent.removeAllViews();
        }

        if (hasFeature(FEATURE_CONTENT_TRANSITIONS)) {
            final Scene newScene = Scene.getSceneForLayout(mContentParent, layoutResID,
                    getContext());
            transitionTo(newScene);
        } else {
            // You can see that the view mContentParent acts as the parent of layoutResID, so the layoutResID root width/height parameter is valid
            mLayoutInflater.inflate(layoutResID, mContentParent);
        }
        mContentParent.requestApplyInsets();
        final Callback cb = getCallback();
        if (cb ! = null && !isDestroyed()) {
            cb.onContentChanged();
        }
    }

    @Override
    public void setContentView(View view) {
        setContentView(view, new ViewGroup.LayoutParams(MATCH_PARENT, MATCH_PARENT));// so it's always MATCH_PARENT, so the width/height of the view is invalid
    }

    @Override
    public void setContentView(View view, ViewGroup.LayoutParams params) {
        // Note: FEATURE_CONTENT_TRANSITIONS may be set in the process of installing the window
        // decor, when theme attributes and the like are crystalized.
        // before this happens.
        if (mContentParent == null) {
            installDecor();
        } else if (!hasFeature(FEATURE_CONTENT_TRANSITIONS)) {
            mContentParent.removeAllViews();
        }

        if (hasFeature(FEATURE_CONTENT_TRANSITIONS)) {
            view.setLayoutParams(params);
            final Scene newScene = new Scene(mContentParent, view);
            transitionTo(newScene);
        } else {
            mContentParent.addView(view, params);//add this view to mContentParent now, while layoutparam is MATCH_PARENT
        }
        mContentParent.requestApplyInsets();
        final Callback cb = getCallback();
        if (cb ! = null && !isDestroyed()) {
            cb.onContentChanged();
        }
    }
setContentView(int layoutResID) ビューによって設定されたlayout_width/layout_heightはinflate(id,mParent)を介して設定されているので有効です。
inflateメソッドの内訳は、以下の通りです。
Android LayoutInflaterの原理解析
mContentParentはinstallDecorメソッドで初期化されるため、このメソッドでは
      private void installDecor() {
        if (mDecor == null) {
            mDecor = generateDecor();//initialize mDecor the View
            mDecor.setDescendantFocusability(ViewGroup.FOCUS_AFTER_DESCENDANTS);
            mDecor.setIsRootNamespace(true);
            if (!mInvalidatePanelMenuPosted && mInvalidatePanelMenuFeatures ! = 0) {
                mDecor.postOnAnimation(mInvalidatePanelMenuRunnable);
            }
        }
        if (mContentParent == null) {
            mContentParent = generateLayout(mDecor);//initialize mContentParent by mDecor object
            .....
	    }
	.....
	}
private final class DecorView extends FrameLayout implements RootViewSurfaceTaker
そして、generateLayoutメソッドでmContentParentオブジェクトを初期化します。
    protected ViewGroup generateLayout(DecorView decor) {
        // Apply data from current theme.
        TypedArray a = getWindowStyle();
		.........

        if (a.getBoolean(R.styleable.Window_windowNoTitle, false)) { // Get the setting in the theme, if it is NoTitle
            requestFeature(FEATURE_NO_TITLE);// call this method to indicate no title
        } else if (a.getBoolean(R.styleable.Window_windowActionBar, false)) { // get the setting in the theme, if it's ActionBar
            // Don't allow an action bar if there is no title.
            requestFeature(FEATURE_ACTION_BAR);// call this method to indicate actionbar
        }
	.........

        int layoutResource;
        int features = getLocalFeatures();//remember the requestFeature from above, then you can get it through the getLocalFeatures method. In fact, you can call requestFeature in the activity
        // System.out.println("Features: 0x" + Integer.toHexString(features));
        if ((FEATURES & (1 << FEATURE_SWIPE_TO_DISMISS)) ! = 0) {
            layoutResource = R.layout.screen_swipe_dismiss;
        }
	..........
  	else if ((FEATURES & (1 << FEATURE_NO_TITLE)) == 0) {
            // If no other features and not embedded, only need a title.
            // If the window is floating, we need a dialog layout
            if (mIsFloating) {
                TypedValue res = new TypedValue();
                getContext().getTheme().resolveAttribute(
                        R.attr.dialogTitleDecorLayout, res, true);
                layoutResource = res.resourceId;
            } else if ((FEATURES & (1 << FEATURE_ACTION_BAR)) ! = 0) {
                layoutResource = a.getResourceId(
                        R.styleable.Window_windowActionBarFullscreenDecorLayout,
                        R.layout.screen_action_bar);
            } else {
                layoutResource = R.layout.screen_title;
            }
            // System.out.println("Title!");
        } else if ((FEATURES & (1 << FEATURE_ACTION_MODE_OVERLAY)) ! = 0) {
            layoutResource = R.layout.screen_simple_overlay_action_mode;
        } else {
            // Embedded, so no decoration is needed.
            layoutResource = R.layout.screen_simple;
            // System.out.println("Simple!");
        }
	............

        View in = mLayoutInflater.inflate(layoutResource, null);
        decor.addView(in, new ViewGroup.LayoutParams(MATCH_PARENT, MATCH_PARENT));//add the above obtained layoutResource to decor
        mContentRoot = (ViewGroup) in;

        ViewGroup contentParent = (ViewGroup)findViewById(ID_ANDROID_CONTENT);//get the view with id=content as the contenparent
	............
    }
一方、ウィンドウのスタイルを設定したい場合は、setContentViewの前にある
        requestWindowFeature(Window.FEATURE_NO_TITLE);//getLocalFeatures method to be retrieved
        setContentView(R.layout.test_layout);
ウィンドウスタイルがNoTitleでアクションバーがない場合、ウィンドウルートレイアウトはscreen_title.xml.xmlとなります。
<LinearLayout xmlns:android="http://schemas.android.com/apk/res/android"
    android:orientation="vertical"
    android:fitsSystemWindows="true">
    <! -- Popout bar for action modes -->
    <ViewStub android:id="@+id/action_mode_bar_stub"
              android:inflatedId="@+id/action_mode_bar"
              android:layout="@layout/action_mode_bar"
              android:layout_width="match_parent"
              android:layout_height="wrap_content"
              android:theme="?attr/actionBarTheme" />
    <FrameLayout
        android:layout_width="match_parent"
        android:layout_height="?android:attr/windowTitleSize"
        style="?android:attr/windowTitleBackgroundStyle">
        <TextView android:id="@android:id/title"
            style="?android:attr/windowTitleStyle"
            android:background="@null"
            android:fadingEdge="horizontal"
            android:gravity="center_vertical"
            android:layout_width="match_parent"
            android:layout_height="match_parent" />
    </FrameLayout>
    <FrameLayout android:id="@android:id/content"
        android:layout_width="match_parent"
        android:layout_height="0dip"
        android:layout_weight="1"
        android:foregroundGravity="fill_horizontal|top"
        android:foreground="?android:attr/windowContentOverlay" />
</LinearLayout>
この推測を検証するために、Androidandroid-SDK-Toolsの階層ビューアツールを開き、以下を確認します。
私のコードでは、タイトルもアクションバーも設定されていません。
メイン_アクティビティ.xml
<LinearLayout xmlns:android="http://schemas.android.com/apk/res/android"
              android:layout_width="match_parent"
              android:layout_height="match_parent"
              android:gravity="center"
              android:orientation="vertical">

    <Button
        android:id="@+id/test"
        android:text="Test"
        android:layout_width="wrap_content"
        android:layout_height="wrap_content"/>
    <Button
        android:id="@+id/startAnim"
        android:layout_marginTop="100dp"
        android:background="@android:color/holo_red_dark"
        android:layout_width="wrap_content"
        android:layout_height="wrap_content"
        android:text="start"/>

</LinearLayout>
    <style name="AppTheme.NoActionBar">
        <item name="windowActionBar">false</item>
        <item name="windowNoTitle">true</item>
    </style>
    final void handleResumeActivity(IBinder token,
            boolean clearHide, boolean isForward, boolean reallyResume) {
        // If we are getting ready to gc after going to the background, well
        // we are back active so skip it.
        ......
        // TODO Push resumeArgs into the activity for consideration
        ActivityClientRecord r = performResumeActivity(token, clearHide);

        if (r ! = null) {
            ......
            // If the window hasn't yet been added to the window manager,
            // and this guy didn't finish itself or start another activity,
            // then go ahead and add the window.
            ......
            // If the window has already been added, but during resume
            // we started another activity, then don't yet make the
            // window visible.
            ......
            // The window is now visible if it has been added, we are not
            // simply finishing, and we are not starting another activity.
            If (!r.activity.mFinished && willBeVisible
                    && r.activity.mDecor ! = null && !r.hideForNow) {
                ......
                if (r.activity.mVisibleFromClient) {
                    r.activity.makeVisible();
                }
            }
            ......
        } else {
            // If an exception was thrown when trying to resume, then
            // just end this activity.
            ......
        }
    }
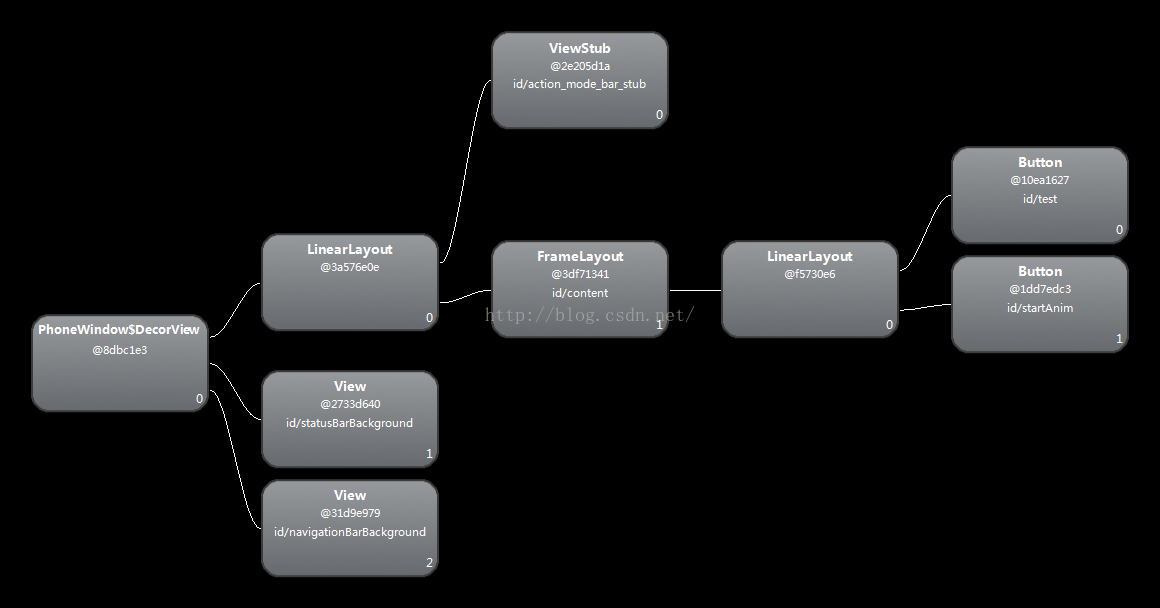
DecorViewは本当にルートViewとして機能し、その下に3つのサブビューがあります。idはstatusBarBackgroudとnavigationBarBackgroundで、それぞれ電話の上部にあるステータスバーと電話の下部にあるナビゲーションバーに相当するものです。次にLinearLayoutがあり、これは明らかに前述のscreen_title.xml.xmlのルートLinearLayoutです。そして、@+id/action_mode_bar_stubのViewStub、@android:id/content FrameLayout、そして、setContentViewにあるので、次の2通りのルートビューとしてこのFrameLayoutを持ってmain_activity.xmlで表示されます。
mLayoutInflater.inflate(layoutResID, mContentParent)を実行します。
mContentParent.addView(view, params)を実行します。
最後に inflate は内部的に addview を呼び出します。そして、ビューがビューグループである場合、ビューグループはその中のすべてのサブビューを追加するので、最終的にビューはビュー階層を形成します。 .
inflateの原理は
Android LayoutInflaterの原理解析
では最後に、すべてのビューのルートビューグループが上記の decorview であることを知った上で、この decorview はどこに追加されるのでしょうか?
Activityを開始すると、実際にはactivityThreadのmainメソッドが開始され、メインスレッドのルーパーが作成されることが分かっています。
ActivityThreadのmainメソッドを呼び出してActivityを開始した後、ActivityThreadクラスのperformLaunchActivityを呼び出して、起動するActivityコンポーネントを作成します。
(onCreateでsetContentViewが呼ばれたので、decorView以外のビューが追加されています)。decorViewはhandleResumeActivityで追加されます。
handleResumeActivityメソッドは、r.activity.makeVisible()を呼び出します。
    void makeVisible() {
        if (!mWindowAdded) {
            ViewManager wm = getWindowManager();
            wm.addView(mDecor, getWindow().getAttributes());
            mWindowAdded = true;
        }
        mDecor.setVisibility(View.VISIBLE);
    }
このDecorViewをwmに追加するために、ActivityのMakeVisibleメソッドを使用します。
    public void addView(View view, ViewGroup.LayoutParams params, Display display, Window parentWindow) {
        ............
        ViewRootImpl root;
        View panelParentView = null;

		............
        root = new ViewRootImpl(view.getContext(), display);
        view.setLayoutParams(wparams);
        mViews.add(view);
        mRoots.add(root);
        mParams.add(wparams);
    }
一方 wm.addView は実際には WindowManagerGlobal の addView メソッドを呼び出して、ViewRootImpl オブジェクトを生成しているのですが、このメソッドを呼び出すことで、WindowManagerGlobal は ViewRootImpl オブジェクトを生成します。ViewRootImplをご存知の方は、Viewの描画処理は、ViewRootImplのperformTraversalsメソッドから始まり、計測、レイアウト、描画の処理を経て、Viewが描画されます。実は、invalidateも最後にViewRootImplのperformTraversalsメソッドを呼び出しています。
    public void addView(View view, ViewGroup.LayoutParams params, Display display, Window parentWindow) {
        ............
        ViewRootImpl root;
        View panelParentView = null;

		............
        root = new ViewRootImpl(view.getContext(), display);
        view.setLayoutParams(wparams);
        mViews.add(view);
        mRoots.add(root);
        mParams.add(wparams);
    }
要約すると
1. アプリケーションウィンドウ全体のルートビューとなるDecorViewオブジェクトmDecorを作成します。
2. Featureなどのスタイルテーマに基づいて異なるウィンドウモディファイアレイアウトファイルを作成し、Activityレイアウトファイルが格納されるべき場所をfindViewById(ウィンドウモディファイアレイアウトファイル内のidコンテンツを持つFrameLayout)により取得します。
3. ActivityのレイアウトファイルをidコンテンツでFrameLayoutに追加します。
関連
-
よくあるJavaのエラー50選(その1)
-
Androidアップグレード/ブラシ戦略(GoogleネイティブシステムPixel)
-
Android Studioプロジェクトをインポートすると、無効なgradle jdkコンフィギュレーションが見つかったと報告される
-
エラーの解決方法 URIがandroid studioのxmlファイルに登録されていない。
-
テスト、Eclipseは "エラーが発生しました、詳細はエラーログを参照してください。 java.lang.NullPointerException" を報告します。
-
-bash : gradlew コマンドが見つかりません。
-
Android 開発 キーボード イベント モバイル ミッキーマウス ケース
-
Android studioでTextViewのフォントを変更する2つの方法(例:模造歌、公式スクリプト)。
-
AndroidManifest.xml ファイルが見つからない 解決策
-
Android.view.InflateException: バイナリ XML ファイルの行番号 0: クラス <unknown> を展開する際のエラー 解決方法
最新
-
nginxです。[emerg] 0.0.0.0:80 への bind() に失敗しました (98: アドレスは既に使用中です)
-
htmlページでギリシャ文字を使うには
-
ピュアhtml+cssでの要素読み込み効果
-
純粋なhtml + cssで五輪を実現するサンプルコード
-
ナビゲーションバー・ドロップダウンメニューのHTML+CSSサンプルコード
-
タイピング効果を実現するピュアhtml+css
-
htmlの選択ボックスのプレースホルダー作成に関する質問
-
html css3 伸縮しない 画像表示効果
-
トップナビゲーションバーメニュー作成用HTML+CSS
-
html+css 実装 サイバーパンク風ボタン