redis の高可用性 --- マスタースレーブレプリケーション、センチネル、クラスタ
記事目次
前回の記事からの続きです。 redisの高可用性と永続性
I. Redis のマスター・スレーブ レプリケーション
1. マスター・スレーブ レプリケーションの概要
マスタースレーブレプリケーションは、あるサーバーから他のRedisサーバーにデータを複製することです。前者をマスターノード(Master)、後者をスレーブノード(Slave)と呼び、データのレプリケーションはマスターからスレーブへの一方通行のみとなります。
デフォルトでは、各Redisサーバーはマスターノードであり、マスターノードは複数のスレーブノードを持つことができますが、スレーブノードはマスターノードを1つだけ持つことができます。
2. マスター・スレーブ・レプリケーションが行うこと
Data Redundancy
: マスタースレーブレプリケーションは、データのホットバックアップを可能にし、永続性に加えてデータの冗長性の一形態となります。
Fault Recovery
: マスターノードが故障した場合、スレーブノードがサービスを提供することで、迅速な障害復旧を可能にする、いわばサービスの冗長化。
●
Load Balancing
3. マスター・スレーブ複製の流れ
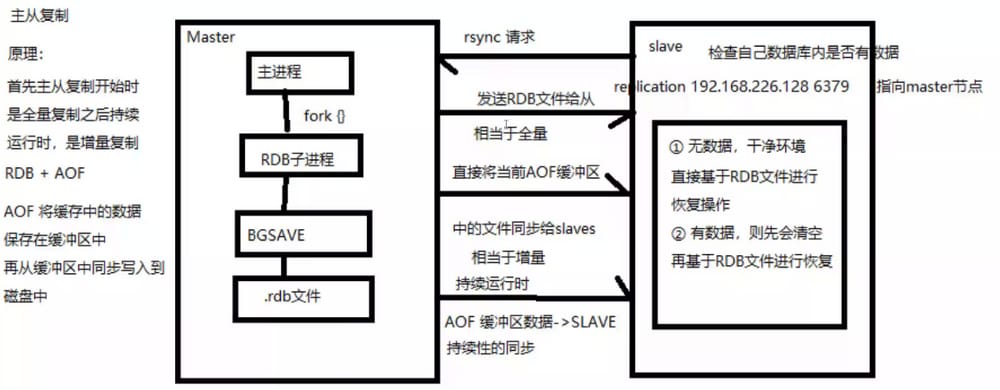
(1) スレーブマシンのプロセスを起動すると、マスターマシンに同期接続を要求する "sync command" が送信されます。
(2) 初回接続時、再接続時にかかわらず、マスター機はバックグラウンドプロセスを起動し、データのスナップショットをデータファイルに保存し(rdb操作の実行)、マスター機はデータを変更したすべてのコマンドも記録してデータファイルにキャッシュします。
(3) バックグラウンド・プロセスがキャッシュ処理を完了した後、マスター機はデータファイルをスレーブ機に送り、スレーブ機はデータファイルをハードディスクに保存してからメモリにロードし、マスター機はデータを修正する操作をすべてまとめてスレーブ機に送信する。スレーブが故障してダウンしても、正常な状態に戻れば自動的に再接続されます。
(4) マスター機は、スレーブ機からの接続を受信した後、スレーブ機に完全なデータファイルを送信する。マスター機が複数のスレーブ機から同時に同期要求を受信した場合、マスター機はバックグラウンドでプロセスを開始してデータファイルを保存し、すべてのスレーブ機に送信してすべてのスレーブ機が起動していることを確認します。
4. Redisのマスタースレーブレプリケーションの構築
4.1 サーバIPの設定
<テーブル サーバー ホスト名 IP マスターノード マスター 192.168.122.10 Slave1 ノード スレーブ1 192.168.122.11 スレーブ2ノード スレーブ2 192.168.122.124.2 各サーバーのファイアウォール環境
systemctl stop firewalld && systemctl disable firewalld
setenforce 0
4.3 各サーバーにRedisをインストールする
redisのインストールは、過去のブログで詳しく紹介しています。
NoSQLのredisを解説
Pass in the installer to the /opt directory
yum install -y gcc gcc-c++ make
tar zxvf redis-5.0.7.tar.gz -C /opt/
cd /opt/redis-5.0.7/
make
make PREFIX=/usr/local/redis install
cd /opt/redis-5.0.7/utils
. /install_server.sh
......
Please select the redis executable path []
#type /uar/local/redis/bin/redis-server
ln -s /usr/local/redis/bin/* /usr/local/bin/
4.4 Redis設定ファイルの変更(マスターノードでの運用)
マスター 192.168.122.10
[root@master ~]# vim /etc/redis/6379.conf

##70, change the listen address to 0.0.0.0, which means listen to any address
bind 0.0.0.0
##137, enable the daemon
daemonize yes
##172, specify the log file directory
logfile /var/log/redis_6379.log
##264, specify the work log
dir /var/lib/redis/6379
##700 lines, enable AOF persistence
appendonly yes
4.5 Redis設定ファイルの変更(スレーブノードの操作)
スレーブ1: 192.168.122.11
[root@slave1 utils]# vim /etc/redis/6379.conf

##70, change the listen address to 0.0.0.0, which means listen to any address
bind 0.0.0.0
##137, enable the daemon
daemonize yes
##172, specify the log file directory
logfile /var/log/redis_6379.log
##264, specify the work log
dir /var/lib/redis/6379
##288 line, add the IP and port of the Master node to be synchronized
replicaof 192.168.122.10 6379
##700 line, enable AOF persistence
appendonly yes

[root@slave1 utils]# /etc/init.d/redis_6379 restart
Stopping ...
Redis stopped
Starting Redis server...
スレーブ2: 192.168.122.12
[root@slave2 utils]# vim /etc/redis/6379.conf

##70, change the listen address to 0.0.0.0, which means listen to any address
bind 0.0.0.0
##137, enable the daemon
daemonize yes
##172, specify the log file directory
logfile /var/log/redis_6379.log
##264, specify the work log
dir /var/lib/redis/6379
##288 line, add the IP and port of the Master node to be synchronized
replicaof 192.168.122.10 6379
##700 line, enable AOF persistence
appendonly yes

[root@slave2 utils]# /etc/init.d/redis_6379 restart
Stopping ...
Redis stopped
Starting Redis server...

[root@master ~]# tail -f /var/log/redis_6379.log
1002:M 23 Sep 2021 16:46:33.569 * Background saving terminated with success
1002:M 23 Sep 2021 16:46:33.569 * Synchronization with replica 192.168.122.11:6379 succeeded
1002:M 23 Sep 2021 16:46:34.519 * Replica 192.168.122.12:6379 asks for synchronization
1002:M 23 Sep 2021 16:46:34.519 * Full resync requested by replica 192.168.122.12:6379
1002:M 23 Sep 2021 16:46:34.519 * Starting BGSAVE for SYNC with target: disk
1002:M 23 Sep 2021 16:46:34.519 * Background saving started by pid 7941
7941:C 23 Sep 2021 16:46:34.521 * DB saved on disk
7941:C 23 Sep 2021 16:46:34.521 * RDB: 0 MB of memory used by copy-on-write
1002:M 23 Sep 2021 16:46:34.591 * Background saving terminated with success
1002:M 23 Sep 2021 16:46:34.591 * Synchronization with replica 192.168.122.12:6379 succeeded

[root@master ~]# redis-cli info replication
# Replication
role:master
connected_slaves:2
slave0:ip=192.168.122.11,port=6379,state=online,offset=910,lag=0
slave1:ip=192.168.122.12,port=6379,state=online,offset=910,lag=0
master_replid:9d7fa17fc64cd573f5b81457183831d97dfad7dc
master_replid2:000000000000000000000000000000000000000000
master_repl_offset:910
second_repl_offset:-1
repl_backlog_active:1
repl_backlog_size:1048576
repl_backlog_first_byte_offset:1
repl_backlog_histlen:910
4.6 マスター・スレーブ効果の検証
4.6.1 マスターノードでログを見る
Monitoring
4.6.2 マスターノードでスレーブノードを検証する
Automatic failover
II. Redis センチネルモード
1. センチネルパターンのコア機能
Sentinelは、マスター・スレーブ間のレプリケーションに加えて、マスター・ノードの自動フェイルオーバーを導入しています。
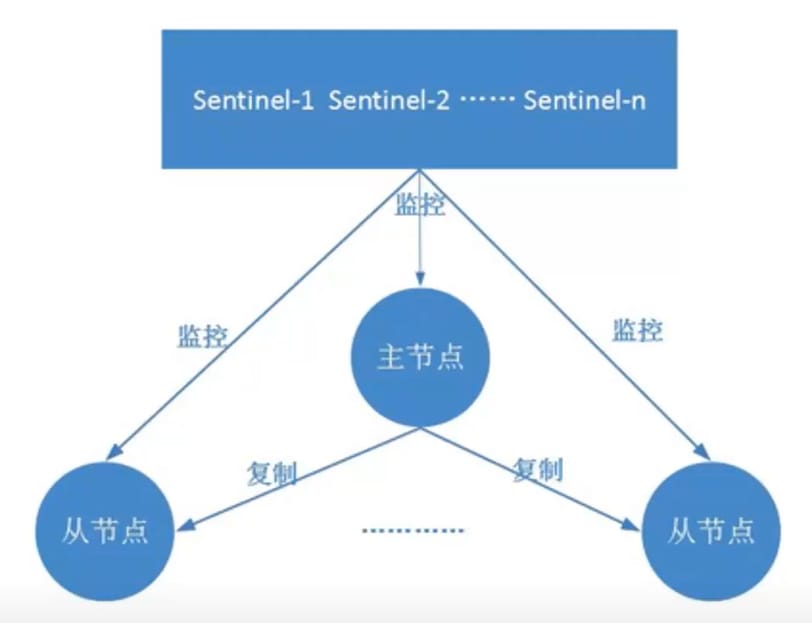
2. Sentinelモデルの理論的根拠
センチネルは、マスター・スレーブ構造の各サーバーを監視し、障害が発生すると新しいマスターを選択し、投票機構によってすべてのスレーブを新しいマスターに接続する分散システムなので、センチネルを動かすクラスタ全体が3ノード以上でなければならない。
3. センチネルモードが行うこと
Notification alerts
: Sentinelは、マスターノードとスレーブノードが正常に機能しているかどうかを常にチェックしています。
systemctl stop firewalld && systemctl disable firewalld
setenforce 0

vim /opt/redis-5.0.7/sentinel.conf

##17 line, uncomment and turn off protected mode
protected-mode no
##21 line, the default listening port for Redis Sentinel
port 26379
##26, specify that sentienel is started in the background
daemonize yes
line ##36, specifying the path to the logs
logfile "/var/log/sentinel.log"
##65 lines, specify the database path
dir "/var/lib/redis/6379"
##84 lines, modify, specify that the sentinel node monitor 192.168.122.10 6379 the master node, the name of the master node is mymaster
## the meaning of the last 2 and the master node failure determination; at least 2 sentinel nodes need to agree to determine the failure and failover
sentinel monitor mymaster 192.168.122.10 6379 2
##113 line, determine the time period of the server down, the default 30,000 milliseconds (30 seconds)
sentinel down-after-milliseconds mymaster 30000
##146 line, the maximum timeout for the failed node is 180,000 milliseconds (180 seconds)
sentinel failover-timeout mymaster 180000
: マスターノードが正常に動作しない場合、Sentinelは自動フェイルオーバー操作を開始し、故障したマスターノードのスレーブノードの1つを新しいマスターノードにアップグレードし、他のスレーブノードに新しいマスターノードを代わりにレプリケートさせる。
●
cd /opt/redis-5.0.7/
redis-sentinel sentinel.conf &
: Sentinelはフェイルオーバーの結果をクライアントに送信することができます。
4. センチネルモデルの構造
センチネルの構造は、センチネルノードとデータノードの2つの部分からなる。
● センチネルノード センチネルシステムは、1つ以上のノードから構成されます。センチネルノードとは、データを保存しない特別なredisノードです。
データノード:マスターノードとスレーブノードの両方がデータノードです。
5. センチネルモード作業フォーム
セントリーモードは、マスタースレーブモードに依存しているので、マスタースレーブモードはセントリーモードを行う前にインストールする必要があります、すべてのノードがセントリーモードを展開する必要があります、セントリーモードは、彼らが正常であるかどうかを確認するすべてのRedis作業ノードを監視します、マスターは、他のノードがマスターノードとの接触を失ったので、問題がある場合、それは投票されます、投票は半分以上がマスターが行うと思われる問題発生時に、それはその後新しいマスターとしてスレーブのいずれかを選択セントリールーム、に通知します。
6. フェイルオーバーメカニズム
- センチネルノードは、定期的にセントリーノードを監視し、マスターノードに障害が発生したかどうかを確認します。各センチネルノードは、1秒ごとにマスターノード、スレーブノード、他のセンチネルノードにpingコマンドを送信し、ハートビート検出を行います。マスターノードが一定時間内に応答しないか、エラーメッセージで応答した場合、このセンチネルはマスターノードを主観的(一方的)にオフラインと見なします。センチネルノードの半分以上が、このマスターノードが主観的にオフラインであると考えた場合、客観的にオフラインであると判断するように。
- マスターノードに障害が発生すると、この時点でセンチネルノードはラフトアルゴリズム(選挙アルゴリズム)による選挙機構を実装し、マスターノードのフェイルオーバーと通知を担当するリーダーとしてセンチネルノードを共同選出する。そのため、センチネルクラスターのホスト数は3ノード以下であってはならない。
-
フェイルオーバーはリーダーのセンチネルノードが行い、以下のような流れで行われます。
スレーブノードの1つを新しいマスターノードにアップグレードし、他のスレーブノードが新しいマスターノードを指すようにします。
元のマスターノードが復元された場合、スレーブノードにもなり、新しいマスターノードを指すようになります。
マスターノードが交換されたことをクライアントに通知します。
特に、客観的オフラインはマスターノードのみの概念であることに注意してください。スレーブノードとセンチネルノードが故障した場合、センチネルによって主観的にオフラインにされた後、その後の客観的オフラインまたはフェイルオーバー操作は行われません。
7. マスターノード選出
- センチネルPingに応答しない不健全な(オフラインの)スレーブノードをフィルタリングします。
- 設定ファイル(replica-priority、デフォルト値100)の中で最も優先度の高い設定のスレーブノードを選択します。
- レプリケーションオフセットが最も大きい、つまりレプリケーションが最も完全なスレーブノードを選択します。
8. Redisセンチネルスキーマの構築
8.1 サーバIPの設定
<テーブル サーバー ホスト名 IP マスターノード マスター 192.168.122.10 Slave1 ノード スレーブ1 192.168.122.11 スレーブ2ノード スレーブ2 192.168.122.128.2 各サーバーのファイアウォール環境
[root@master redis-5.0.7]# redis-cli -p 26379 info sentinel
# Sentinel
sentinel_masters:1
sentinel_tilt:0
sentinel_running_scripts:0
sentinel_scripts_queue_length:0
sentinel_simulate_failure_flags:0
master0:name=mymaster,status=ok,address=192.168.122.10:6379,slaves=2,sentinels=3
8.3 Redisセンチネルモード(全ノード操作)の設定ファイルの変更
The role of clusters can be summarized in two points.
8.4 センチネルモードを起動する
注意:最初にマスターを起動し、次にスレーブを起動する必要があります。
systemctl stop firewalld && systemctl disable firewalld
setenforce 0

[root@node ~]# cd /etc/redis
[root@node redis]# mkdir -p redis-cluster/redis600{1..6}
[root@node redis]# for i in {1..6}
> do
> cp /opt/redis-5.0.7/redis.conf /etc/redis/redis-cluster/redis600$i
> cp /opt/redis-5.0.7/src/redis-cli /opt/redis-5.0.7/src/redis-server /etc/redis/redis-cluster/redis600$i
> done
[root@node redis]# ls -R redis-cluster/
redis-cluster/:
redis6001 redis6002 redis6003 redis6004 redis6005 redis6006

redis-cluster/redis6001:
redis-cli redis.conf redis-server

redis-cluster/redis6002:
redis-cli redis.conf redis-server

redis-cluster/redis6003:
redis-cli redis.conf redis-server

redis-cluster/redis6004:
redis-cli redis.conf redis-server

redis-cluster/redis6005:
redis-cli redis.conf redis-server

redis-cluster/redis6006:
redis-cli redis.conf redis-server
8.5 センチネル情報を表示する
マスター 192.168.122.10
[root@node redis]# cd redis-cluster/redis6001
[root@node redis6001]# vim redis.conf

##69, comment out the bind entry to listen to all NICs by default
##bind 127.0.0.1
##88, change to disable protected mode
protected-mode no
##92, modify, redis listens on port
port 6001
##136, enable daemonize and start as a standalone process
daemonize yes
##832 lines, uncomment to enable clustering
cluster-enabled yes
##840 lines, uncomment, cluster name file settings
cluster-config-file nodes-6001.conf
##846, comment out, cluster timeout set
cluster-node-timeout 15000
##700 lines, modify, enable AOF persistence
appendonly yes
III. Redis クラスターモード
1. Redisクラスタの概要
クラスタリング、またはRedis Clusterは、Redis 3.0から導入された分散ストレージソリューションです。
2. Redisクラスタ
クラスタは、Redisのデータが分散された複数のノード(Node)で構成されます。クラスタ内のノードはマスターノードとスレーブノードに分けられ、マスターノードのみが読み書き要求やクラスタ情報のメンテナンスを行い、スレーブノードはマスターノードからのデータや状態情報のレプリケーションのみを行う。
3. Redisクラスタの役割
[root@node redis6001]# for d in {1..6}
> do
> cd /etc/redis/redis-cluster/redis600$i
> ^C
[root@node redis6001]# for d in {1..6}
> do
> cd /etc/redis/redis-cluster/redis600$d
> redis-server redis.conf
> done
[root@node1 redis6006]# ps -ef | grep redis
root 992 1 0 13:45 ?        00:00:07 /usr/local/redis/bin/redis-server 0.0.0.0:6379
root 2289 1 0 14:41 ?        00:00:00 redis-server *:6001 [cluster]
root 2294 1 0 14:41 ?        00:00:00 redis-server *:6002 [cluster]
root 2299 1 0 14:41 ?        00:00:00 redis-server *:6003 [cluster]
root 2304 1 0 14:41 ?        00:00:00 redis-server *:6004 [cluster]
root 2309 1 0 14:41 ?        00:00:00 redis-server *:6005 [cluster]
root 2314 1 0 14:41 ?        00:00:00 redis-server *:6006 [cluster]
root 2450 2337 0 14:50 pts/0 00:00:00 grep --color=auto redis

[root@node redis6006]# redis-cli --cluster create 127.0.0.1:6001 127.0.0.1:6002 127.0.0.1:6003 127.0.0.1:6004 127.0.0.1:6005 127.0.0.1:6006 - -cluster-replicas 1
3.1 データパーティショニング
データパーティショニング(またはデータシャーディング)は、クラスタの最も中心的な機能です。
クラスタリングによりデータを複数のノードに分散させることで、一方ではRedisの1台のメモリサイズの限界を突破し、ストレージ容量を大幅に増加させ、他方では各マスターノード度が外部に対して読み込みサービスや書き込みサービスを提供できるため、クラスタの応答性を大幅に向上させることが可能です。
Redisのスタンドアローンメモリのサイズ制限の問題は、永続化やマスタースレーブレプリケーションを導入する際にボリュームがあります。例えば、スタンドアローンメモリが大きすぎると、bgsaveやbgrewriteaofのフォーク操作でマスタープロセスがブロックされたり、マスタースレーブ環境でホスト切り替え時にスレーブノードが長時間利用できなかったり、フルレプリケーション時にマスターノードのレプリケーションバッファがオーバーフローしてしまう可能性があるからです。
3.2 高可用性
このクラスタは、マスター・スレーブ間のレプリケーションとマスター・ノードの自動フェイルオーバーをサポートしています(Sentinelと同様)。どちらかのノードに障害が発生しても、クラスタは公開されています。
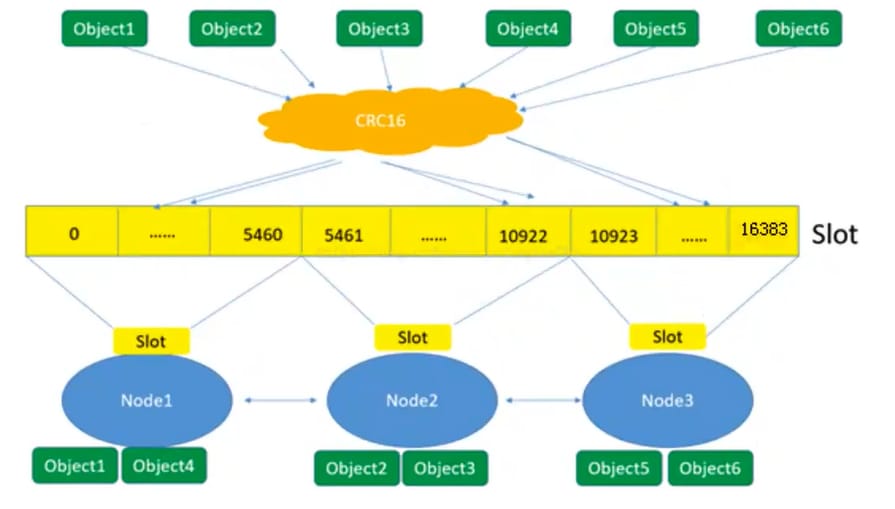
4. Redisクラスタにおけるデータシャード
Redis クラスタでは、ハッシュスロットの概念を導入しています。
Redisクラスタには16384個のハッシュスロットがあります(0~16383の番号)。
クラスタ内の各ノードは、ハッシュスロットの一部を担当します。
5. ハッシュスロット
5.1 ハッシュスロットの割り当て
-
ハッシュスロットはクラスタホストの数に応じて均等に分配することができます(デフォルトの分配)。
3ノードからなるクラスタを例として。
ノードAはハッシュスロット0~5460を含む
ノードBはハッシュスロット5461-10922を含む
ノードCはハッシュスロット10923~16383を含む -
また、ホストの性能と能力に応じて割り当てをカスタマイズすることも可能です
3ノードからなるクラスタの例として。
ノードAは最もパフォーマンスが悪く、ハッシュ番号0-2000を含む
ノードBは中程度の性能で、ハッシュ2001-7000を含む
ノードCは最強で、ハッシュ7001-16383を含む
5.2 ハッシュスロットの使用
クラスタ構築時に、クラスタのノードにスロットを割り当てる必要があり、0~16383
node1 で set a a を実行
- crc16アルゴリズムでキーを計算し、数値を求め、その数値に16384の余りをかける(crc16 : a = 26384l;26384 % 16384 = 10000)
- スロット10000を含むノードを探すと、node2が見つかり、自動的にnode2へジャンプする
- node2に対してset a aコマンドを実行する
ノード3に対してget aを実行
- a --> 10000
- ノード2へジャンプ
- node2でget aを実行
6. Redisクラスタのマスター・スレーブ型レプリケーションモデル
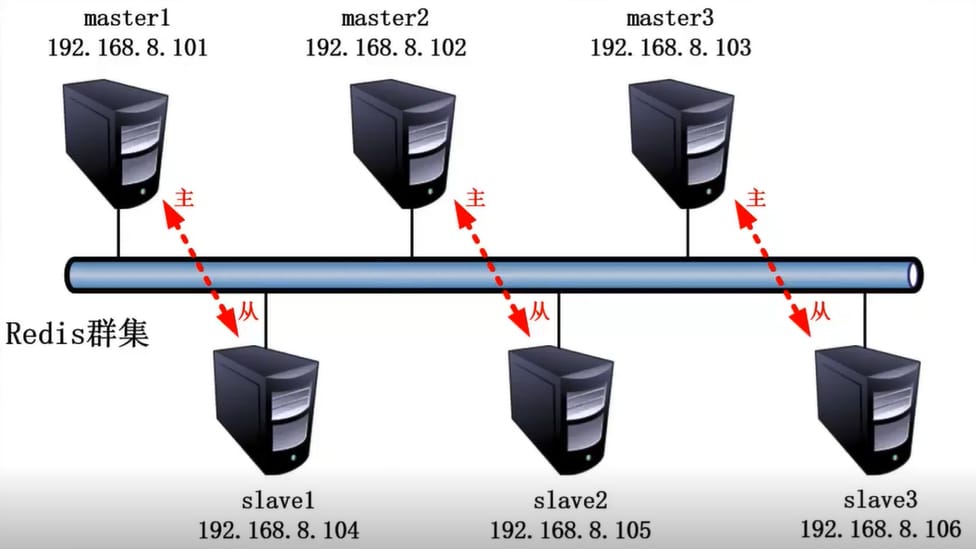
このクラスタには3つのノードA、B、Cがあります。ノードBが故障すると、範囲5461-10922のスロットが欠落するため、クラスタ全体が使用できなくなります。
各ノードがスレーブノードA1,B1,C1を追加したとき、3つのマスターノードと3つのスレーブノードからなるクラスタが構成されます。ノードBに障害が発生した後、クラスタはB1ビットを新しいマスターノードとして選出し、サービスを継続します。BとB1の両方が故障した場合、クラスタは利用できなくなる。
7. Redisクラスタスキーマの構築
7.1 サーバIPの設定
Redisのクラスタは通常、マスター3台、スレーブ3台の合計6台が必要です。
ポート番号で区別し、3つのマスターノードのポート番号は6001/6002/6003、対応するスレーブノードのポート番号は6004/6005/6006とします。
7.2 サーバファイアウォール環境
[root@node1 redis6006]# redis-cli -p 6001 -c
# Add the -c parameter so that the nodes can jump to each other before
127.0.0.1:6001> cluster slots
#View the node's hash slot number range
1) 1) (integer) 0
#Hash slot starting number
   2) (integer) 5460
# hash slot termination number
   3) 1) "127.0.0.1"
      2) (integer) 6001
#node node master
      3) "18e59f493579facea29abf90ca4050f566d66339"
   4) 1) "127.0.0.1"
      2) (integer) 6004
#node node from
      3) "2635bf6a0c286ef910ec5da03dbdc7cde308c588"
2) 1) (integer) 10923
   2) (integer) 16383
   3) 1) "127.0.0.1"
      2) (integer) 6003
      3) "51460d417eb56537e5bd7e8c9581c66fdd817b3c"
   4) 1) "127.0.0.1"
      2) (integer) 6006
      3) "51a75667dcf21b530e69a3242a3e9f81f577168d"
3) 1) (integer) 5461
   2) (integer) 10922
   3) 1) "127.0.0.1"
      2) (integer) 6002
      3) "6381d68c06ddb7ac43c8f7d7b8da0644845dcd59"
   4) 1) "127.0.0.1"
      2) (integer) 6005
      3) "375ad927116d3aa845e95ad5f0586306e7ff3a96"
127.0.0.1:6001> set num 1
ok
127.0.0.1:6001> get num
"1"
127.0.0.1:6001> keys *
1) "num"
127.0.0.1:6001> quit
[root@node1 redis6006]# redis-cli -p 6002 -c
127.0.0.1:6002> keys *
# no key pairs on port 6002
(empty list or set)
127.0.0.1:6002> get num
-> Redirected to slot [2765] located at 127.0.0.1:6001
"1"
#6002 get num key located at port 6001, switch to port 6001 and display the key value
127.0.0.1:6001> set key1 11111
-> Redirected to slot [9189] located at 127.0.0.1:6002
OK
#Create a key pair on port 6001, save it to port 6002, and switch to port 6002
127.0.0.1:6002>
7.3 クラスタ構成ディレクトリとファイルの作成
[root@node ~]# cd /etc/redis
[root@node redis]# mkdir -p redis-cluster/redis600{1..6}
[root@node redis]# for i in {1..6}
> do
> cp /opt/redis-5.0.7/redis.conf /etc/redis/redis-cluster/redis600$i
> cp /opt/redis-5.0.7/src/redis-cli /opt/redis-5.0.7/src/redis-server /etc/redis/redis-cluster/redis600$i
> done
[root@node redis]# ls -R redis-cluster/
redis-cluster/:
redis6001 redis6002 redis6003 redis6004 redis6005 redis6006

redis-cluster/redis6001:
redis-cli redis.conf redis-server

redis-cluster/redis6002:
redis-cli redis.conf redis-server

redis-cluster/redis6003:
redis-cli redis.conf redis-server

redis-cluster/redis6004:
redis-cli redis.conf redis-server

redis-cluster/redis6005:
redis-cli redis.conf redis-server

redis-cluster/redis6006:
redis-cli redis.conf redis-server
7.4 クラスタリングを有効にする
redis6001のみを例にして、他の5つのフォルダの設定ファイルをこのように変更し、特にポート番号に注意します。
[root@node redis]# cd redis-cluster/redis6001
[root@node redis6001]# vim redis.conf

##69, comment out the bind entry to listen to all NICs by default
##bind 127.0.0.1
##88, change to disable protected mode
protected-mode no
##92, modify, redis listens on port
port 6001
##136, enable daemonize and start as a standalone process
daemonize yes
##832 lines, uncomment to enable clustering
cluster-enabled yes
##840 lines, uncomment, cluster name file settings
cluster-config-file nodes-6001.conf
##846, comment out, cluster timeout set
cluster-node-timeout 15000
##700 lines, modify, enable AOF persistence
appendonly yes
7.5 redisノードの起動
6つのフォルダーに移動し、コマンドを実行します: "redis-server redis.conf" redisノードを起動します。
[root@node redis6001]# for d in {1..6}
> do
> cd /etc/redis/redis-cluster/redis600$i
> ^C
[root@node redis6001]# for d in {1..6}
> do
> cd /etc/redis/redis-cluster/redis600$d
> redis-server redis.conf
> done
[root@node1 redis6006]# ps -ef | grep redis
root 992 1 0 13:45 ?        00:00:07 /usr/local/redis/bin/redis-server 0.0.0.0:6379
root 2289 1 0 14:41 ?        00:00:00 redis-server *:6001 [cluster]
root 2294 1 0 14:41 ?        00:00:00 redis-server *:6002 [cluster]
root 2299 1 0 14:41 ?        00:00:00 redis-server *:6003 [cluster]
root 2304 1 0 14:41 ?        00:00:00 redis-server *:6004 [cluster]
root 2309 1 0 14:41 ?        00:00:00 redis-server *:6005 [cluster]
root 2314 1 0 14:41 ?        00:00:00 redis-server *:6006 [cluster]
root 2450 2337 0 14:50 pts/0 00:00:00 grep --color=auto redis
7.6 クラスターを起動する
[root@node redis6006]# redis-cli --cluster create 127.0.0.1:6001 127.0.0.1:6002 127.0.0.1:6003 127.0.0.1:6004 127.0.0.1:6005 127.0.0.1:6006 - -cluster-replicas 1
6台のインスタンスを3つのグループに分け、1グループにつきマスターとスレーブを1台ずつ配置し、手前がマスターノード、奥がスレーブノードになります。以下のインタラクションでは、作成に成功するためにyesを入力する必要があります。
-replicas 1は、各マスターノードが1つのスレーブノードを持つことを意味します。
7.7 クラスタのテスト
[root@node1 redis6006]# redis-cli -p 6001 -c
# Add the -c parameter so that the nodes can jump to each other before
127.0.0.1:6001> cluster slots
#View the node's hash slot number range
1) 1) (integer) 0
#Hash slot starting number
   2) (integer) 5460
# hash slot termination number
   3) 1) "127.0.0.1"
      2) (integer) 6001
#node node master
      3) "18e59f493579facea29abf90ca4050f566d66339"
   4) 1) "127.0.0.1"
      2) (integer) 6004
#node node from
      3) "2635bf6a0c286ef910ec5da03dbdc7cde308c588"
2) 1) (integer) 10923
   2) (integer) 16383
   3) 1) "127.0.0.1"
      2) (integer) 6003
      3) "51460d417eb56537e5bd7e8c9581c66fdd817b3c"
   4) 1) "127.0.0.1"
      2) (integer) 6006
      3) "51a75667dcf21b530e69a3242a3e9f81f577168d"
3) 1) (integer) 5461
   2) (integer) 10922
   3) 1) "127.0.0.1"
      2) (integer) 6002
      3) "6381d68c06ddb7ac43c8f7d7b8da0644845dcd59"
   4) 1) "127.0.0.1"
      2) (integer) 6005
      3) "375ad927116d3aa845e95ad5f0586306e7ff3a96"
127.0.0.1:6001> set num 1
ok
127.0.0.1:6001> get num
"1"
127.0.0.1:6001> keys *
1) "num"
127.0.0.1:6001> quit
[root@node1 redis6006]# redis-cli -p 6002 -c
127.0.0.1:6002> keys *
# no key pairs on port 6002
(empty list or set)
127.0.0.1:6002> get num
-> Redirected to slot [2765] located at 127.0.0.1:6001
"1"
#6002 get num key located at port 6001, switch to port 6001 and display the key value
127.0.0.1:6001> set key1 11111
-> Redirected to slot [9189] located at 127.0.0.1:6002
OK
#Create a key pair on port 6001, save it to port 6002, and switch to port 6002
127.0.0.1:6002>
関連
-
[解決済み】127.0.0.1:6379 で Redis に接続できませんでした。homebrewで接続が拒否された
-
[解決済み] MISCONF RedisがRDBスナップショットを保存するように設定されている。
-
[解決済み] レディス パターンに一致するキーを検索する
-
[解決済み] エラーです。スタンナルメソッドでElastic cacheに接続中、ピアによって接続がリセットされました。
-
[解決済み] Redis Dockerの接続が拒否されました
-
[解決済み] Redisインスタンスのバージョンを確認する方法は?
-
[解決済み] Zookeeper vs インメモリデータグリッド vs Redis
-
を作ってください。*** ターゲット "install "を作るためのルールがありません。停止
-
error:[Errno 98] アドレスが既に使用されている場合の解決策
-
Linux installation of redis common error server.c:3318:16: error: 'struct redisServer' has no member named 'loading '
最新
-
nginxです。[emerg] 0.0.0.0:80 への bind() に失敗しました (98: アドレスは既に使用中です)
-
htmlページでギリシャ文字を使うには
-
ピュアhtml+cssでの要素読み込み効果
-
純粋なhtml + cssで五輪を実現するサンプルコード
-
ナビゲーションバー・ドロップダウンメニューのHTML+CSSサンプルコード
-
タイピング効果を実現するピュアhtml+css
-
htmlの選択ボックスのプレースホルダー作成に関する質問
-
html css3 伸縮しない 画像表示効果
-
トップナビゲーションバーメニュー作成用HTML+CSS
-
html+css 実装 サイバーパンク風ボタン
おすすめ
-
ハートビート・エフェクトのためのHTML+CSS
-
HTML ホテル フォームによるフィルタリング
-
HTML+cssのボックスモデル例(円、半円など)「border-radius」使いやすい
-
HTMLテーブルのテーブル分割とマージ(colspan, rowspan)
-
ランダム・ネームドロッパーを実装するためのhtmlサンプルコード
-
Html階層型ボックスシャドウ効果サンプルコード
-
QQの一時的なダイアログボックスをポップアップし、友人を追加せずにオンラインで話す効果を達成する方法
-
sublime / vscodeショートカットHTMLコード生成の実装
-
HTMLページを縮小した後にスクロールバーを表示するサンプルコード
-
html のリストボックス、テキストフィールド、ファイルフィールドのコード例