Docker入門、Django uwsgi nginxアプリケーションをデプロイする方法

このエッセイを開いた時点で、あなたの頭の中にはすでに答えがあるはずなので、dockerについてや、なぜ使うべきなのかについては何も言いません。では、コンピューターの電源を入れ、袖をまくり上げ、docker を使い始めましょう。
関連用語
- image: パッケージ化されたアプリケーションと、そのアプリケーションが動作するためのシステム、リソース、設定ファイルなど。
- コンテナ:イメージのインスタンス。オブジェクト(イメージ)を使って、1つ以上のインスタンス(コンテナ)を割り当てる、と言えば理解できるだろう。
- リポジトリ:githubでコードを管理し、プロジェクトごとにリポジトリを作成し、ミラーも同じように管理します。
dockerのインストール
ここから適切なDockerのインストールをダウンロードするだけです。
ドッカーダウンロードページ
CentOS などの独自のイメージを構築するためのベースイメージが必要で、直接イメージを取得します。
ドッカーハブ
プル、git clone操作に似ています。ただ、海外サイトへのアクセスは遅いので、その場合は
アリクラウド
ダウンロードするか、AliCloudのガスペダルを設定します。
共通コマンド
コマンドの数が多いので、見るだけ見てスキップすることをお勧めします。何かしたいことがあれば、戻ってコマンドを探せばいいだけです。
ミラーを検索する
docker search centos
docker pull registry.cn-hangzhou.aliyuncs.com/1hpc/centos
iMac:~ yetongxue$ docker images
REPOSITORY TAG IMAGE ID CREATED SIZE
registry.cn-hangzhou.aliyuncs.com/yetongxue/docker_test 1.2 f7d570f13f0a 7 days ago 515 MB
yetongxue/docker_test 1.2 f7d570f13f0a 7 days ago 515 MB
mysql 5.7 c73c7527c03a 3 weeks ago 412 MB
centos 7 3bee3060bfc8 2 months ago 193 MB
ミラーIDを表示します。
docker images -q
docker rmi image_id
docker rmi $(docker images -q)
docker run --name <container_name> centos:7
, container_name は自分で定義したコンテナ名です。
すべてのコンテナを見るには
docker ps -a
docker ps
docker ps -q
docker exec -it <container_id> bash
exit
docker rm <container_id>
docker rm $(docker ps -aq)
docker run -d -p 8080:80 hub.c.163.com/library/nginx
docker start/stop/restart <container_id>
docker inspect <container_id>
docker run -v host/machine/dir :container/path/dir --name volume_test_container centos:7
データボリュームのマウントは、ホストのディレクトリとコンテナのディレクトリの間にリンクを作ることと同じなので、どちらかの内容を変更すると、もう一方の内容も並行して変更されます。データボリュームの作成がもたらすもの コンテナが削除されると、コンテナ内のデータも一緒に削除される。データベースやメディア・リソースなどのファイルでは、通常、-vを使用してコンテナの内容をホストにリンクさせ、コンテナを再作成するときに再び-vするとデータが戻ってくるようにします。
mysqlコンテナを起動します。
docker run --name some-mysql -e MYSQL_ROOT_PASSWORD=qwerasdf -d mysql:5.7
デフォルトユーザーをroot、パスワードをqwerasdfとした場合
mysqlコンテナが起動すると、以下のように他のコンテナが来て接続し、使用することができる。
コンテナの接続
docker run --name some-app --link some-mysql:mysql -d application-that-uses-mysql
###ドッカーファイル
私たちがかつて学校に通っていた頃、多くのコースが学ぶことに面白みを感じなかったのは、それがテストを受ける以外にどんな学びができるのか知らなかったからです。私たちは何かをマクロ的にとらえ、それを多くのステップに分解していきます。そうやって、自分たちが何をしているのか、それが全体にとってどんな意味があるのかを知るのです。そうやって、自分たちが何をしているのか、それについてどう感じているのかを知ることができるのです。
Dockerfileディレクティブは、全体の雰囲気をつかむのに良い方法です。
もちろん、以下の内容は、あなたがすでに通常のアプリケーションのデプロイメントの経験を持っていることを前提としています。このデモでは、django+uwsgi+nginx の組み合わせで、データベースとして mysql を使っています。
通常のデプロイメントに不慣れな方は Django uwsgi nginx アプリケーションのデプロイメント
デモを見る
git clone https://github.com/shiyeli/docker_test.git
Dockerfileの内容詳細
#When you write FROM centos:7, you have to think that every step you take after that is an operation in the centos 7 system image.
#How you deployed your application before, just follow your previous steps step by step.
FROM centos:7
#Declare the image creator
MAINTAINER yetongxue <[email protected]>
#set time zone
ENV TZ "Asia/Shanghai"

# Set the system environment variable DOCKER_SRC
ENV DOCKER_SRC=mysite
# Set the system environment variable DOCKER_HOME
ENV DOCKER_HOME=/root
# Set the system environment variable DOCKER_PROJECT
ENV DOCKER_PROJECT=/root/project

# This command is equivalent to: cd /root
WORKDIR $DOCKER_HOME
# Immediately afterwards, two folders are created under the root directory
RUN mkdir media static

#install the tools needed to run the application depend on pip, git seems to be useless, mysql client
#nc is a network tool, port detection script wait-for-it.sh inside the use of this software
RUN yum -y install epel-release && \
    yum -y install python-pip && \
    yum -y install git nginx gcc gcc-c++ python-devel && yum -y install mysql && \
    yum -y install mysql-devel && yum install nc -y && yum clean all && \
    pip install --upgrade pip

# cd $DOCKER_PROJECT
WORKDIR $DOCKER_PROJECT
# . indicates the current directory, one is the directory where the Dockerfile is located, and the other is the DOCKER_PROJECT directory just set.
#This step will copy all the files in the application directory to the mirror directory DOCKER_PROJECT=/root/project
COPY . / . / .
#This step installs the python dependencies django, Pillow, mysql-python, uwsgi, and django-ckeditor.
# Add, -i is to modify pip source, the default source is very slow and often stuck here.
RUN pip install -i https://pypi.tuna.tsinghua.edu.cn/simple -r requirements.txt
#expose port 8000, so that when you run docker, you can map the host port to 8000
EXPOSE 8000
#Give start_script permission to execute
RUN chmod u+x start_script
#Commands to be executed after the container starts
ENTRYPOINT [". /start_script"]
これが、イメージを構築するために必要なことです。このDockerfileがあれば、Dockerfileがあるディレクトリに移動して実行することができます。
docker build -t yetongxue/docker_test:1.2 . /
いよいよイメージのビルドです。
今までに、皆さんの頭の中には、次のような多くの疑問があることでしょう。
このコンテナは起動したら動くのか?
データベースはどこに接続すればよいのですか?
nginxの設定、データベースをリフレッシュするためのpython manage.py migrate、そしてuwsgiはまだ始まってさえいないのです!
はい、はい、引き続き分解してみましょう...。
スタートスクリプト start_script
コンテナが起動した後も実行されるコマンドを無視したところです。start_script の内部で何が起こっているのかを見てみましょう。
#! /bin/bash
#sed is a Linux editor, right? This command looks for the line containing user in /etc/nginx/nginx.conf and replaces nginx with root in that line
sed -i '/user/{s/nginx/root/}' /etc/nginx/nginx.conf
# Connect the project nginx configuration to the nginx configuration
ln -s /root/project/mysite_nginx.conf /etc/nginx/conf.d/
#Start nginx
nginx
#Give wait-for-it.sh executable privileges
chmod u+x wait-for-it.sh
#Determine if the database port is available, as the next database refresh will fail if the database is not ready.
#In fact, this can be omitted if we have started a database container.
#This is because we will end up using docker-compose to manage two or more containers together.
#docker-compose has three keywords: link, depends_on, and volume_from, which determine the order in which containers are started.
#However, it is not certain whether the mysql inside the container is started, so it is safer to check the port.
# No good we can wait a few seconds also does not hurt
# In addition, here the two environment variables DB_PORT_3306_TCP_ADDR and DB_PORT_3306_TCP_PORT are in the mysql container.
#No need to guess, one is host and one is port
# If we connect a container to mysql container through link, some environment variables in mysql container will be shared out.
. /wait-for-it.sh $DB_PORT_3306_TCP_ADDR:$DB_PORT_3306_TCP_PORT &
wait
# Set the settings used in manage.py
export DJANGO_SETTINGS_MODULE=mysite.settings.server
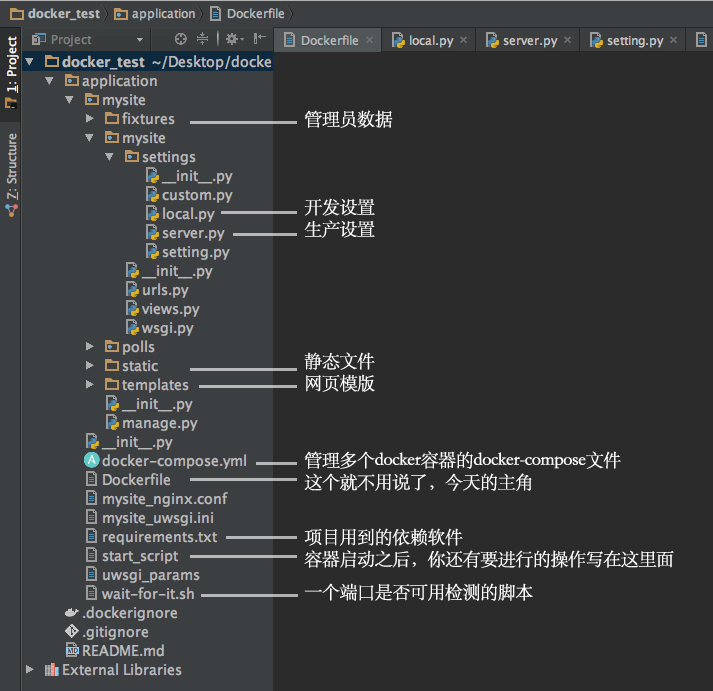
#Enter the mysite directory (the next level of application, not mysite in the mysite directory)
#At first maybe you are a little confused, not knowing exactly where the directory you are operating in now, unlike usually operating Linux, I can pwd a little.
#Actually, you use this script location as a reference, you look at the project directory structure found that
#start_script is at the same level as the mysite directory, and manage.py is under mysite, right?
cd mysite
#refresh the database
. /manage.py migrate --noinput
#load the admin user to the database so that you don't have to go into the container and execute python manage.py createsuperuser after the container starts
. /manage.py loaddata . /fixtures/superuser.json
#collect static files
. /manage.py collectstatic --noinput
#return to the parent directory, where mysite_uwsgi.ini is located
cd ...
#Start uwsgi
uwsgi --ini mysite_uwsgi.ini
添付ファイル1 mysqlコンテナをリンクしているコンテナ用の環境変数
[root@d9f25c4909bb project]# env
HOSTNAME=d9f25c4909bb
DB_NAME=/web/db
DOCKER_HOME=/root
TERM=xterm
DB_PORT=tcp://172.17.0.2:3306
DB_PORT_3306_TCP_PORT=3306
DB_ENV_GOSU_VERSION=1.7
DB_PORT_3306_TCP_PROTO=tcp
DB_ENV_MYSQL_ROOT_PASSWORD=qwerasdf
PATH=/usr/local/sbin:/usr/local/bin:/usr/sbin:/usr/bin:/sbin:/bin
DOCKER_PROJECT=/root/project
PWD=/root/project
TZ=Asia/Shanghai
DB_PORT_3306_TCP_ADDR=172.17.0.2
SHLVL=1
HOME=/root
DB_PORT_3306_TCP=tcp://172.17.0.2:3306
DB_ENV_MYSQL_VERSION=5.7.19-1debian8
LESSOPEN=||/usr/bin/lesspipe.sh %s
DB_ENV_MYSQL_MAJOR=5.7
DOCKER_SRC=mysite
_=/usr/bin/env
添付ファイル 2. server.py セットアップでのデータベース接続設定
DATABASES = {
    #mysql database setting:
    #when the container link a mysql container, this container will have the env variable of "DB_PORT_3306_TCP_ADDR", the mysql host.
    'default':{
        'ENGINE': 'django.db.backends.mysql',
        'NAME':'docker_db',
        'USER':'root',
        'PASSWORD': os.environ.get('DB_ENV_MYSQL_ROOT_PASSWORD'),
        'HOST':os.environ.get('DB_PORT_3306_TCP_ADDR'),
        'PORT':3306,
        'OPTIONS':{
        }
    }
}
添付ファイル3.
Django初期化データ
スクリプト内のコマンドに応答して
. /manage.py loaddata . /fixtures/superuser.json
をご覧ください。
モデルへの初期データの提供
コマンド実行後、データベースの対応するテーブルに行が追加されます。
. /fixtures/superuser.jsonの内容は次のとおりです。
[
    { "model": "auth.user",
        "pk": 1,
        "fields": {
            "username": "root",
            "password": "pbkdf2_sha256$30000$IdlNbZkEbkO3$4sqwI5SnLPDN2bhelVCE+Hu1rzspQU20OuYfQbW0G+c=",
            "is_superuser": true,
            "is_staff": true,
            "is_active": true
        }
    }
]
django のパスワードはハッシュ化されているので、ここに記入されているパスワードは、パスワードを設定したいハッシュ文字列です。
djangoのパスワードを生成するには。
In [1]: from django.contrib.auth.hashers import make_password

In [2]: make_password('qwerasdf')
Out[2]: u'pbkdf2_sha256$30000$IdlNbZkEbkO3$4sqwI5SnLPDN2bhelVCE+Hu1rzspQU20OuYfQbW0G+c='
添付ファイルIV。 nginxの設定
# mysite_nginx.conf


# configuration of the server
server {
    # the port your site will be served on, default_server indicates that this server block
    # is the block to use if no blocks match the server_name
    listen 8000 default_server;

    # the domain name it will serve for
    server_name localhost; # substitute your machine's IP address or FQDN
    charset utf-8;

    # max upload size
    client_max_body_size 75M; # adjust to taste

    # Django media
    location /media {
        alias /root/media; # your Django project's media files - amend as required
    }

    location /static {
        alias /root/static; # your Django project's static files - amend as required
    }

    # Finally, send all non-media requests to the Django server.
    location / {
        uwsgi_pass unix:///root/project/mysite/docker_app.sock; # for a file socket
        include /root/project/uwsgi_params; # the uwsgi_params file you installed
    }
}
これでクリアです。
コンテナの実行
のあるディレクトリでDockerfileを実行したところです。
docker build -t yetongxue/docker_test:1.2 . /
yetongxue/docker_test:1.2 というイメージが取得できましたが、このコンテナはmysqlコンテナに依存して実行されます。そこで、まずmysqlコンテナを起動します。
docker run --name db -d -e MYSQL_ROOT_PASSWORD=qwerasdf -e MYSQL_DATABASE=docker_db -v Users/yetongxue/Desktop/volumes/docker_test/db:/var/ lib/mysql mysql:5.7
- -name でコンテナにキャッチーな名前をつけます。
- -d がバックグラウンドで実行されます。
- -e コンテナに渡す引数で、ユーザー名も指定できます。
- -v 何か問題が発生した場合に備えて、コンテナ内のデータベースをホストに同期させます。データボリュームコンテナを作成した場合、ここで volume_from パラメータを使用することもできます。
- そして最後に、使用するイメージとバージョン番号
追加事項
mysqlのイメージは、実は先ほど構築したものと同じで、Dockerfileの最後に
ENTRYPOINT ["docker-entrypoint.sh"]
では、このスクリプトを見てみましょう。
[root@iZ94l43yka9Z docker_test]# docker ps
CONTAINER ID IMAGE COMMAND CREATED STATUS PORTS NAMES
70d1d4b59e06 registry.cn-hangzhou.aliyuncs.com/yetongxue/docker_test:1.2 ". /start_script" 30 hours ago Up 12 seconds 0.0.0.0:8100->8000/tcp dockertest_web_1
6b5881e8c4b2 mysql:5.7 "docker-entrypoint.sh" 30 hours ago Up 12 seconds 3306/tcp dockertest_db_1
[root@iZ94l43yka9Z docker_test]# docker exec -it 6b5881e8c4b2 bash
root@6b5881e8c4b2:/# ls
bin dev entrypoint.sh home lib64 mnt proc run srv tmp var
boot docker-entrypoint-initdb.d etc lib media opt root sbin sys usr
root@6b5881e8c4b2:/# nl entrypoint.sh
     1 #! /bin/bash
     2 set -eo pipefail
     3 shopt -s nullglob

     4 # if command starts with an option, prepend mysqld
     5 if [ "${1:0:1}" = '-' ]; then
     6 set -- mysqld "$@"
     7 fi

     8 # skip setup if they want an option that stops mysqld
     9 wantHelp=
    10 for arg; do
    11 case "$arg" in
    12 -'?' |--help|--print-defaults|-V|--version)
    13 wantHelp=1
    14 break
    15 ;;
    16 esac
    17 done

    18 # usage: file_env VAR [DEFAULT]
    19 # ie: file_env 'XYZ_DB_PASSWORD' 'example'
    20 # (will allow for "$XYZ_DB_PASSWORD_FILE" to fill in the value of
    21 # "$XYZ_DB_PASSWORD" from a file, especially for Docker's secrets feature)
    22 file_env() {
    23 local var="$1"
    24 local fileVar="${var}_FILE"
    25 local def="${2:-}"
    26 if [ "${!var:-}" ] && [ "${!fileVar:-}" ]; then
    27 echo >&2 "error: both $var and $fileVar are set (but are exclusive)"
    28 exit 1
    29 fi
    30 local val="$def"
    31 if [ "${!var:-}" ]; then
    32 val="${!var}"
    33 elif [ "${!fileVar:-}" ]; then
    34 val="$(< "${!fileVar}")"
    35 fi
    36 export "$var"="$val"
    37 unset "$fileVar"
    38 }

    39 _check_config() {
    40 toRun=( "$@" --verbose --help )
    41 if ! errors="$("${toRun[@]}" 2>&1 >/dev/null)"; then
    42 cat >&2 <<-EOM

    43 ERROR: mysqld failed while attempting to check config
    44 command was: "${toRun[*]}"

    45 $errors
    46 EOM
    47 exit 1
    48 fi
    49 }

    50 # Fetch value from server config
    51 # We use mysqld --verbose --help instead of
    63 exec gosu mysql "$BASH_SOURCE" "$@"
    64 fi

    65 if [ "$1" = 'mysqld' -a -z "$wantHelp" ]; then
    66 # still need to check config, container may have started with --user
    67 _check_config "$@"
    68 # Get config
    69 DATADIR="$(_get_config 'datadir' "$@")"

    70 if [ ! -d "$DATADIR/mysql" ]; then
    71 file_env 'MYSQL_ROOT_PASSWORD'
    72 if [ -z "$MYSQL_ROOT_PASSWORD" -a -z "$MYSQL_ALLOW_EMPTY_PASSWORD" -a -z "$MYSQL_RANDOM_ROOT_PASSWORD" ]; then
    73 echo >&2 'error: database is uninitialized and password option is not specified '
    74 echo >&2 ' You need to specify one of MYSQL_ROOT_PASSWORD, MYSQL_ALLOW_EMPTY_PASSWORD and MYSQL_RANDOM_ROOT_PASSWORD '
    75 exit 1
    76 fi

    77 mkdir -p "$DATADIR"

    78 echo 'Initializing database'
    79 "$@" --initialize-insecure
    80 echo 'Database initialized'

    81 if command -v mysql_ssl_rsa_setup > /dev/null && [ ! -e "$DATADIR/server-key.pem" ]; then
    82 # https://github.com/mysql/mysql-server/blob/23032807537d8dd8ee4ec1c4d40f0633cd4e12f9/packaging/deb-in/extra/mysql-systemd-start# L81-L84
    83 echo 'Initializing certificates'
    84 mysql_ssl_rsa_setup --datadir="$DATADIR"
    85 echo 'Certifications initialized'
    86 fi

    87 SOCKET="$(_get_config 'socket' "$@")"
    88 "$@" --skip-networking --socket="${SOCKET}" &
    89 pid="$! "

    90 mysql=( mysql --protocol=socket -uroot -hlocalhost --socket="${SOCKET}" )

    91 for i in {30..0}; do
    92 if echo 'SELECT 1' | "${mysql[@]}" &> /dev/null; then
    93 break
    94 fi
    95 echo 'MySQL init process in progress...'
    96 sleep 1
    97 done
    98 if [ "$i" = 0 ]; then
    99 echo >&2 'MySQL init process failed.'
   100 exit 1
   101 fi

   102 if [ -z "$MYSQL_INITDB_SKIP_TZINFO" ]; then
   103 # sed is for https://bugs.mysql.com/bug.php?id=20545
   104 mysql_tzinfo_to_sql /usr/share/zoneinfo | sed 's/Local time zone must be set--see zic manual page/FCTY/' | "${mysql[@]}" mysql
   105 fi

   106 if [ ! -z "$MYSQL_RANDOM_ROOT_PASSWORD" ]; then
   107 export MYSQL_ROOT_PASSWORD="$(pwgen -1 32)"
   108 echo "GENERATED ROOT PASSWORD: $MYSQL_ROOT_PASSWORD"
   109 fi

   110 rootCreate=
   111 # default root to listen for connections from anywhere
   112 file_env 'MYSQL_ROOT_HOST' '%'
   113 if [ ! -z "$MYSQL_ROOT_HOST" -a "$MYSQL_ROOT_HOST" ! = 'localhost' ]; then
   114 # no, we don't care if read finds a terminating character in this heredoc
   115 # https://unix.stackexchange.com/questions/265149/why-is-set-o-errexit-breaking-this-read-heredoc-expression/265151#265151
   116 read -r -d '' rootCreate <<-EOSQL || true
   117 CREATE USER 'root'@'${MYSQL_ROOT_HOST}' IDENTIFIED BY '${MYSQL_ROOT_PASSWORD}' ;
   118 GRANT ALL ON *. * TO 'root'@'${MYSQL_ROOT_HOST}' WITH GRANT OPTION ;
   119 EOSQL
   120 fi

   121 "${mysql[@]}" <<-EOSQL
   122 -- What's done in this file shouldn't be replicated
   123 -- or products like mysql-fabric won't work
   124 SET @@SESSION.SQL_LOG_BIN=0;

   125 DELETE F
200行近くあって、やっとロールオーバーされました(・∀・)
72行目でMYSQL_ROOT_PASSWORD、MYSQL_ALLOW_EMPTY_PASSWORD、MYSQL_RANDOM_ROOT_PASSWORDが空かどうかを判定し、空でない場合はDatabase initializeを実行しています。
135 行目で、MYSQL_DATABASE が空かどうかを判断し、空でない場合は echo "CREATE DATABASE IF NOT EXISTS ` を実行します。
KaTeX のパースエラーです。Can't use function '\`' in math mode at position 15: MYSQL_DATABASE̲ ;" | ".KaTeX parse error: Can't use function '\`' in math mode at position 15: MYSQL_DATABASE̲ ;" | "
{mysql[@]}"です。
その直後の140-148行目でデータベース権限付与の操作が行われている。
というわけで、mysqlコンテナを起動した後は、楽しく使って行くことができます。
データベース・コンテナの起動が完了したら、次はアプリケーション・コンテナを起動し、データベース・コンテナとリンクさせます。アプリケーションコンテナを起動し、データベースコンテナとリンクさせるために
docker run --name web -v Users/yetongxue/Desktop/volumes/docker_test/media:/root/media --link db docker_test:1.2
うまくいった!
さて、基本的に一通りの流れが出来ました。
しかし、2つのコンテナがあり、2つの起動コマンドを実行しましたが、3つまたは4つあったらどうでしょうか?そして、今流行のマイクロサービス・アーキテクチャでは、多くのサービスが、うう.........。
心配しないでください、まだdocker-composeがありますよ!
###ドッカーコンポース
docker-composeはサービスオーケストレーションツールで、yaml構文を使って、複雑なアプリケーションを簡素化するための素晴らしいツールです。
yamlについては、コンテナオーケストレーション専用のチュートリアルがあります[ ]。
docker-compose.yml の構文の説明
](http://www.cnblogs.com/freefei/p/5311294.html)を見てみましょう。
さて、今度はアプリケーションコンテナとデータベースコンテナの2つのコンテナについて、docker-compose.ymlがどのようなものかを見てみましょう。
web:
    image: yetongxue/docker_test:1.2
    links:
      - "db"
    ports:
      - "8100:8000"
    volumes:
      - "${DOCKER_VOLUME_PATH}/docker_test/media:/root/media"
    restart: always

db:
    image: mysql:5.7
    environment:
      TZ: 'Asia/Shanghai'
      MYSQL_ROOT_PASSWORD: qwerasdf
      MYSQL_DATABASE: docker_db
    restart: always
    command: ['mysqld', '--character-set-server=utf8']
    volumes:
      - "${DOCKER_VOLUME_PATH}/docker_test/db:/var/lib/mysql"
docker-composeコマンド
- 起動します。 docker-compose up (docker-compose.ymlファイルのディレクトリで実行する必要があることに注意)
- 停止します。 docker-compose stop
-
また
docker-compose start
それ以外は、-help yourselfでOKです。
### アプリのデプロイメント
さて、自分たちのマシンで素晴らしい仕事ができました。今度は別のマシンに載せて動かしてみましょう。
アリ・クラウドを使っています。
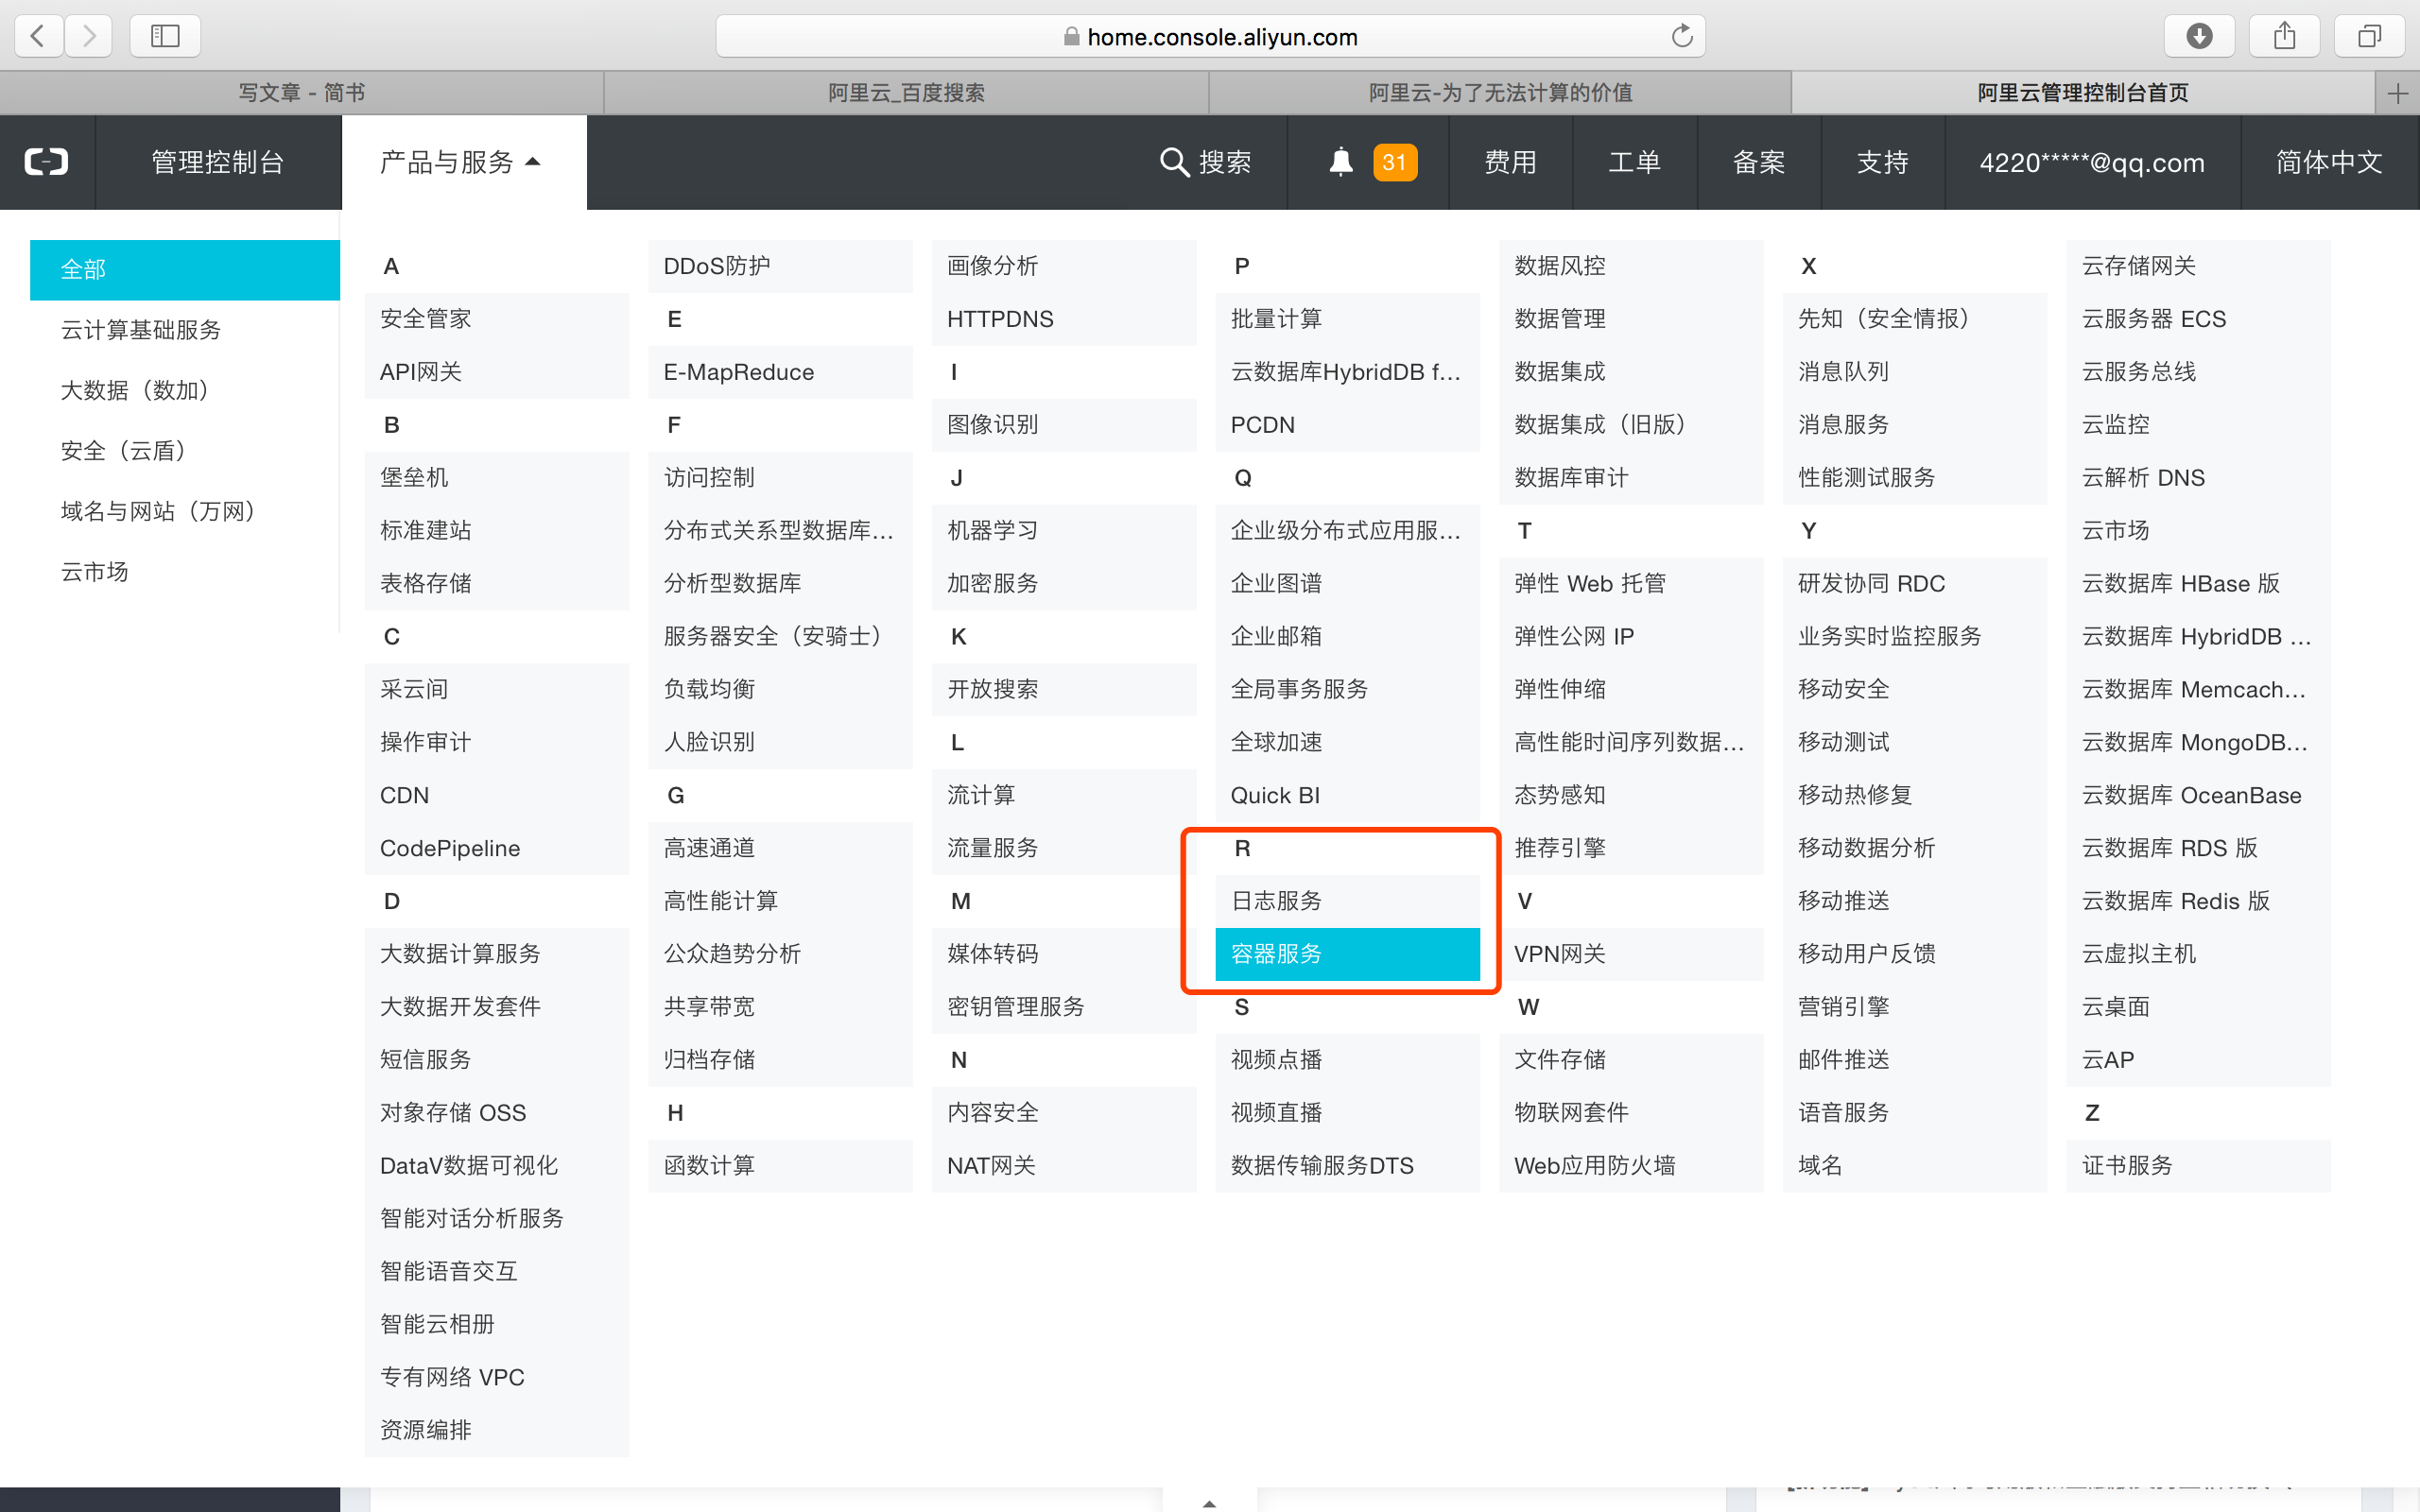
ログイン 》コンソール 》製品とサービス 》コンテナサービス 》新規画像 》新規画像リポジトリ. 下図のようになります。
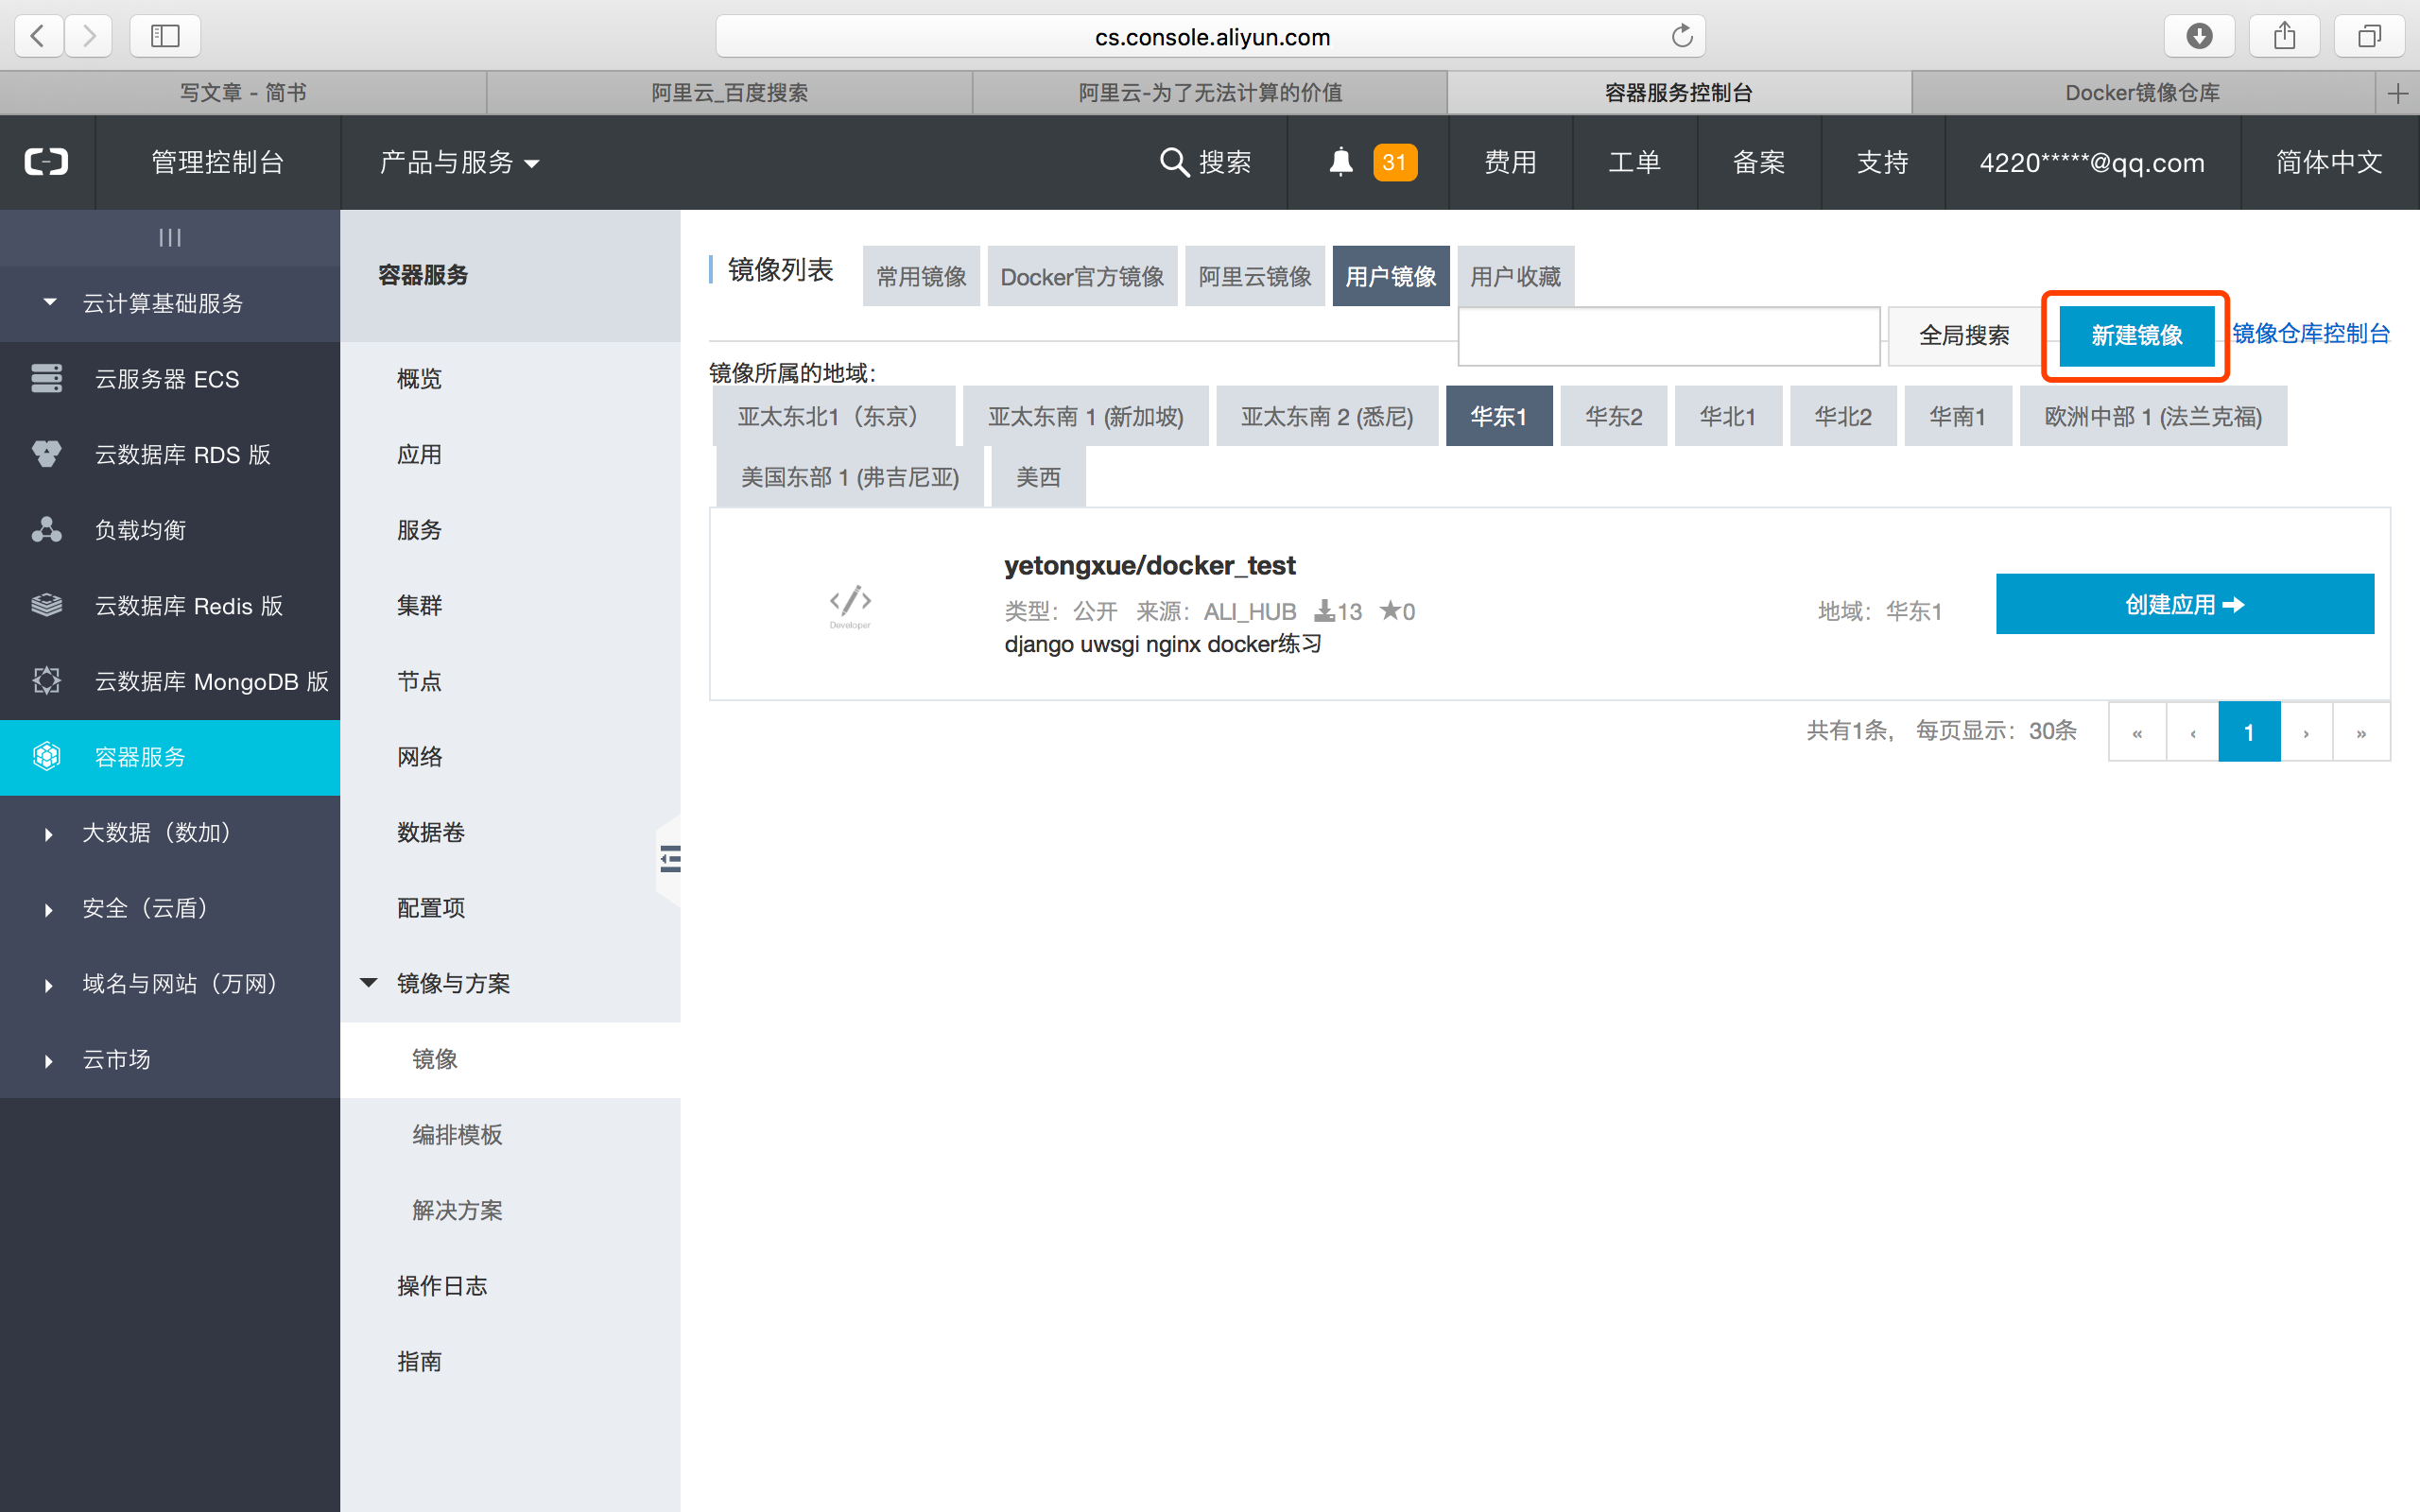
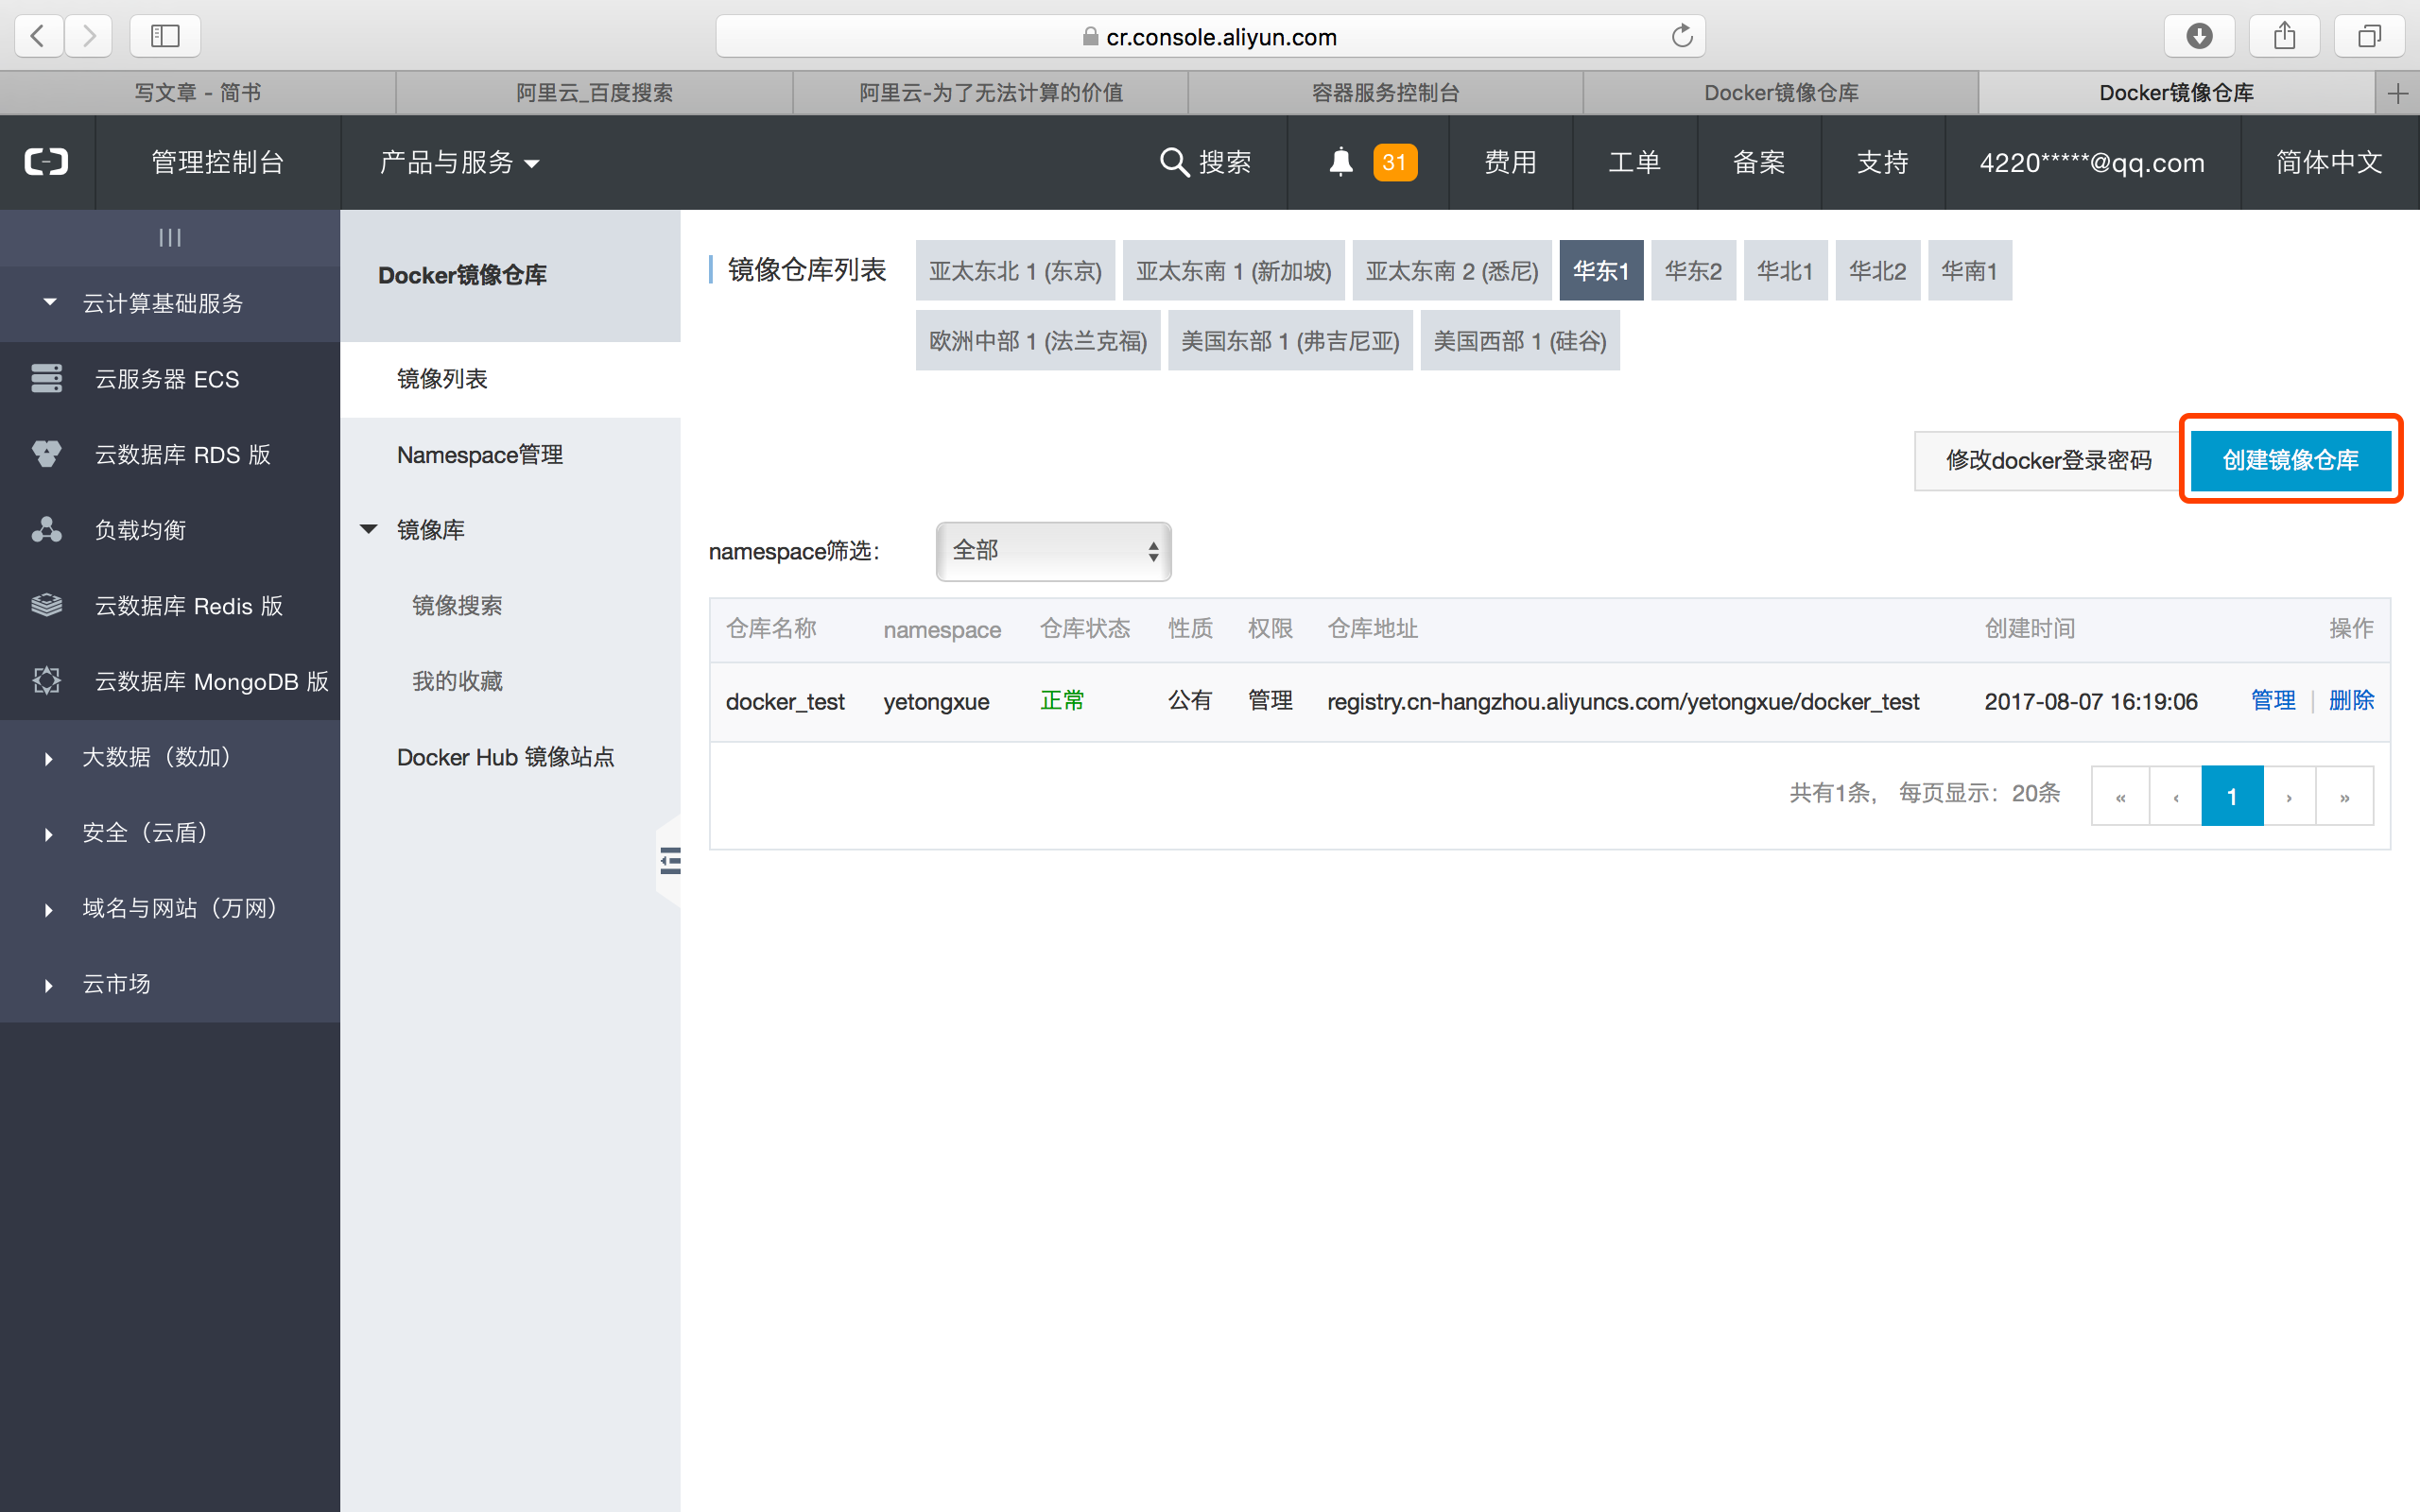
画像を作成したら、コードソースを設定します。ここではローカルリポジトリを選択しました。リポジトリが作成されたら、リポジトリのアドレスを取得して、このアドレスを取得してローカルで実行することにします。
docker tag yetongxue/docker_test:1.2 registry.cn-hangzhou.aliyuncs.com/yetongxue/docker_test:1.2
docker push registry.cn-hangzhou.aliyuncs.com/yetongxue/docker_test:1.2
mysqlの画像は、ネットで公開されている画像を使用しているため、そのままにしています。
デプロイしたいマシンで、-vに使用する関連データボリュームのディレクトリを作成します。
あとはdocker-compose.ymlをWebで使用するイメージに変更するだけです。
web:
    image: registry.cn-hangzhou.aliyuncs.com/yetongxue/docker_test:1.2
    links:
      - "db"
    ports:
      - "8100:8000"
    volumes:
      - "${DOCKER_VOLUME_PATH}/docker_test/media:/root/media"
    restart: always

db:
    image: mysql:5.7
    environment:
      TZ: 'Asia/Shanghai'
      MYSQL_ROOT_PASSWORD: qwerasdf
      MYSQL_DATABASE: docker_db
    restart: always
    command: ['mysqld', '--character-set-server=utf8']
    volumes:
      - "${DOCKER_VOLUME_PATH}/docker_test/db:/var/lib/mysql"
という奇跡を目撃する時が来た。
docker-compose up
###後に書かれた
私は実はDocker初心者なので、このチュートリアルは私がこの1〜2ヶ月間、オフに勉強してきたことをまとめたものです。ちょっと長文ですが、重要なポイントをできるだけ多く記録することを意図しています。プログラマーは共有することが好きな人たちの集まりで、プログラマーである私たちは皆、他の人が書いたチュートリアルを見たことがあるはずです。初心者の私たちにとって、チュートリアルの中に重要な情報が抜けていると、混乱する原因になります。そのため、すべてのポイントで詳しく説明しました。
ご参考になれば幸いです。
最新
-
nginxです。[emerg] 0.0.0.0:80 への bind() に失敗しました (98: アドレスは既に使用中です)
-
htmlページでギリシャ文字を使うには
-
ピュアhtml+cssでの要素読み込み効果
-
純粋なhtml + cssで五輪を実現するサンプルコード
-
ナビゲーションバー・ドロップダウンメニューのHTML+CSSサンプルコード
-
タイピング効果を実現するピュアhtml+css
-
htmlの選択ボックスのプレースホルダー作成に関する質問
-
html css3 伸縮しない 画像表示効果
-
トップナビゲーションバーメニュー作成用HTML+CSS
-
html+css 実装 サイバーパンク風ボタン
おすすめ
-
ハートビート・エフェクトのためのHTML+CSS
-
HTML ホテル フォームによるフィルタリング
-
HTML+cssのボックスモデル例(円、半円など)「border-radius」使いやすい
-
HTMLテーブルのテーブル分割とマージ(colspan, rowspan)
-
ランダム・ネームドロッパーを実装するためのhtmlサンプルコード
-
Html階層型ボックスシャドウ効果サンプルコード
-
QQの一時的なダイアログボックスをポップアップし、友人を追加せずにオンラインで話す効果を達成する方法
-
sublime / vscodeショートカットHTMLコード生成の実装
-
HTMLページを縮小した後にスクロールバーを表示するサンプルコード
-
html のリストボックス、テキストフィールド、ファイルフィールドのコード例